
How to Build the Robotic Arm Kit
Step-by-step photo guide to assembling the Greene Robotics Robotic Arm Kit — a servo-powered DIY robotics project for beginners. No experience needed.
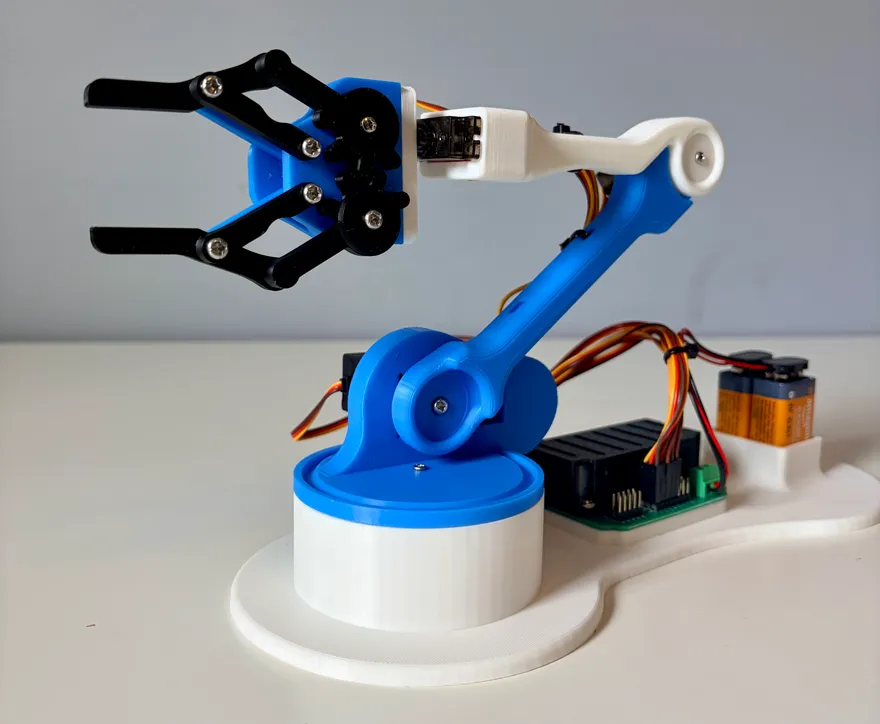
Introduction
Welcome to the official Greene Robotics tutorial for the Robotic Arm Kit! This step-by-step guide walks you through assembling and bringing to life your own desktop robotic arm — just like the one in our product photos and videos.
This tutorial pairs with the Robotic Arm Kit, available on our Etsy shop. Every part you need is included — servos, control board, 3D-printed pieces, and wiring — so you can focus on learning, building, and having fun.
Tip: All images can be clicked on to be enlarged, so that you can zoom in to get a closer look.
Our policy
Our number one goal is for you to finish this tutorial with a fully working robot. If any parts arrived damaged or broken, message us on Etsy and we’ll send replacements. However, once your build is fully functional, we’re no longer able to provide support for anything that happens after that point — including modifications, code changes, or anything else beyond the original kit.
Whether you’re a beginner or an experienced maker, this project is approachable and easy to follow. By the end, you’ll have a fully functional robotic arm ready to control. Let’s dive in!
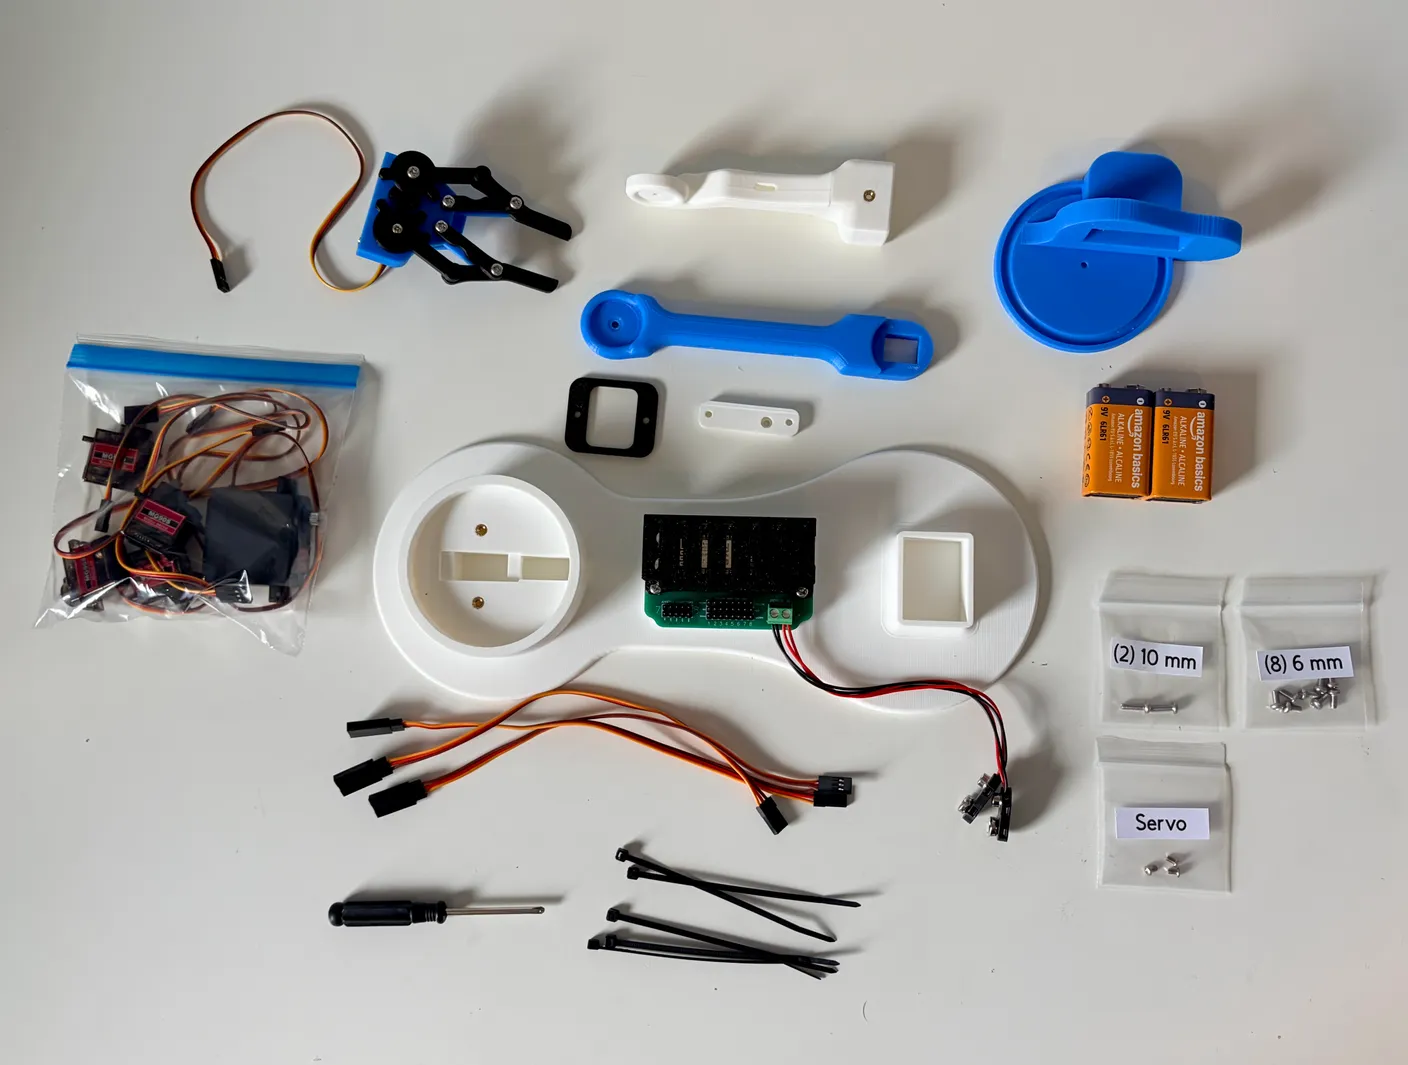
Before you start, please read through all of the instructions. We know reading can be boring, but skipping steps is one of the most common reasons a build goes wrong. Taking the time to read everything will help your robot work right the first time. Have fun!
Start with the Base
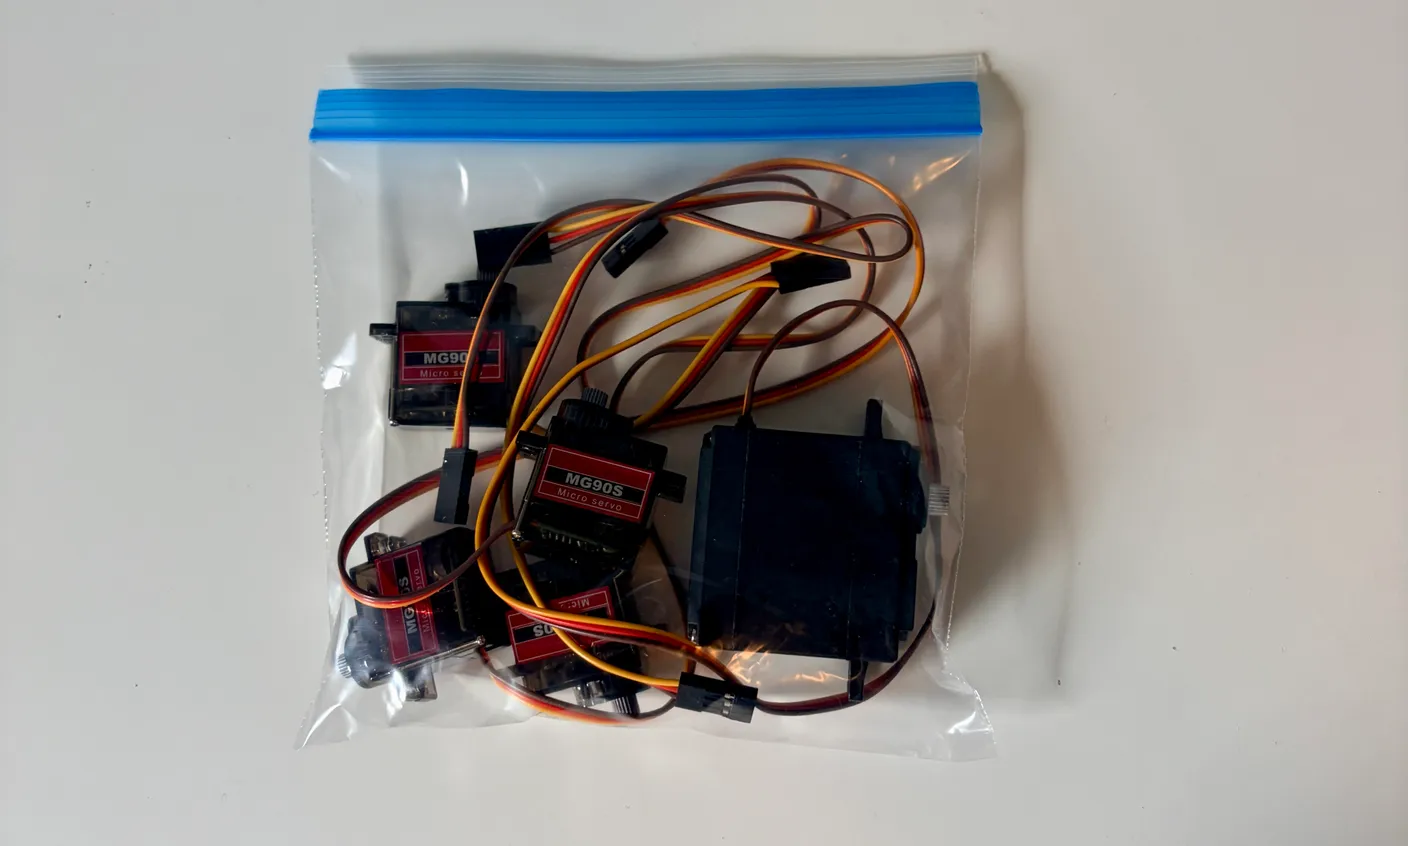
Start by taking the motors out of the bag. These are called servos. You’ll have four smaller ones and one larger one. We provide one extra of the small servos, so don’t be alarmed at the end when there’s an extra! It’s there in case one comes broken (which is very unlikely), or if a servo breaks during operation. If you don’t end up needing it for those reasons, feel free to use it in your own project!
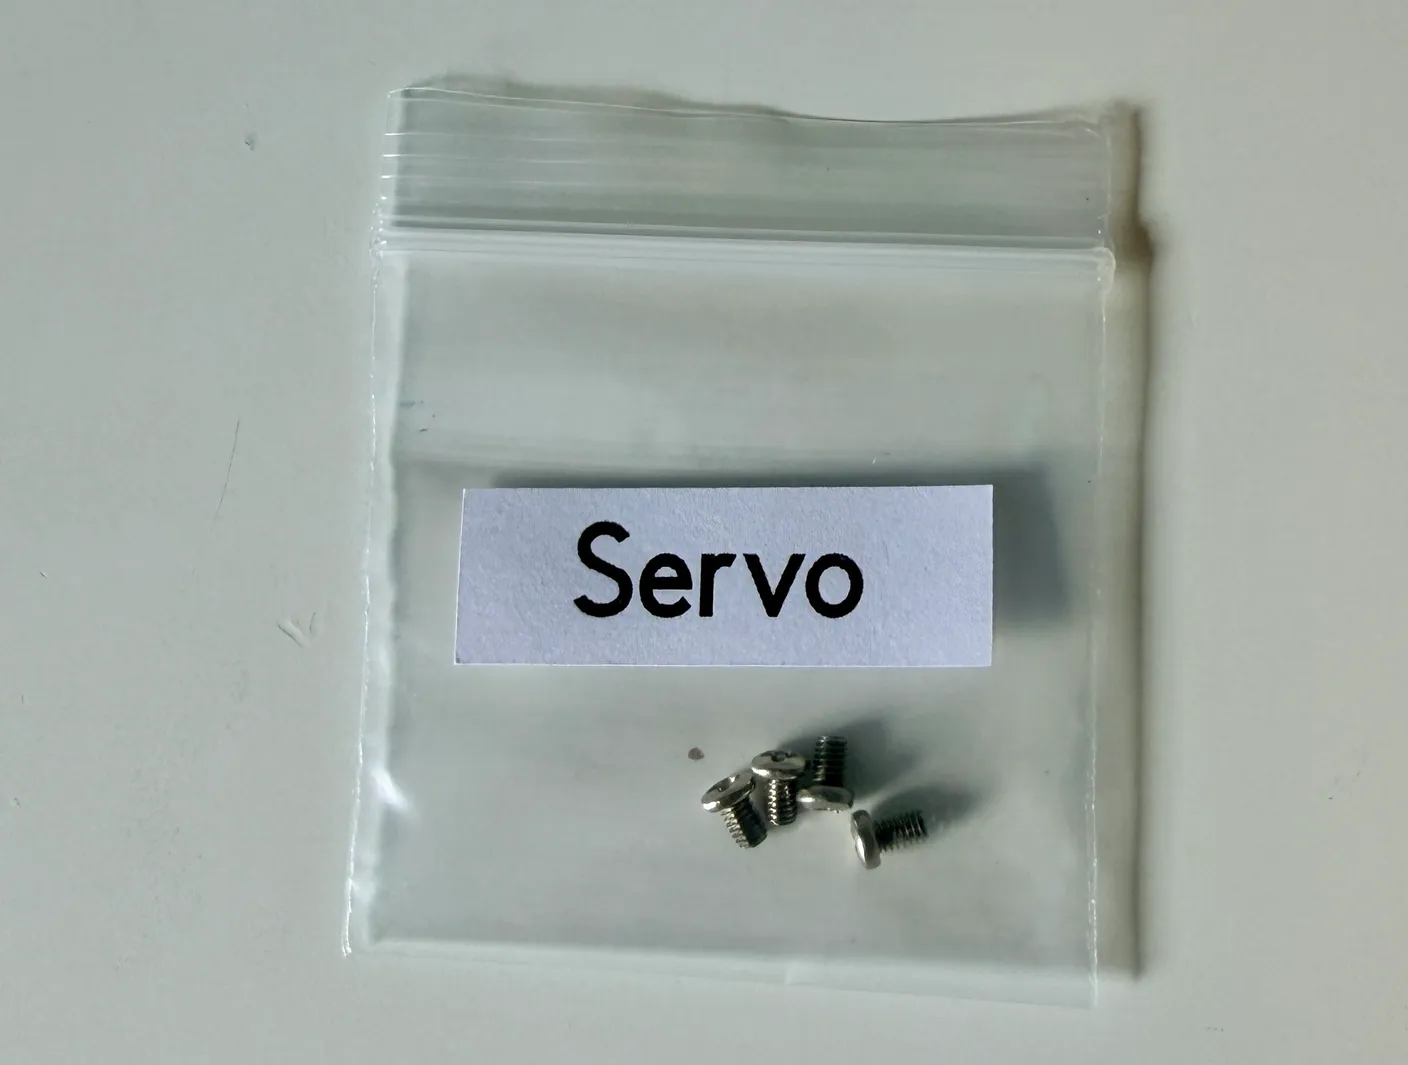
Also find the bag labeled “Servo” — this bag has the corresponding screws you will later use to attach the servos to your robot. There are 4 of them and they are tiny, making them easy to lose. Keep them in the bag until you need them. There’s also one extra of these small screws included, so don’t be alarmed if you have an extra at the end of the build.
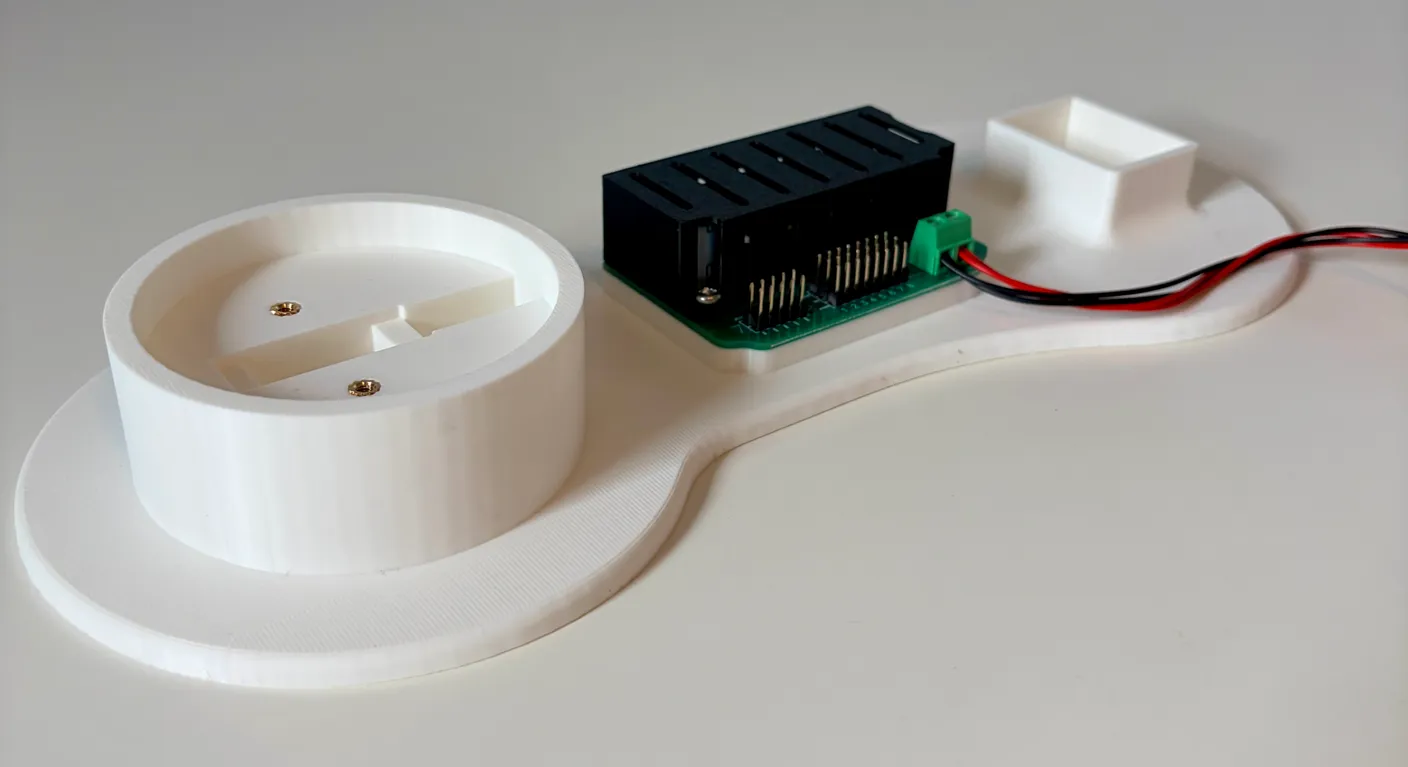
Now find the big white base with the circuit board on it.
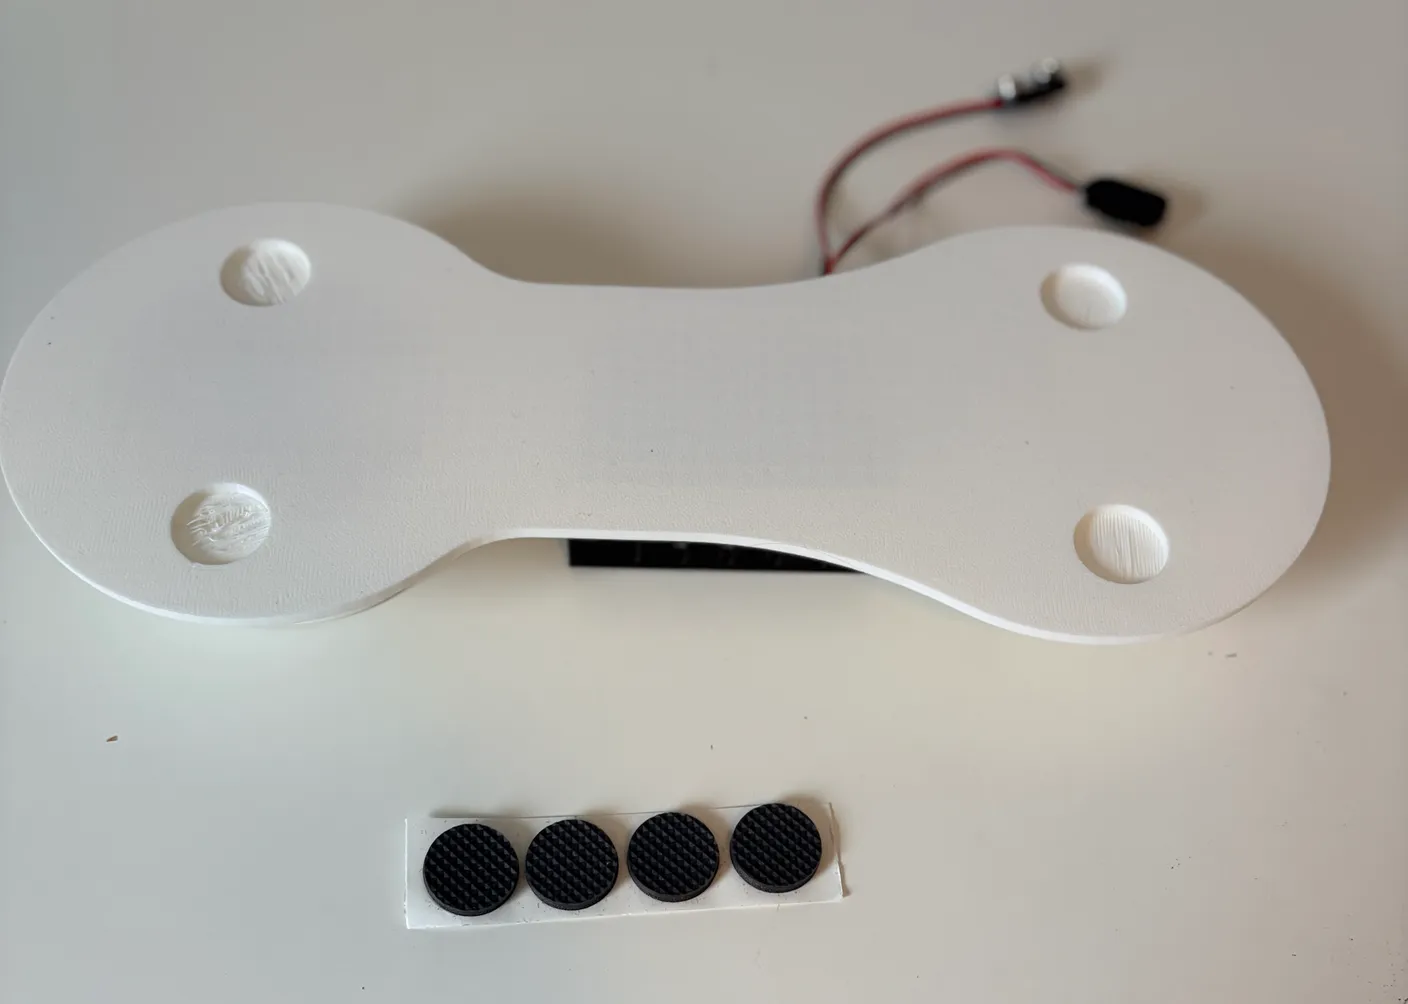
Get the four rubber adhesive pads ready.
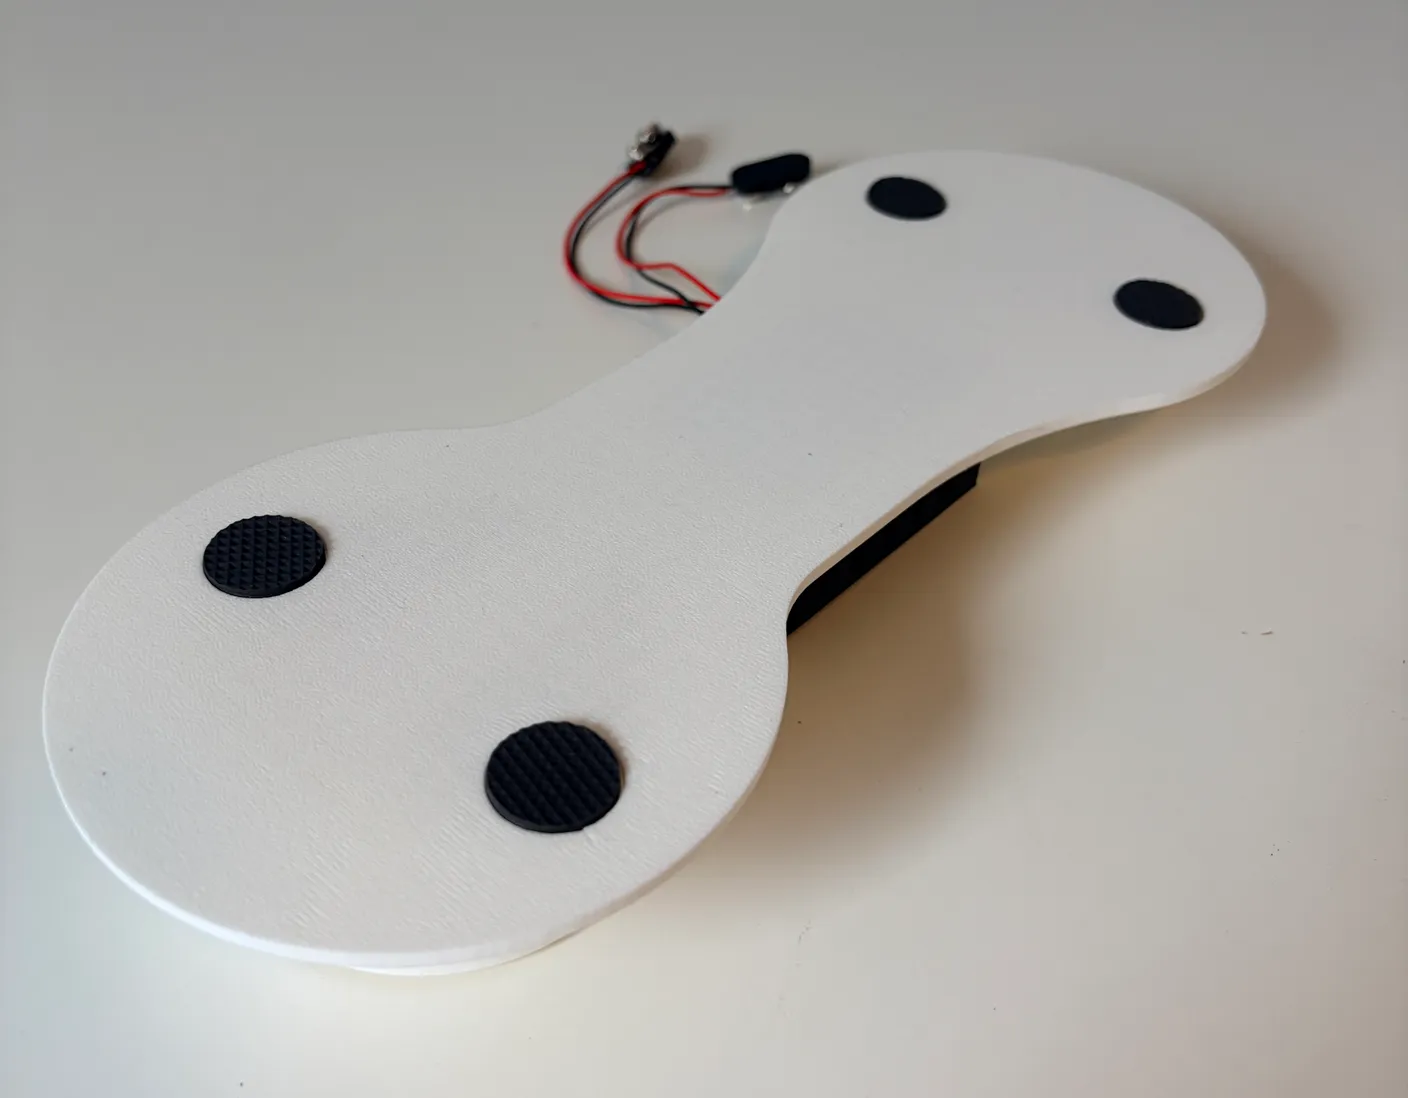
Stick the four rubber pads into the four slots on the bottom of the base. They keep the robot from sliding around, especially on a flat, slippery surface.
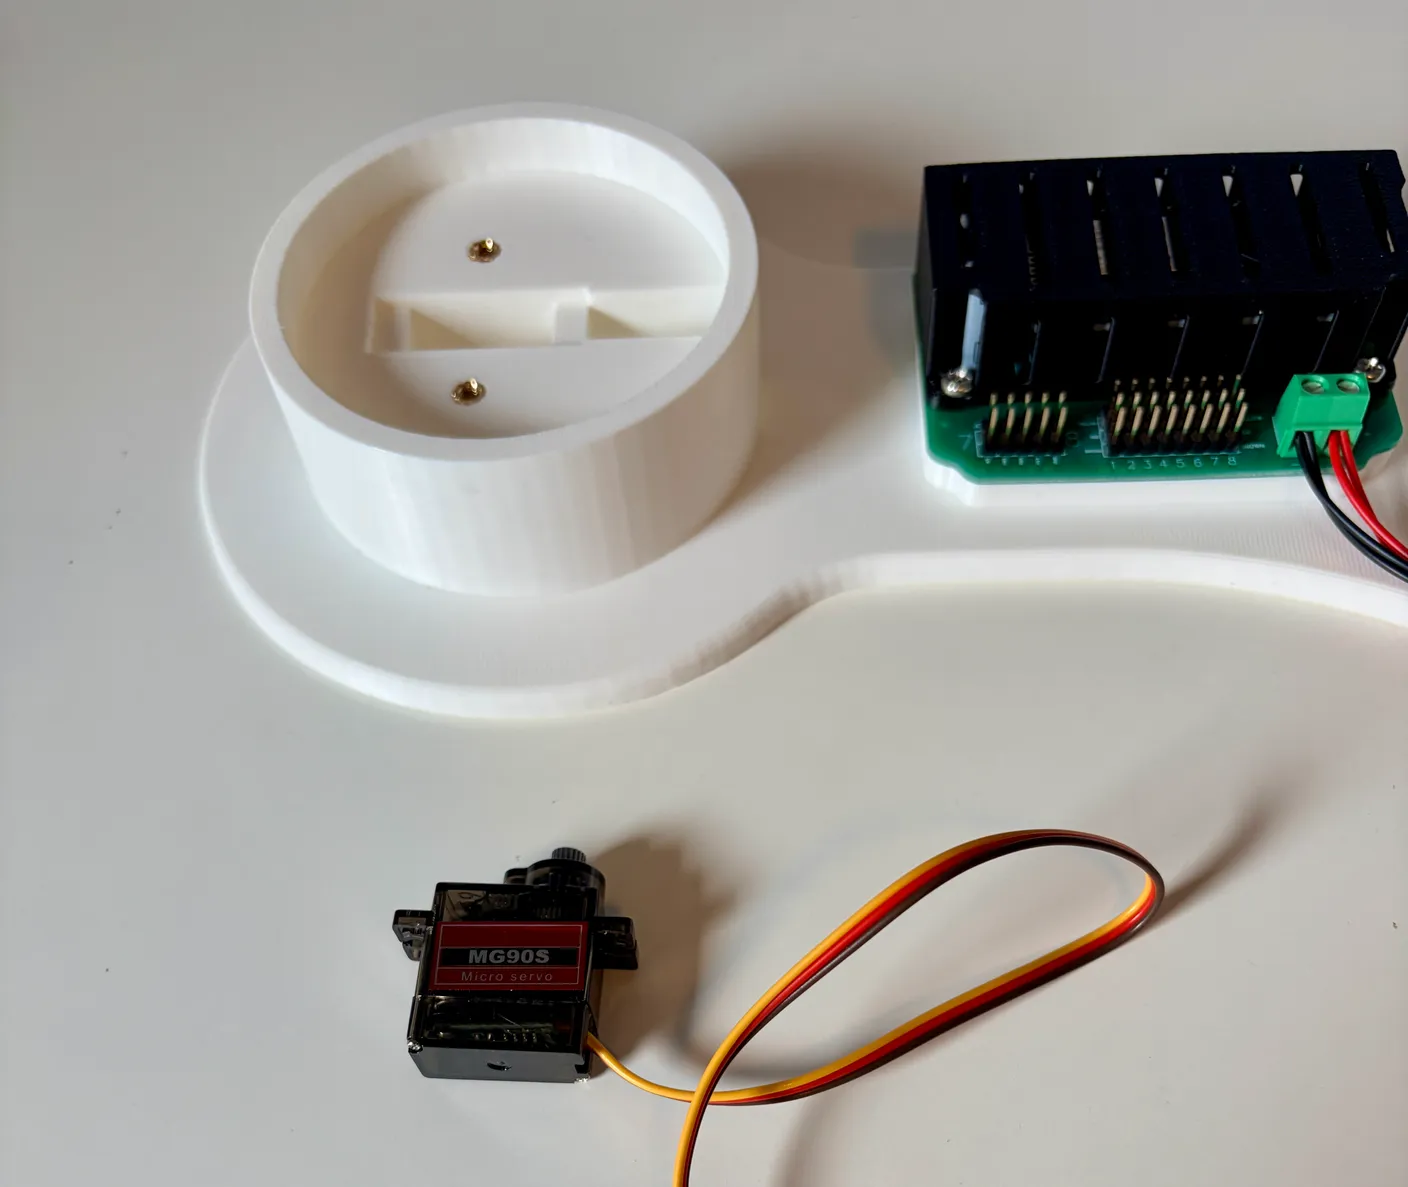
Now get your first servo ready. You’ll need one of the smaller ones for this step, as shown above.
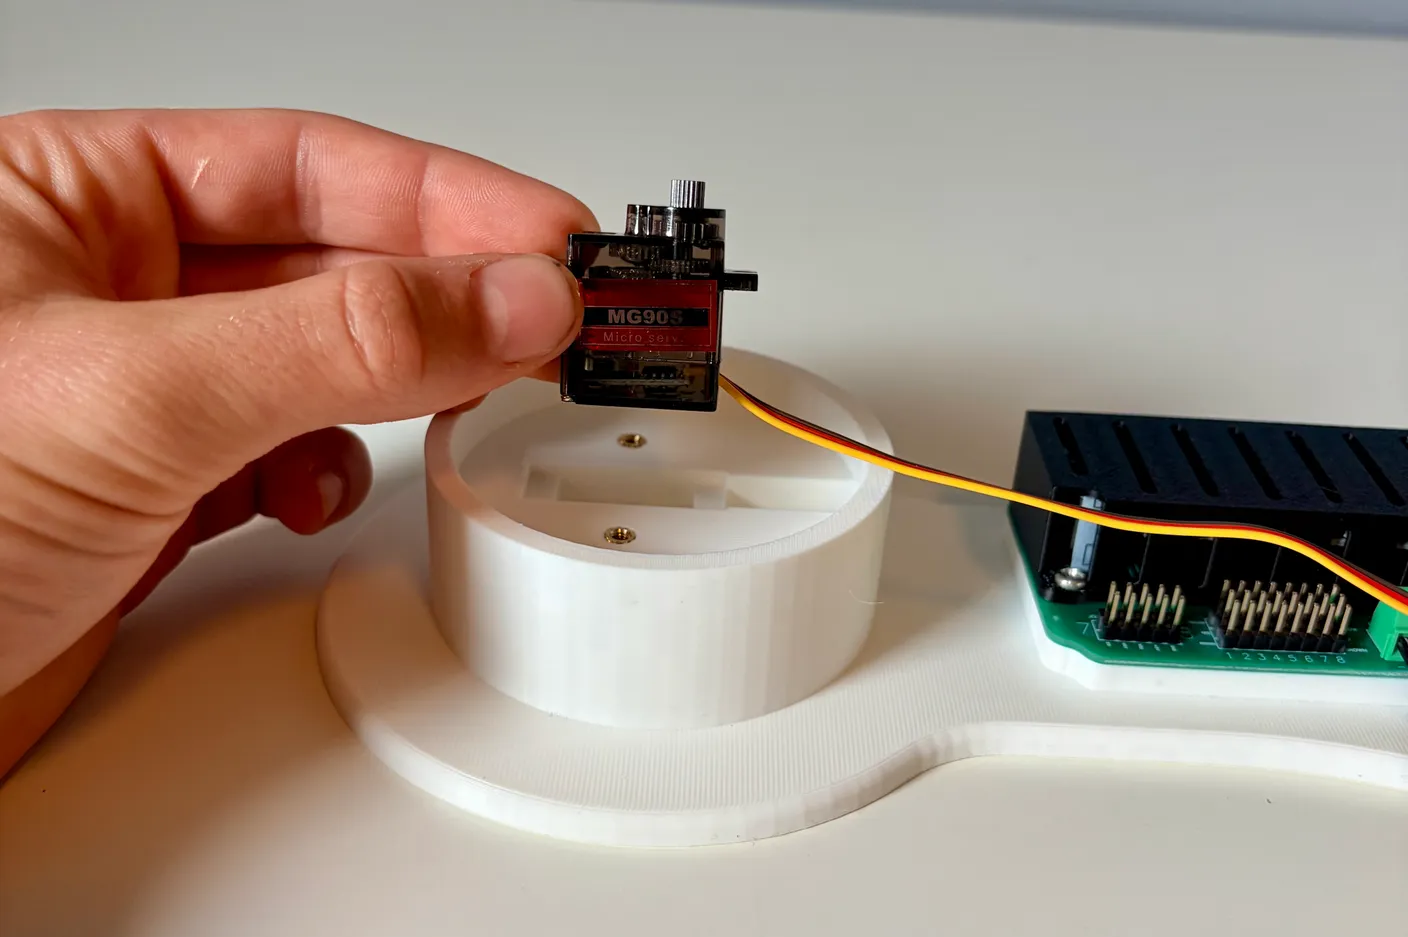
Orient it over the base like this.
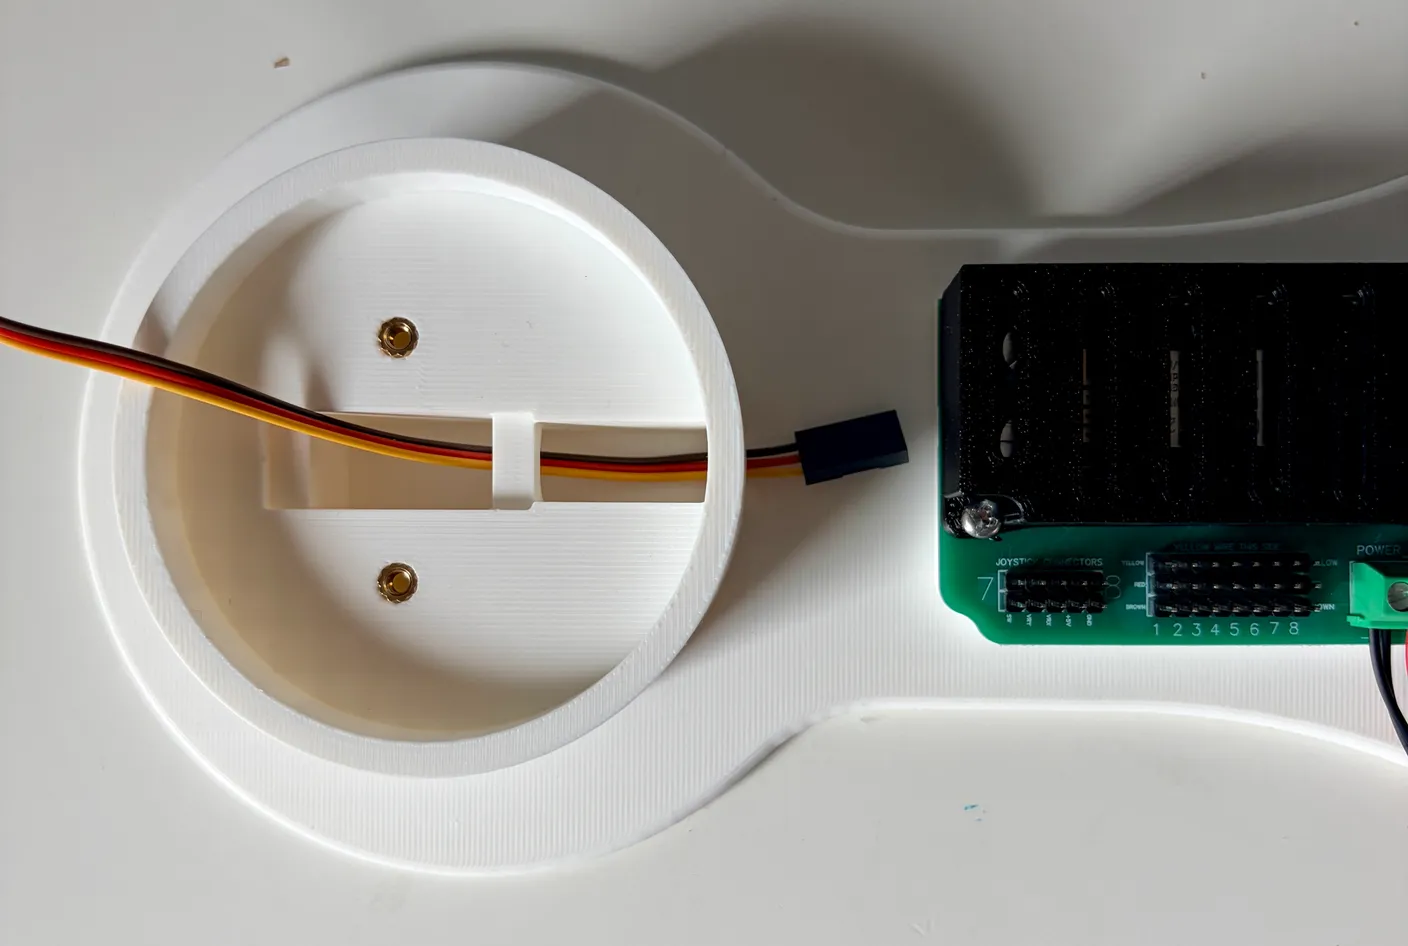
Fish the servo’s wire through the base, as shown above.
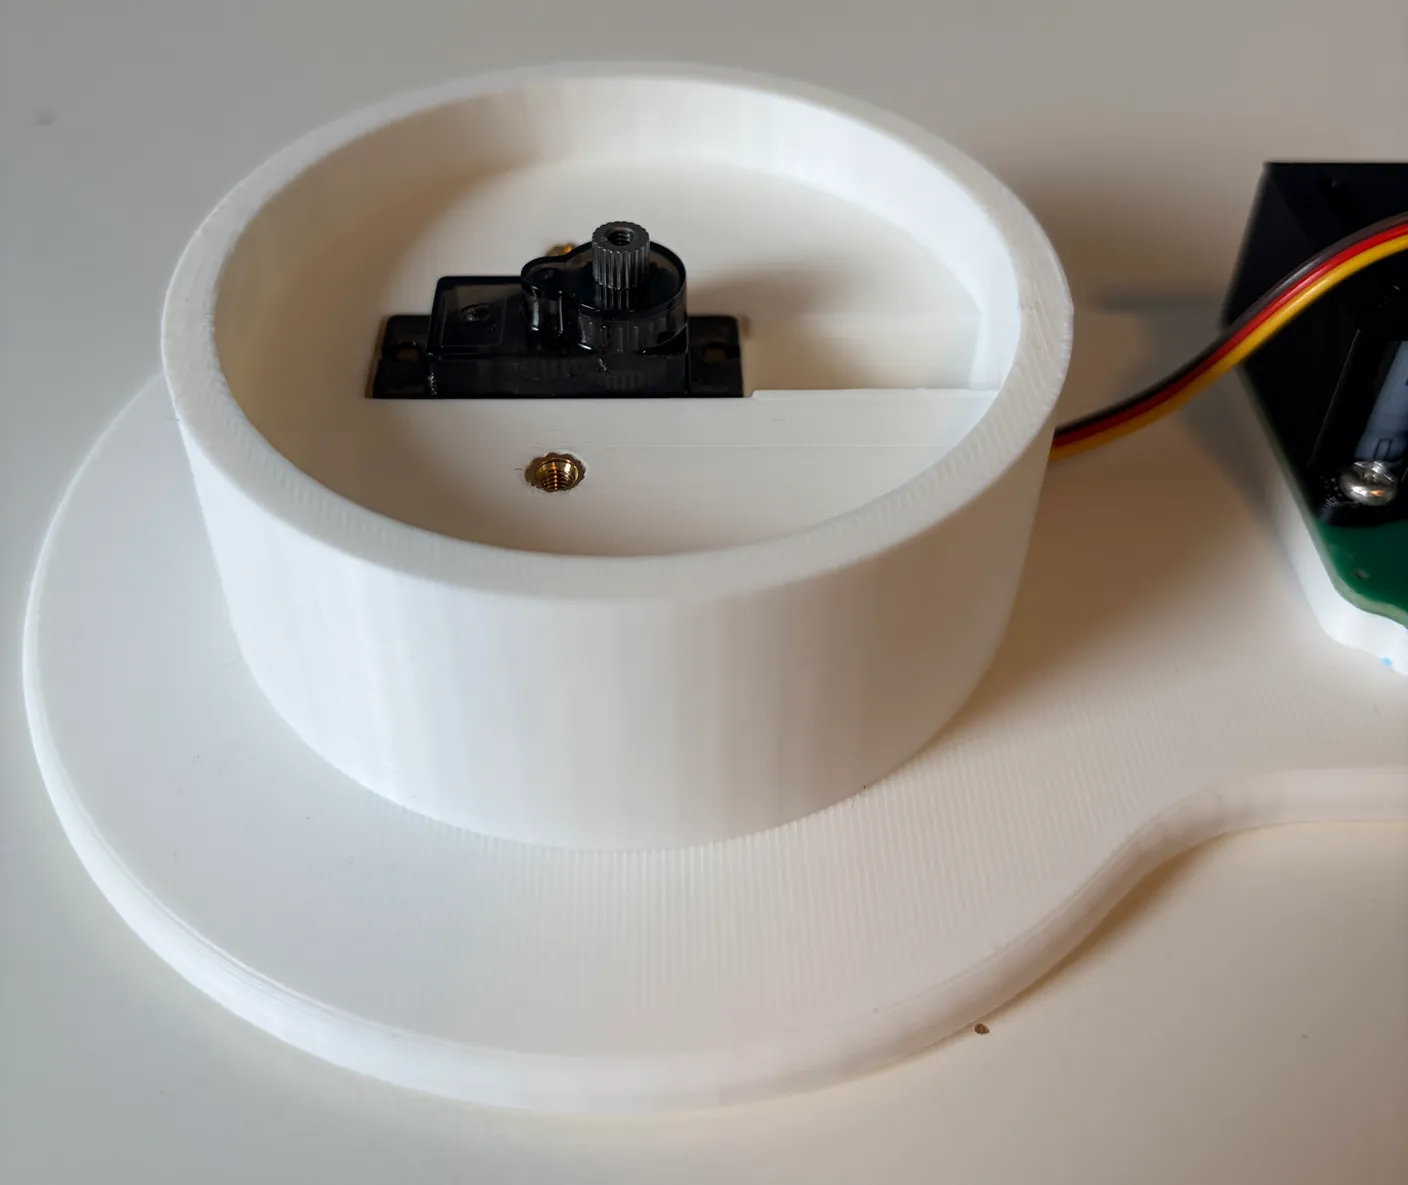
Once it’s all the way through, set the servo into the slot. Go slowly so you don’t damage the wire. Make sure the servo is sitting flat and not resting on top of the wire. As you push the servo into place, gently pull the wire so it doesn’t get crushed underneath. If the servo sits flat in the base and the wire comes straight out, nice work — keep moving!
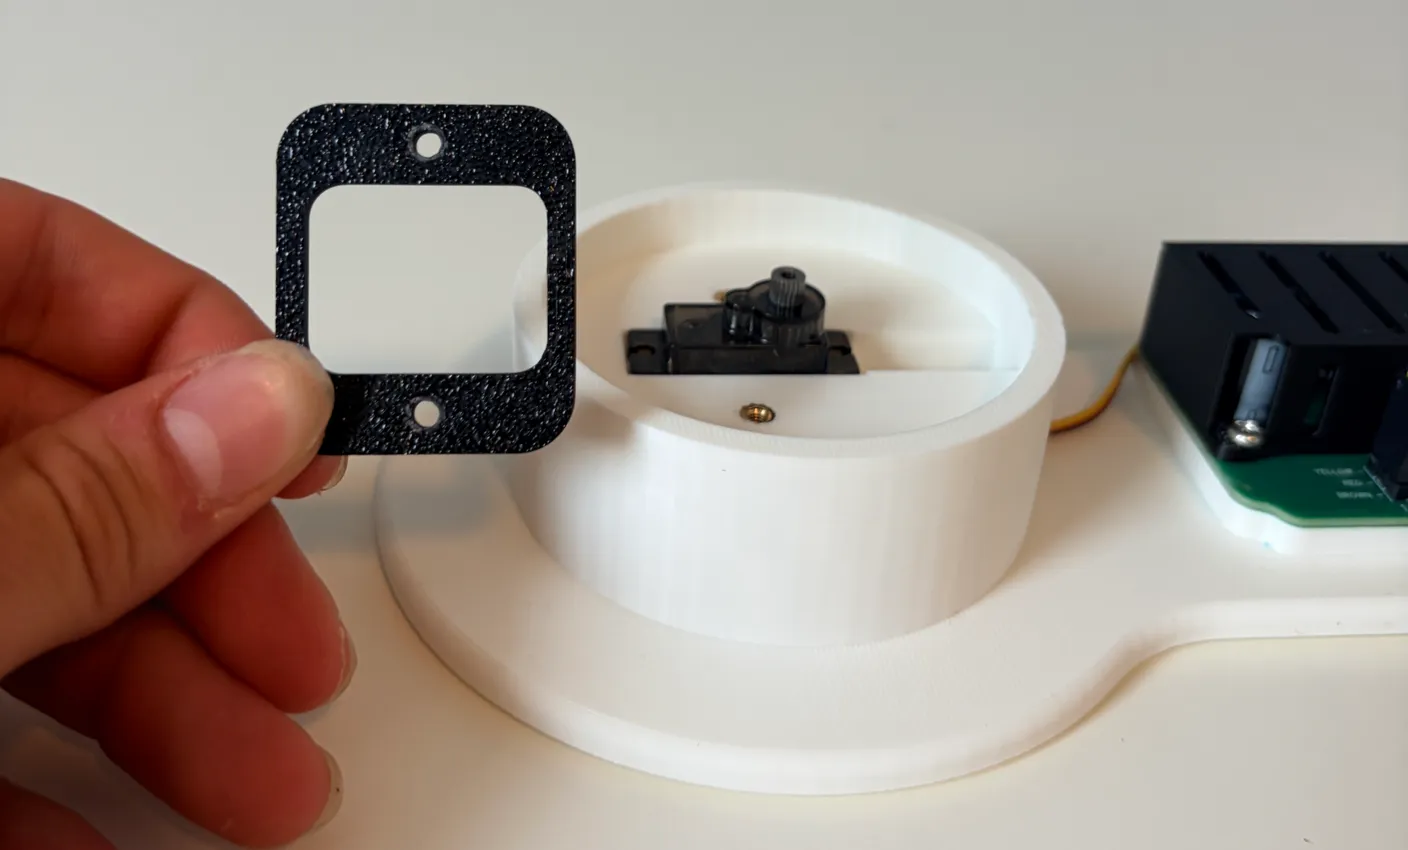
Now grab this black piece.
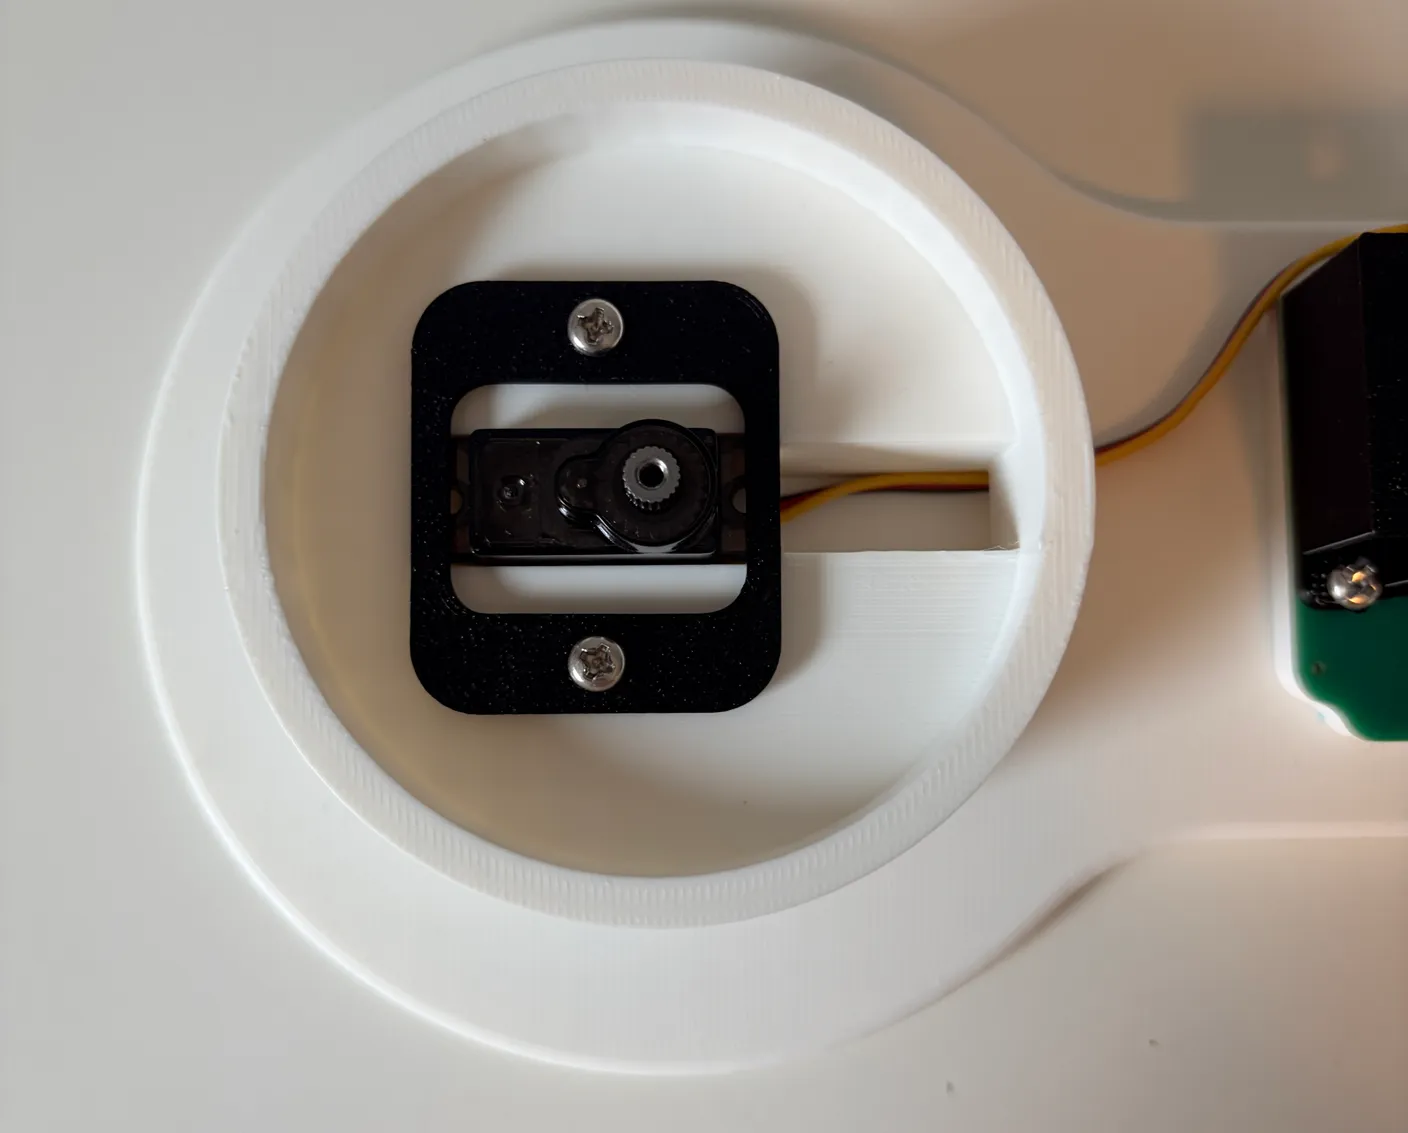
2× 6mm screws
Put it over the servo as shown above. This stops the servo from moving up and falling out. Screw it in with two 6mm screws.
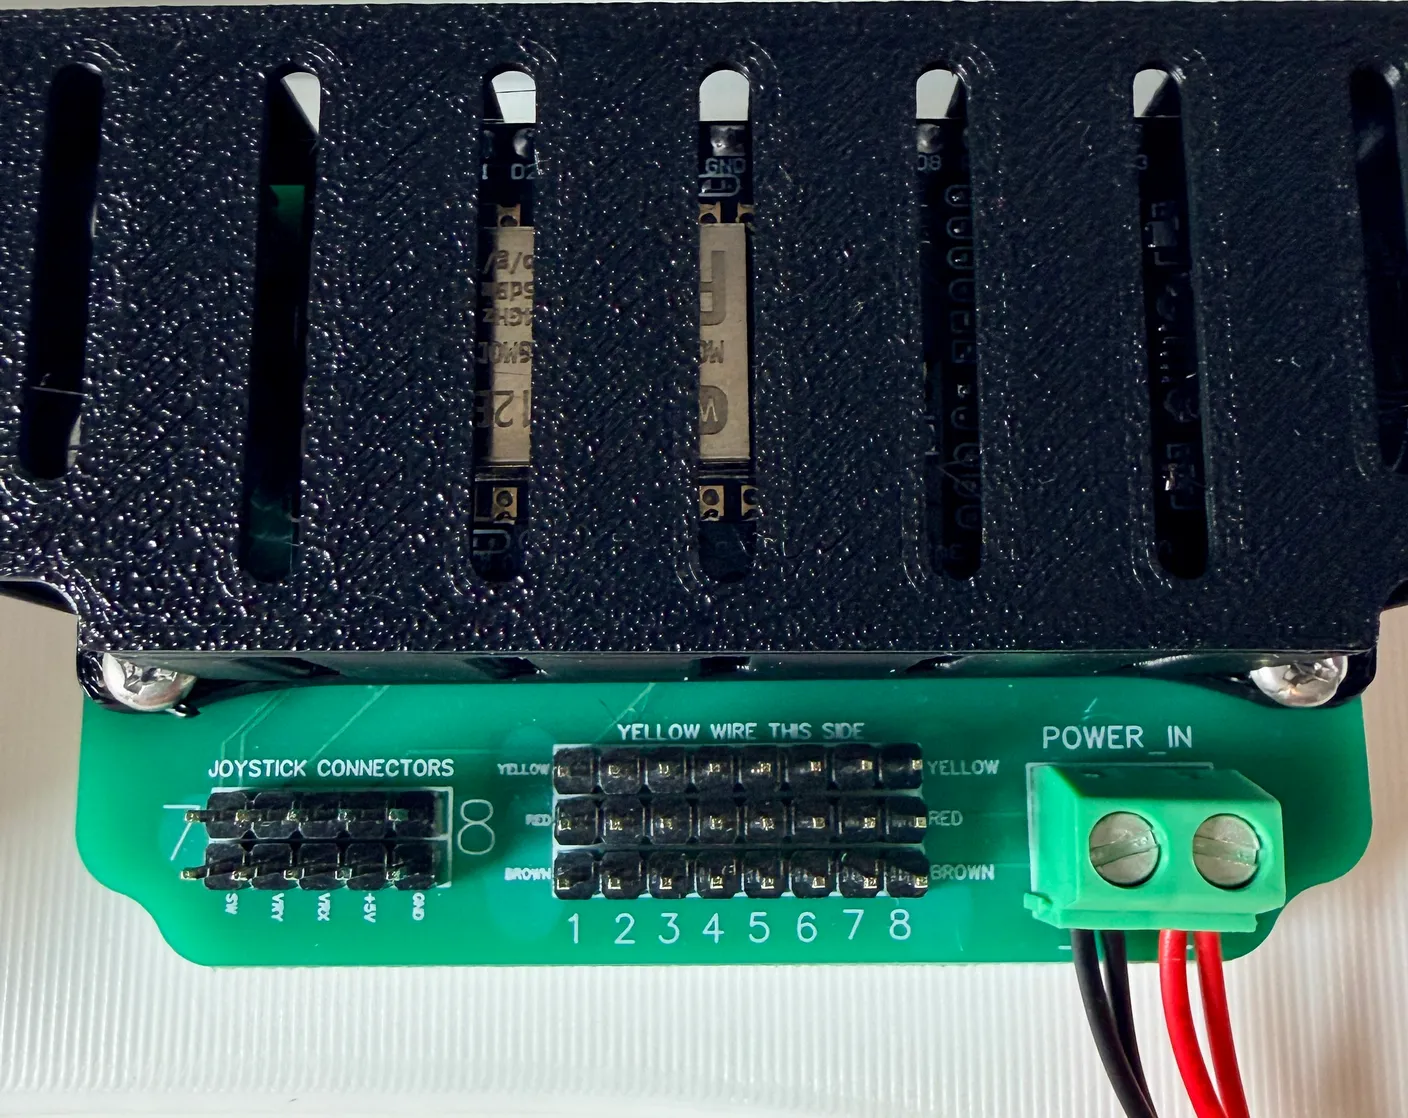
Now we’re about to start wiring the servos to the circuit board, which is what controls them. There are a few things you need to understand before wiring.
First, notice there are two sets of pins. On the left is a 5×2 pin grid labeled “Joystick Connectors” — we won’t be using these for this project. They’re on the board because this circuit board is used in multiple projects, and one of them uses joysticks.
Now notice the 8×3 row of pins next to it. They’re labeled 1–8. For this project, we’re only going to use the first 5.
Also, notice how each row is labeled with a color — yellow, red, and brown. These colors match up with the servo wire colors. It’s extremely important that you match the colors, otherwise the servo could be damaged. This is because each pin sends a specific signal, and the servo expects the right signal. This will be explained further in the next step.
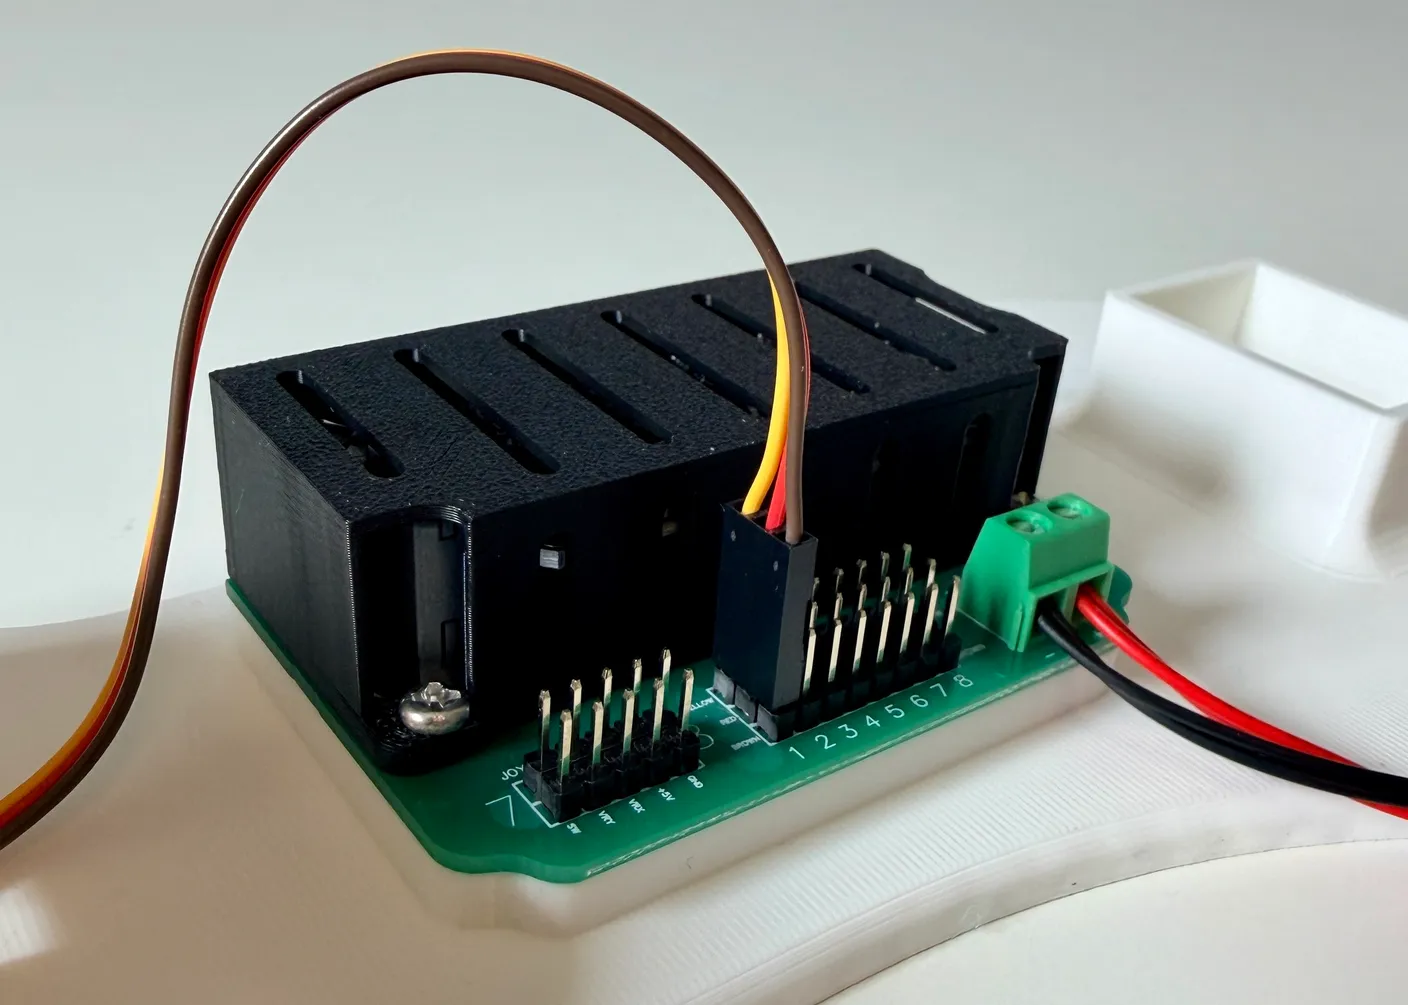
Now plug the servo’s wire into the circuit board. Make sure you’re plugging into the first slot, slot 1, and please read the important note below before you do.
Important!
Wire orientation
Which way the wire faces matters. The servo wire has three colored strands — yellow, red, and brown — and each row of pins on the board is labeled the same way. Line up each strand with its matching label: the yellow strand toward the black box (and toward the “Yellow wire this side” label), and the brown strand facing away from it. Double-check before powering on — a backwards wire can damage your robot.
It’s also extremely important to plug the wire into the right slot. Under each set of three pins is a number, 1 through 8 (this project only uses 1–5). Always plug the wire into the exact slot the tutorial tells you — we’ll go in order from 1 to 5. Plugging it into the wrong slot will make that servo do the wrong job and can break your robot.
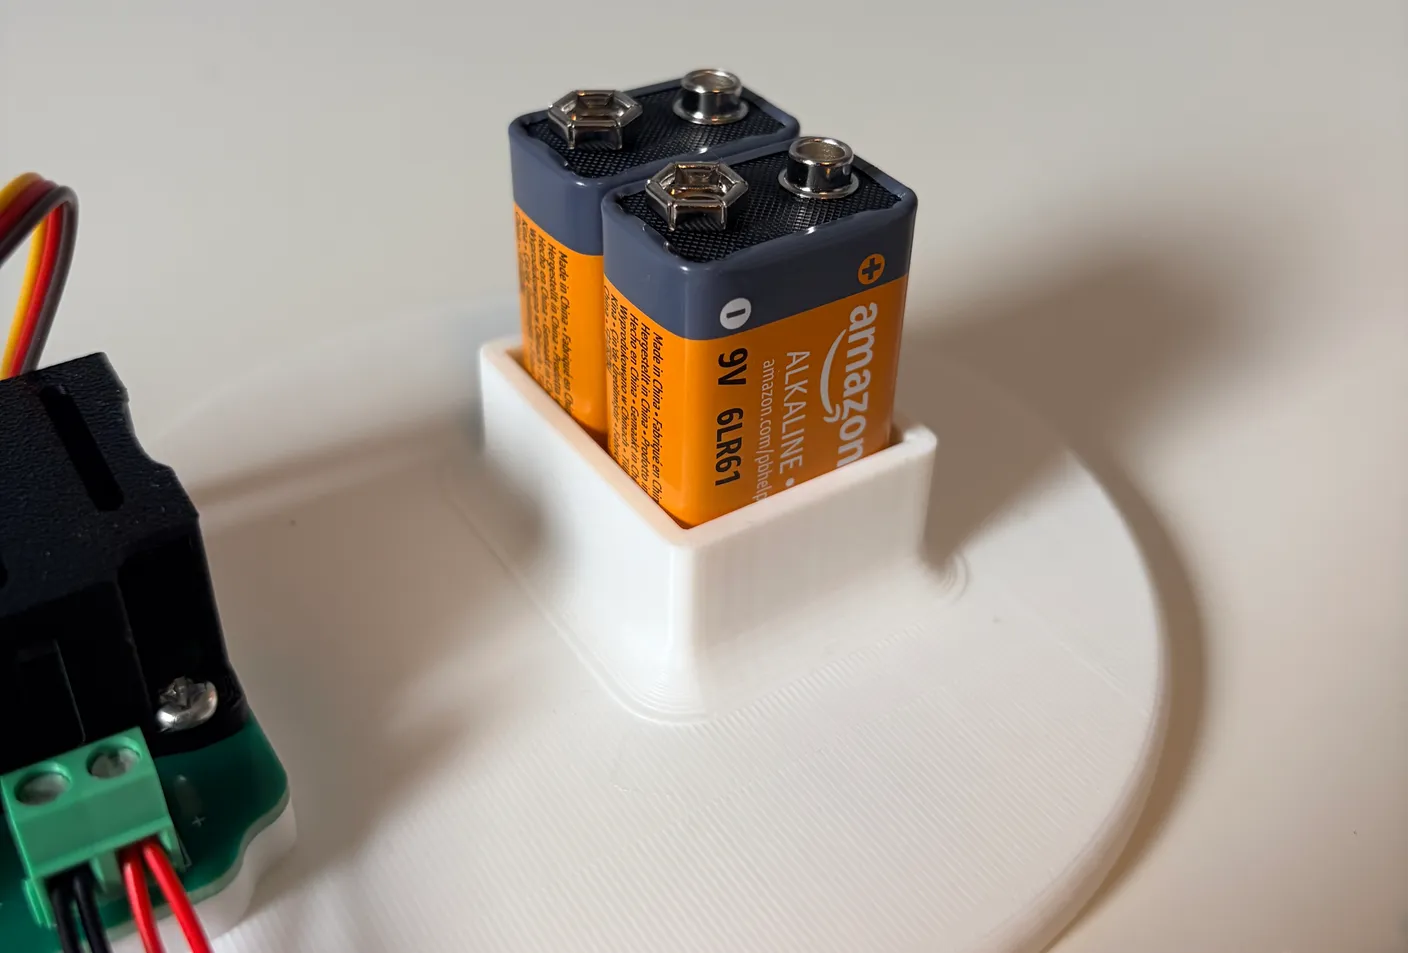
To keep setting up, you’ll need to power the robot. Unwrap the two 9-volt batteries and put them in their slot, as shown above.
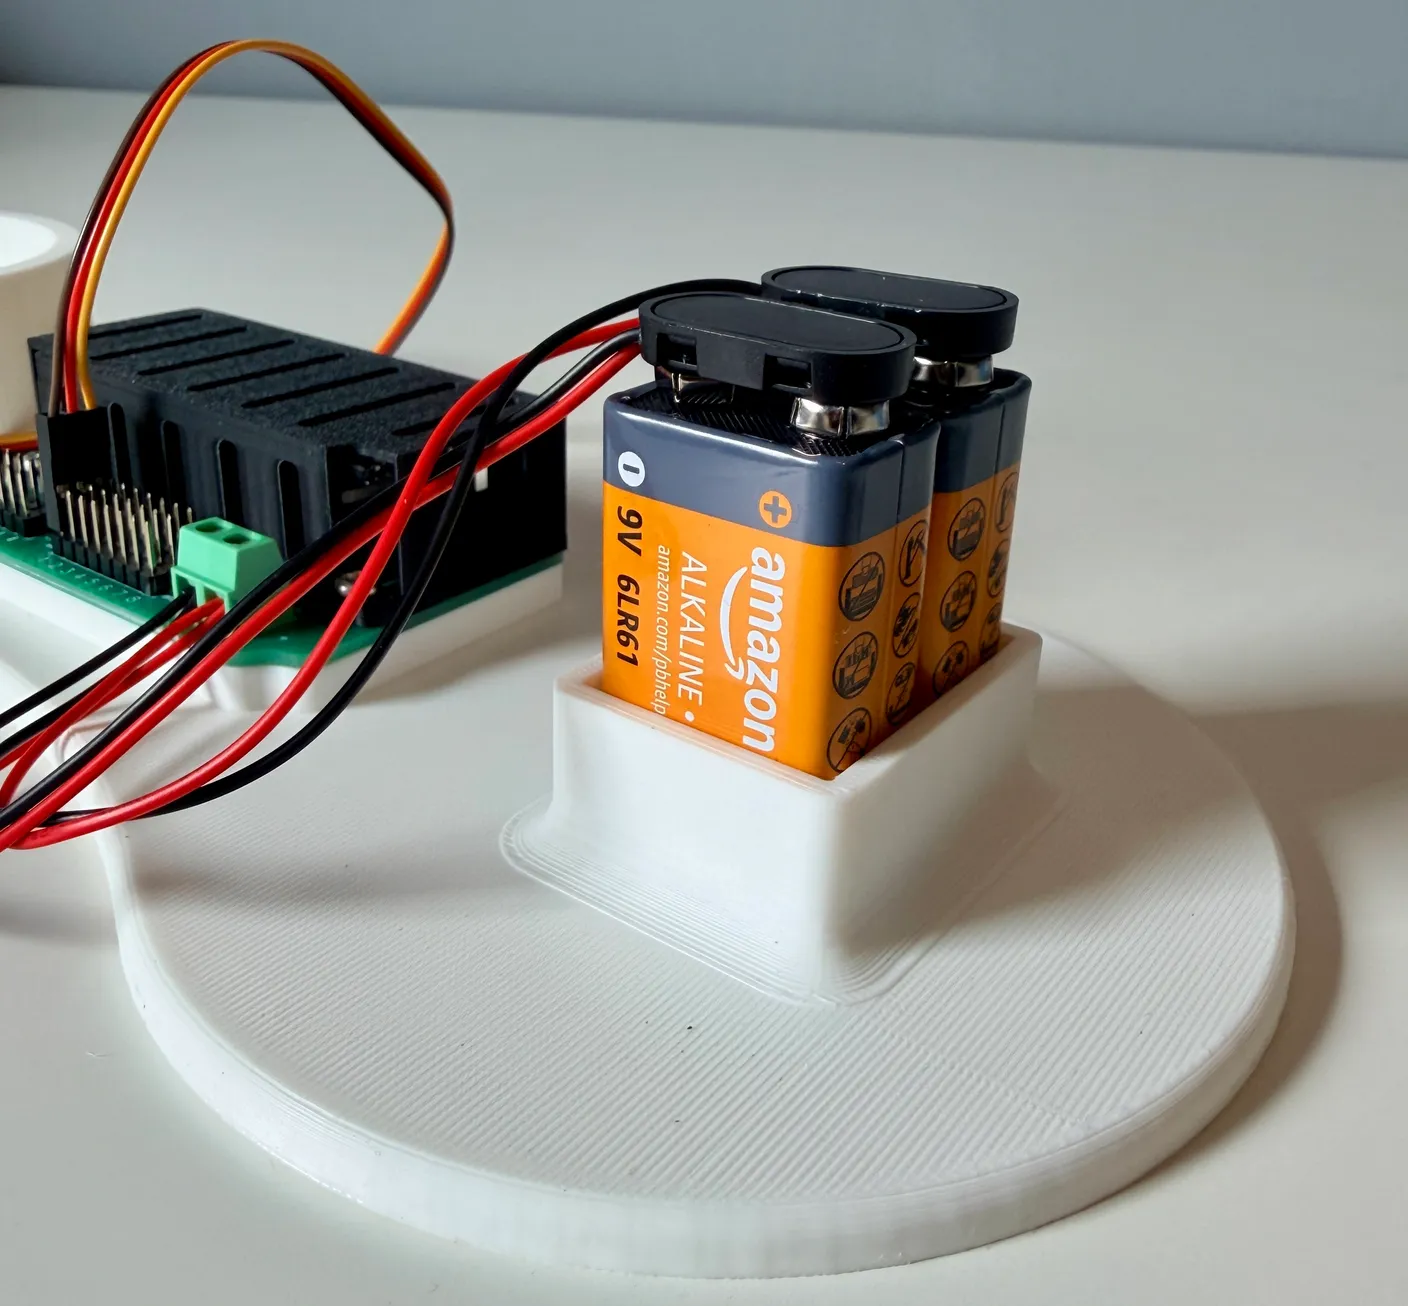
Plug in the batteries. Make sure the blue light on the circuit board comes on. Sometimes it doesn’t stay on the first time — if you notice it’s off, unplug the batteries and plug them back in.
Once plugged in, your board will have power. Avoid touching the board with anything metal (especially the screwdriver) to avoid short-circuiting the board and breaking it.
Assemble the First Half of the Arm
Now that your robot is plugged in — make sure both batteries are connected — it’s set up to follow this tutorial, and the motors are engaged so they can’t be moved by hand. Assemble the robot exactly the way it’s shown here, or it won’t work as intended.
Servo warning
Do NOT try to move a servo by hand. For example, once you connect a piece to a servo, do not try to manipulate it and move it around by hand, as this can damage the servo in some cases, especially if it’s plugged in. If you need to reorient a piece, take it off the servo before readjusting, then set it back onto the servo.
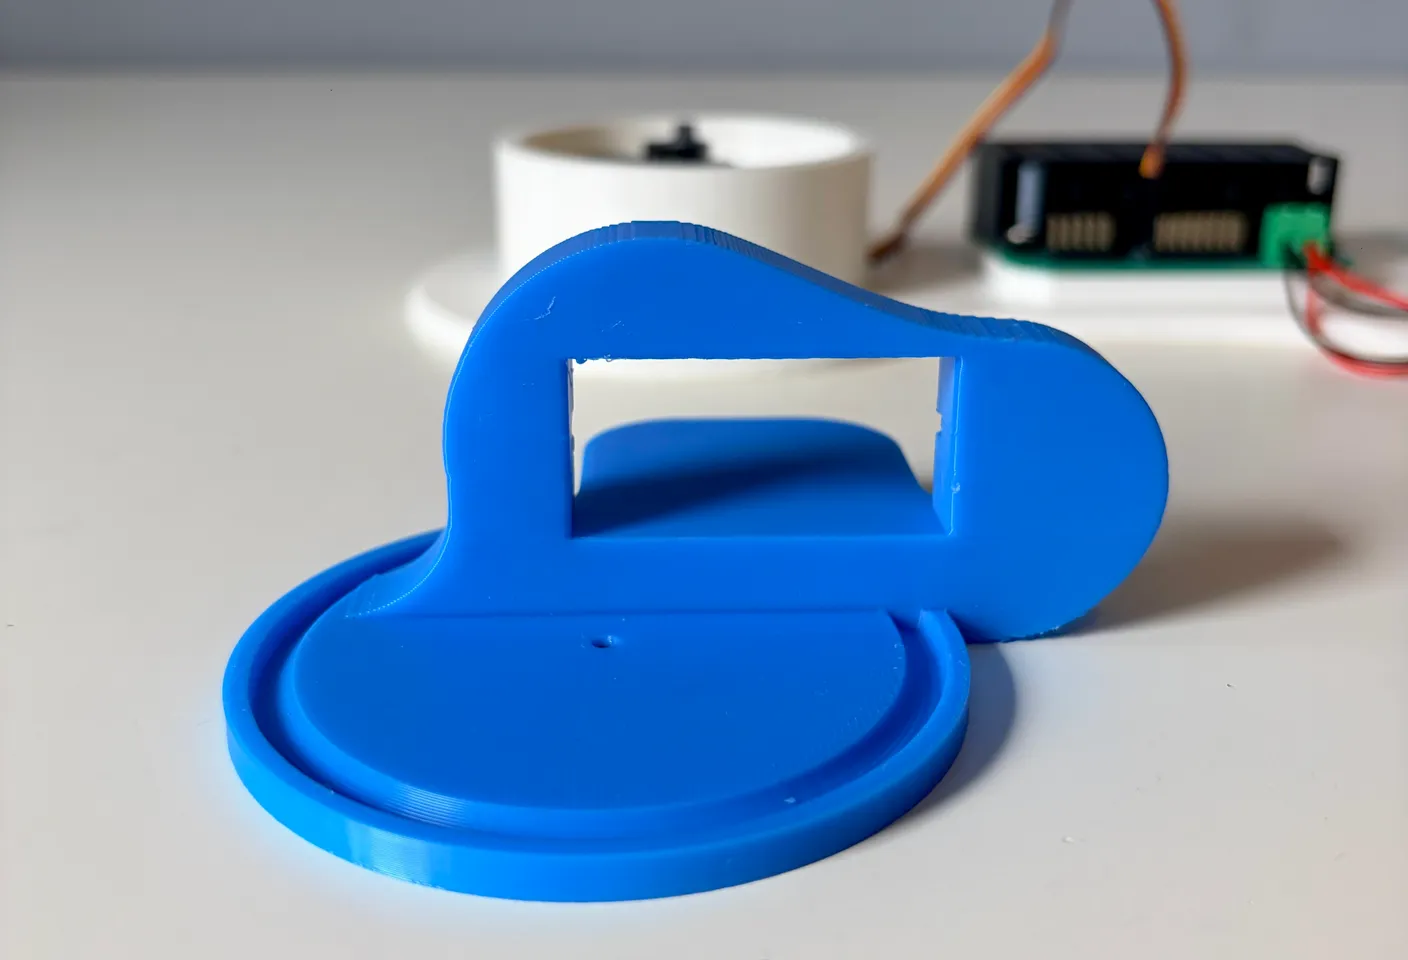
Grab this blue part.
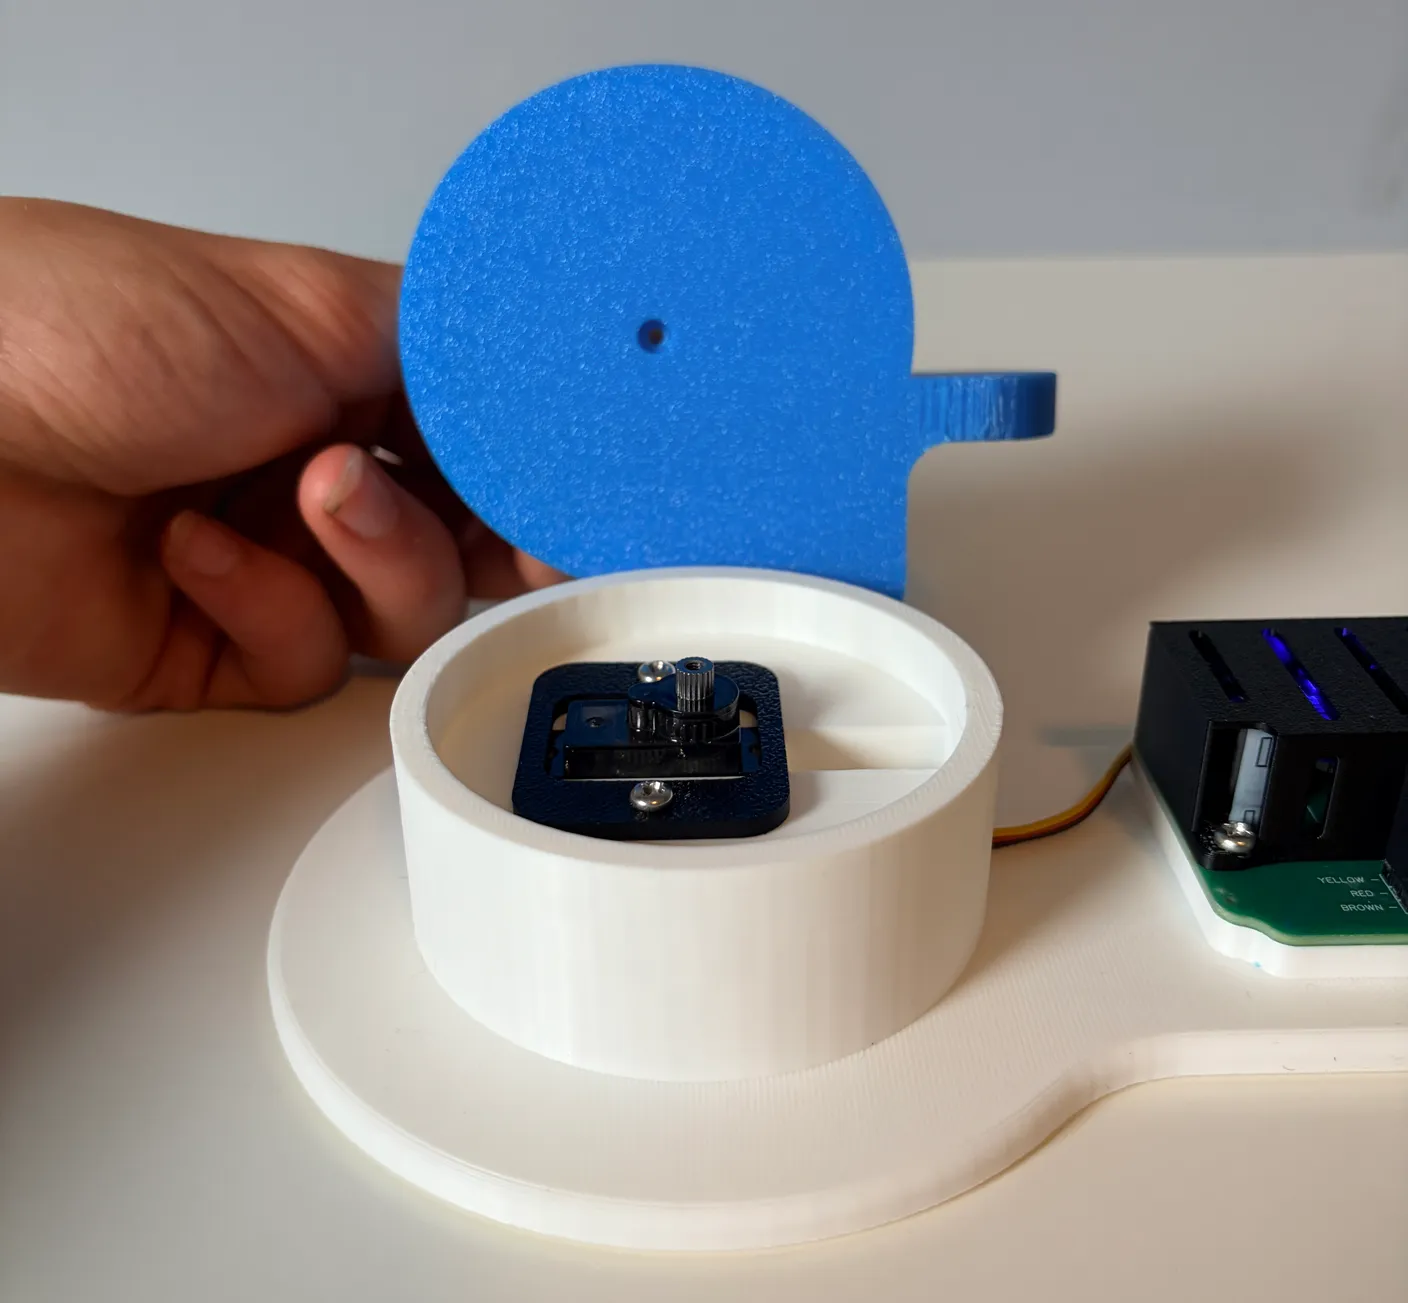
Notice the hole on the bottom of the blue part. You’ll line this hole up with the servo to connect them.
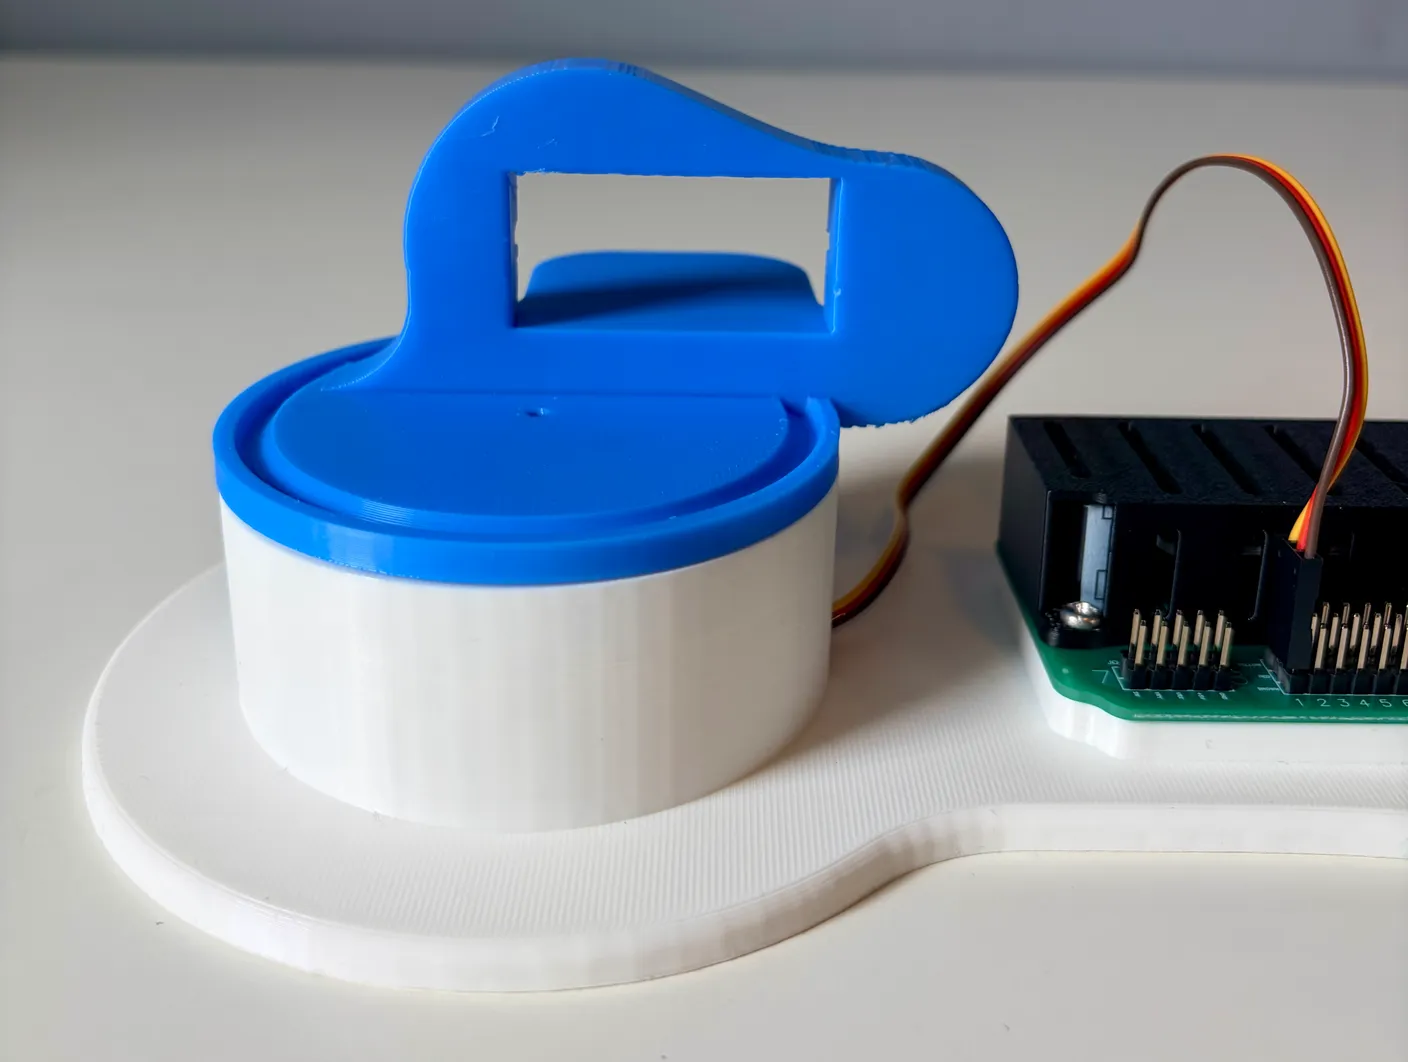
Connect it to the servo as shown above. The hole on the blue piece simply slides onto the servo.
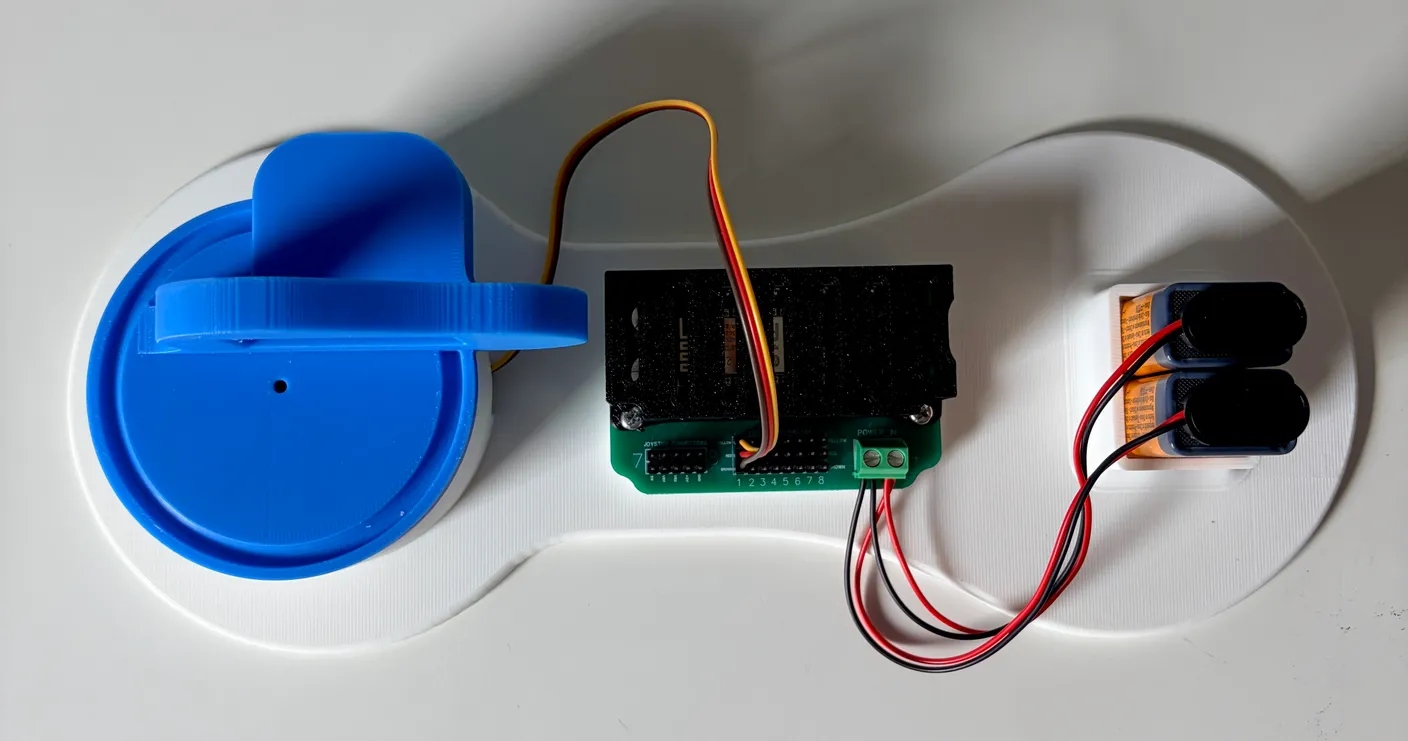
Make sure the square part of the blue piece is perpendicular to the robot. It should look exactly like the image above. If you need to reorient it, don’t spin it (this is what was mentioned in the Servo Warning note earlier). Pull it straight up, reorient it, then put it back.
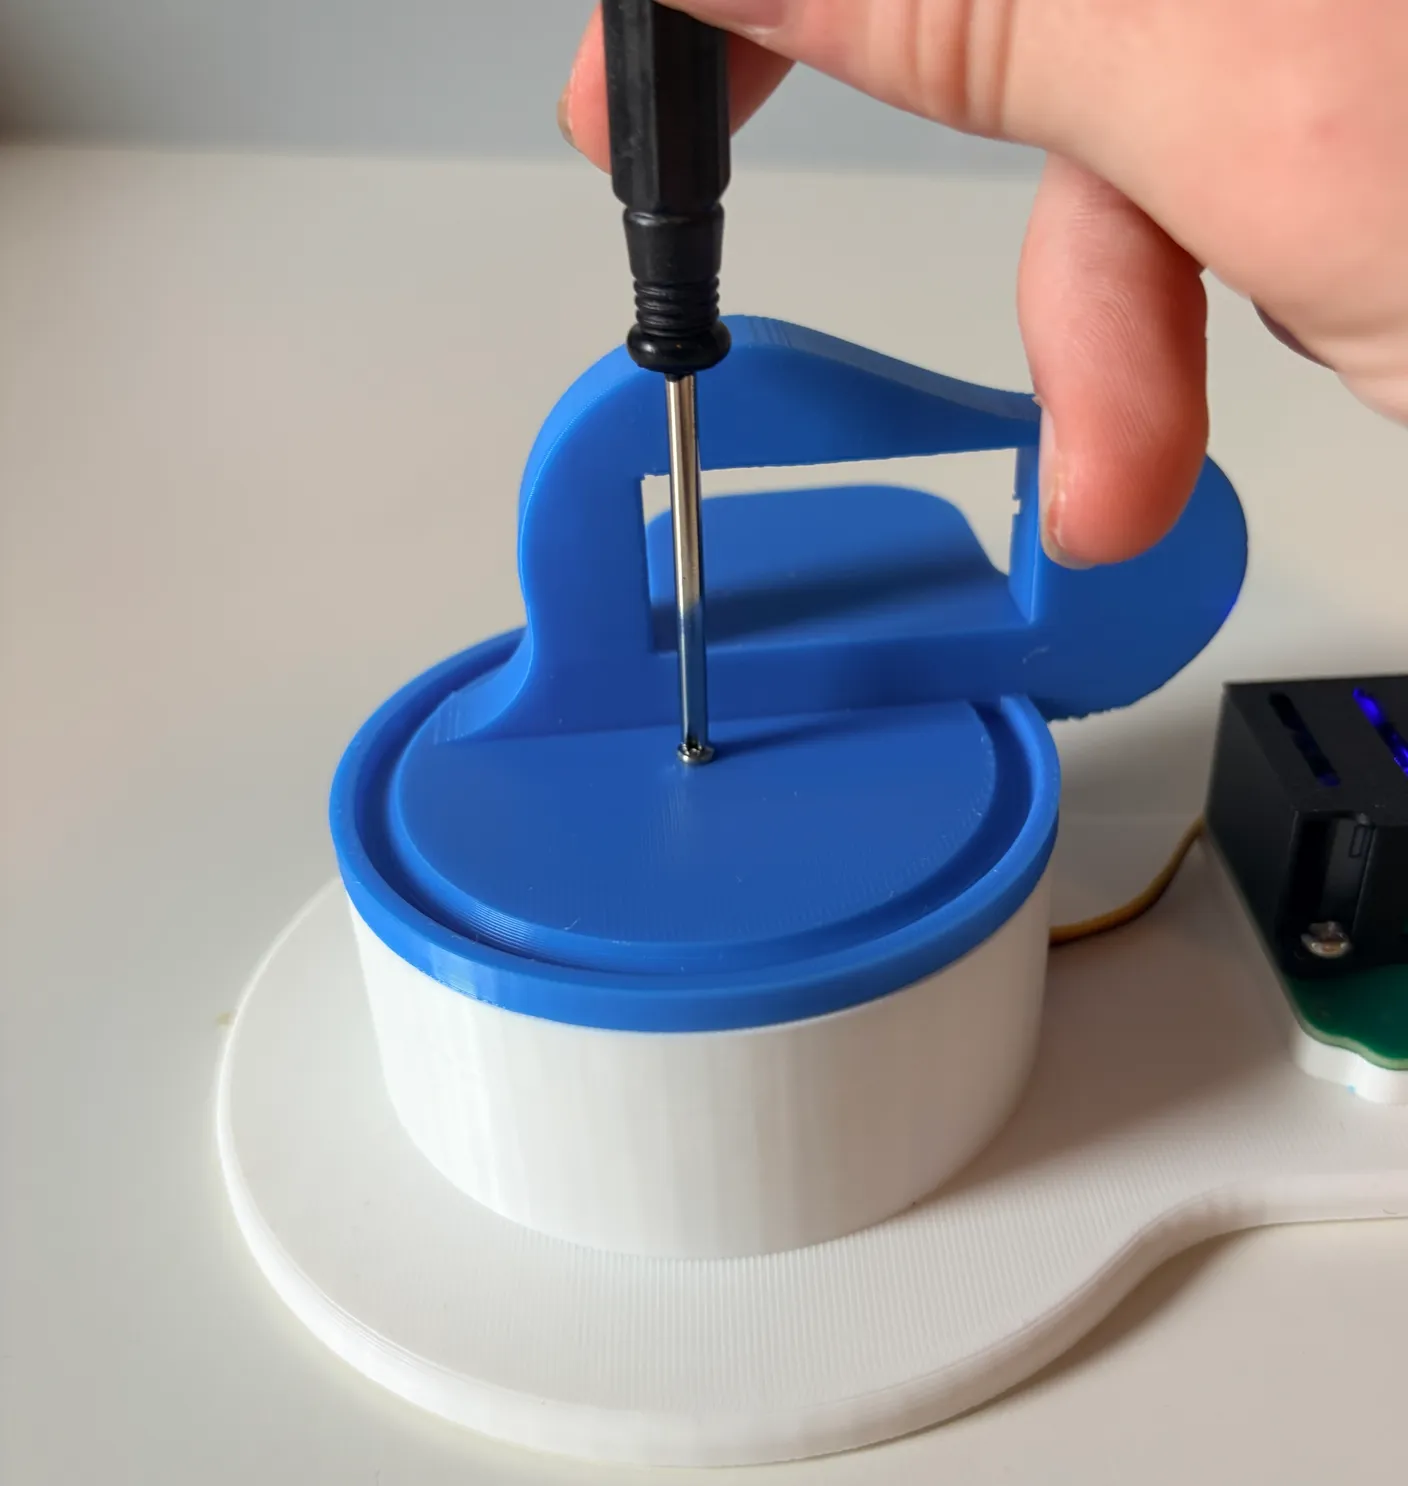
1× Servo Screw
Once it’s aligned correctly, use one screw from the servo bag to screw it in place, as shown above. Only take out one servo screw at a time so you don’t lose them. Screw it tight — this is what makes your robot move.
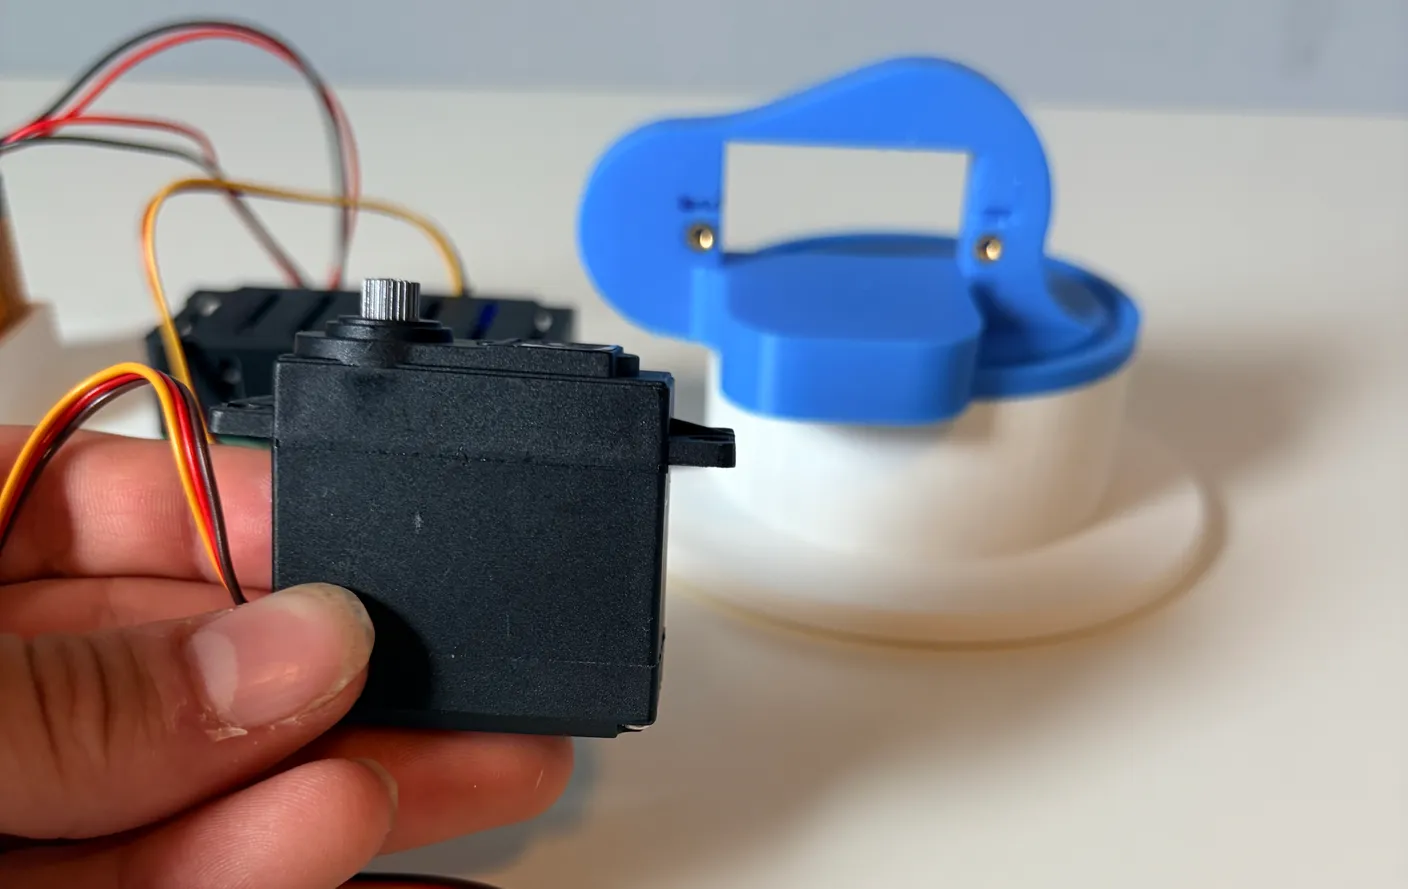
Now get the big servo motor.
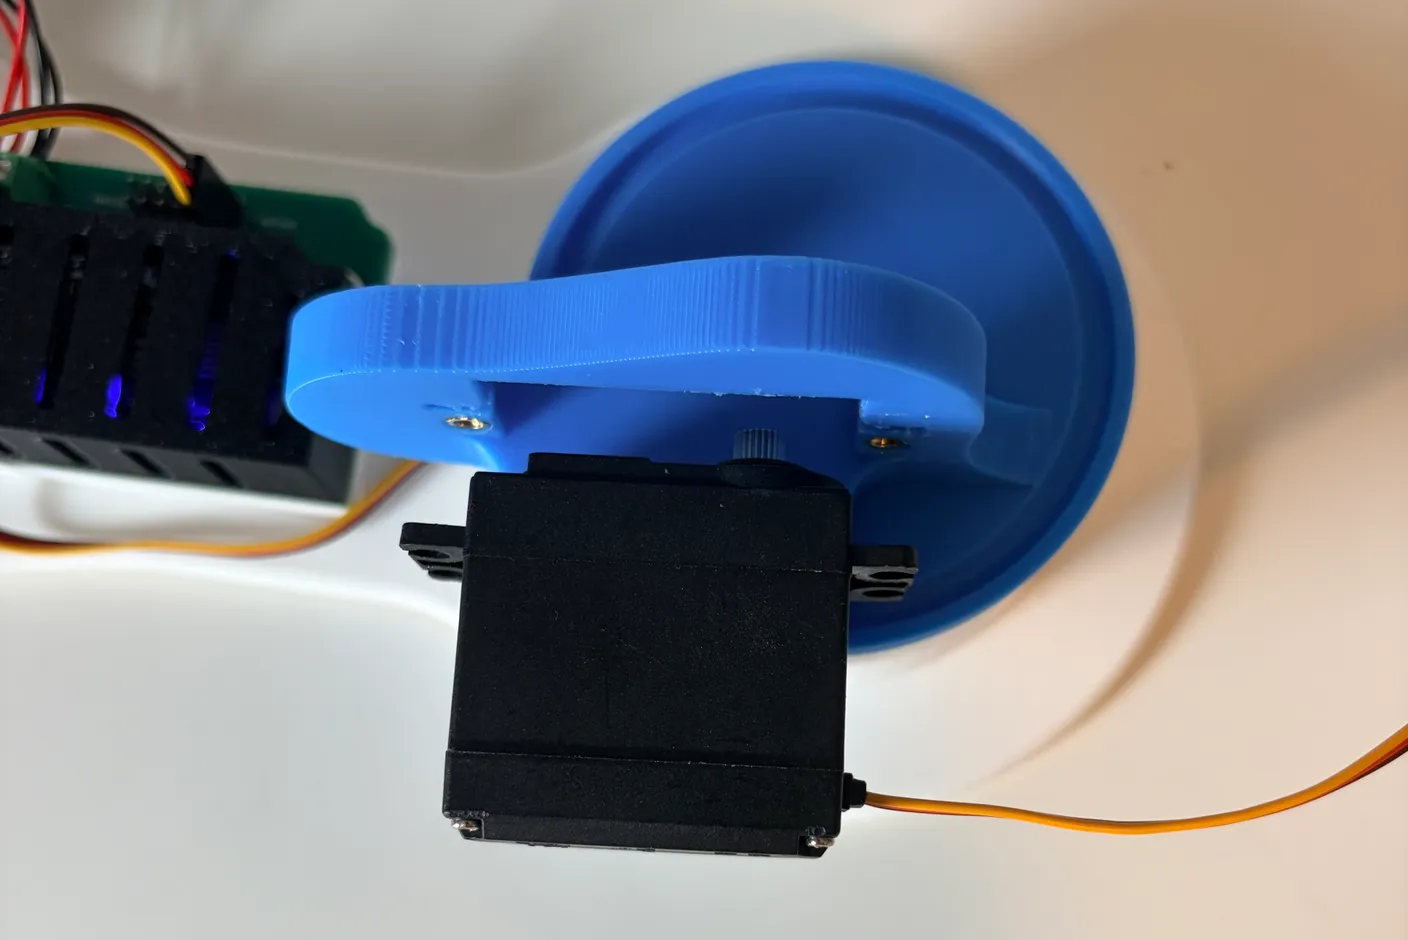
Align it as shown above. Make sure the wire faces away from the circuit board.
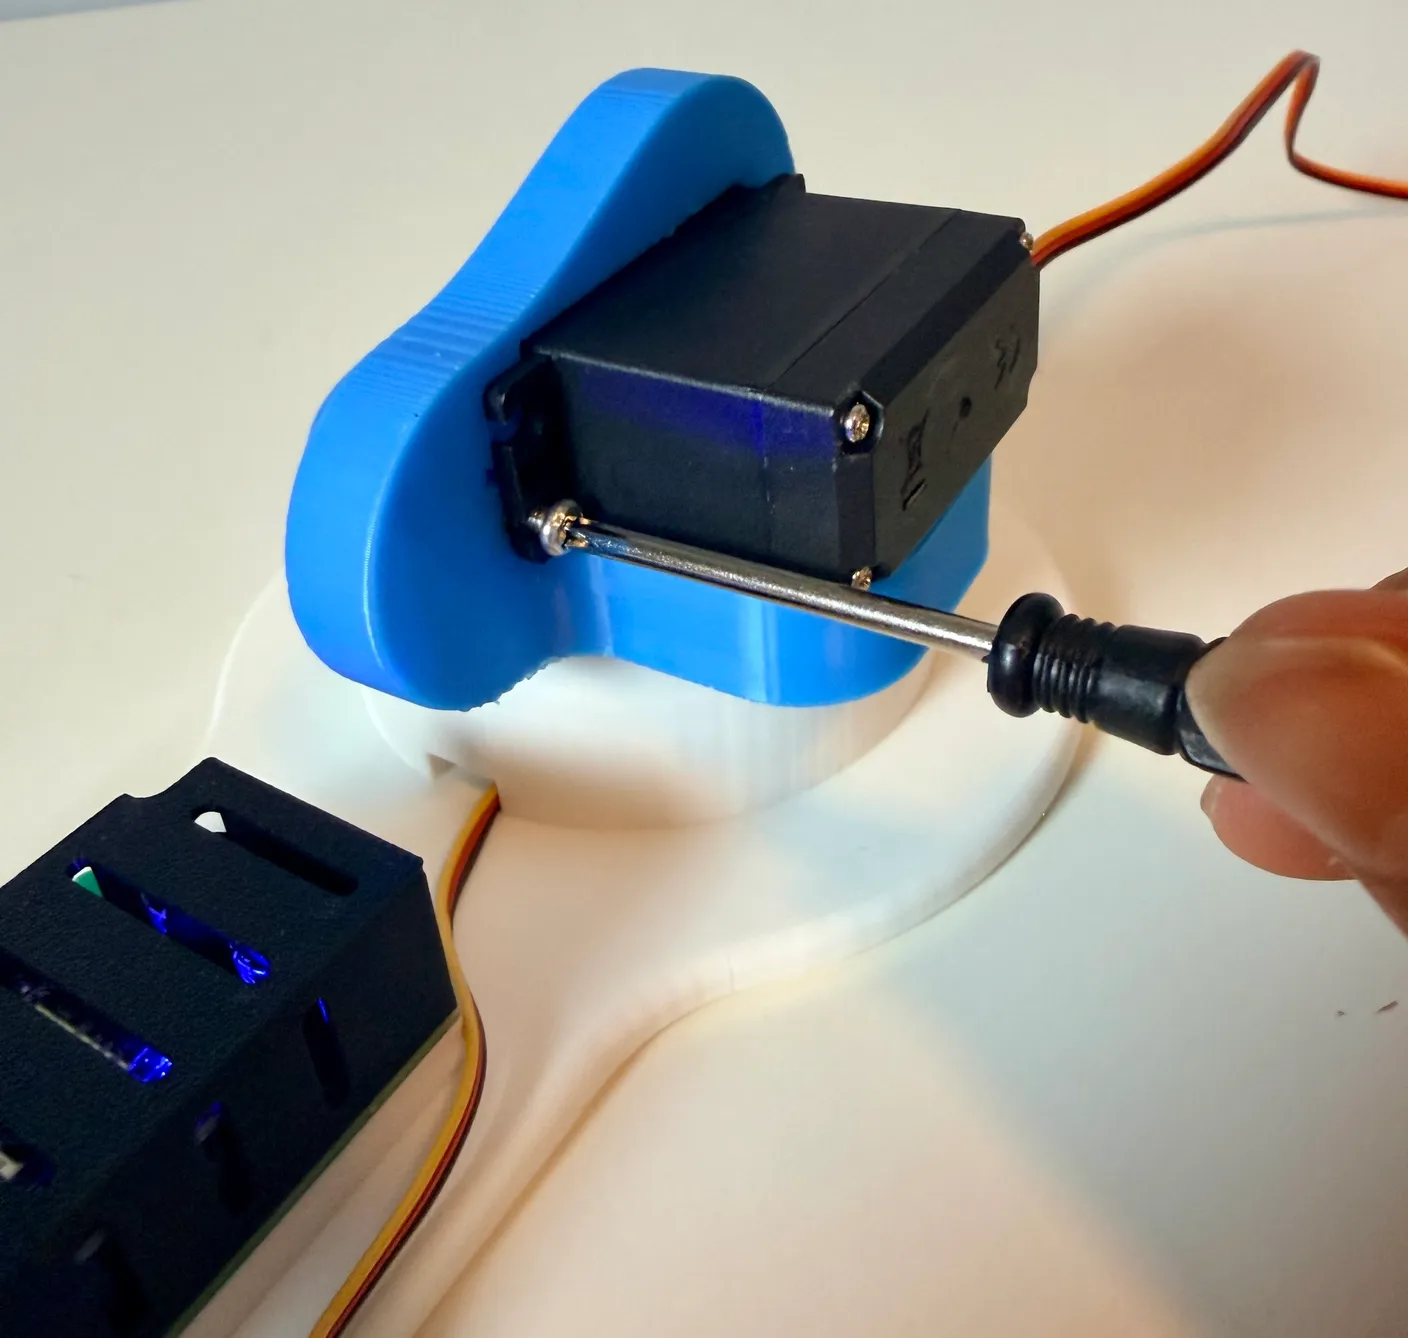
2× 6mm screws
Once it’s aligned to match the image above, screw it in place with two 6mm screws.
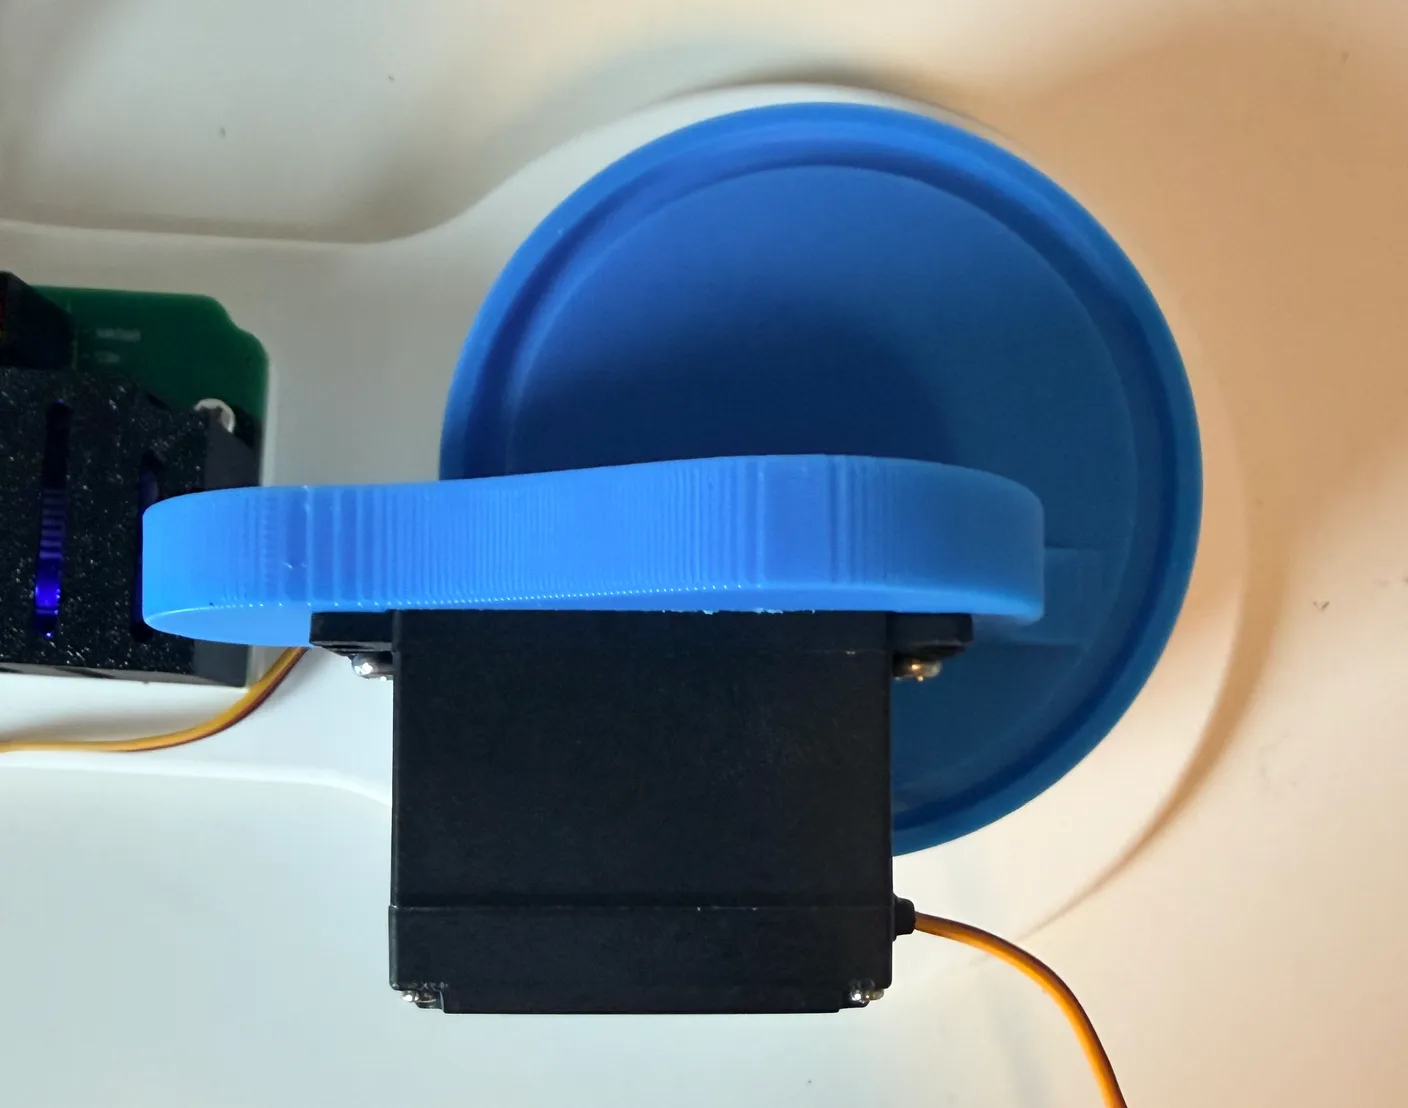
Once it’s screwed in, it should look just like the image above.
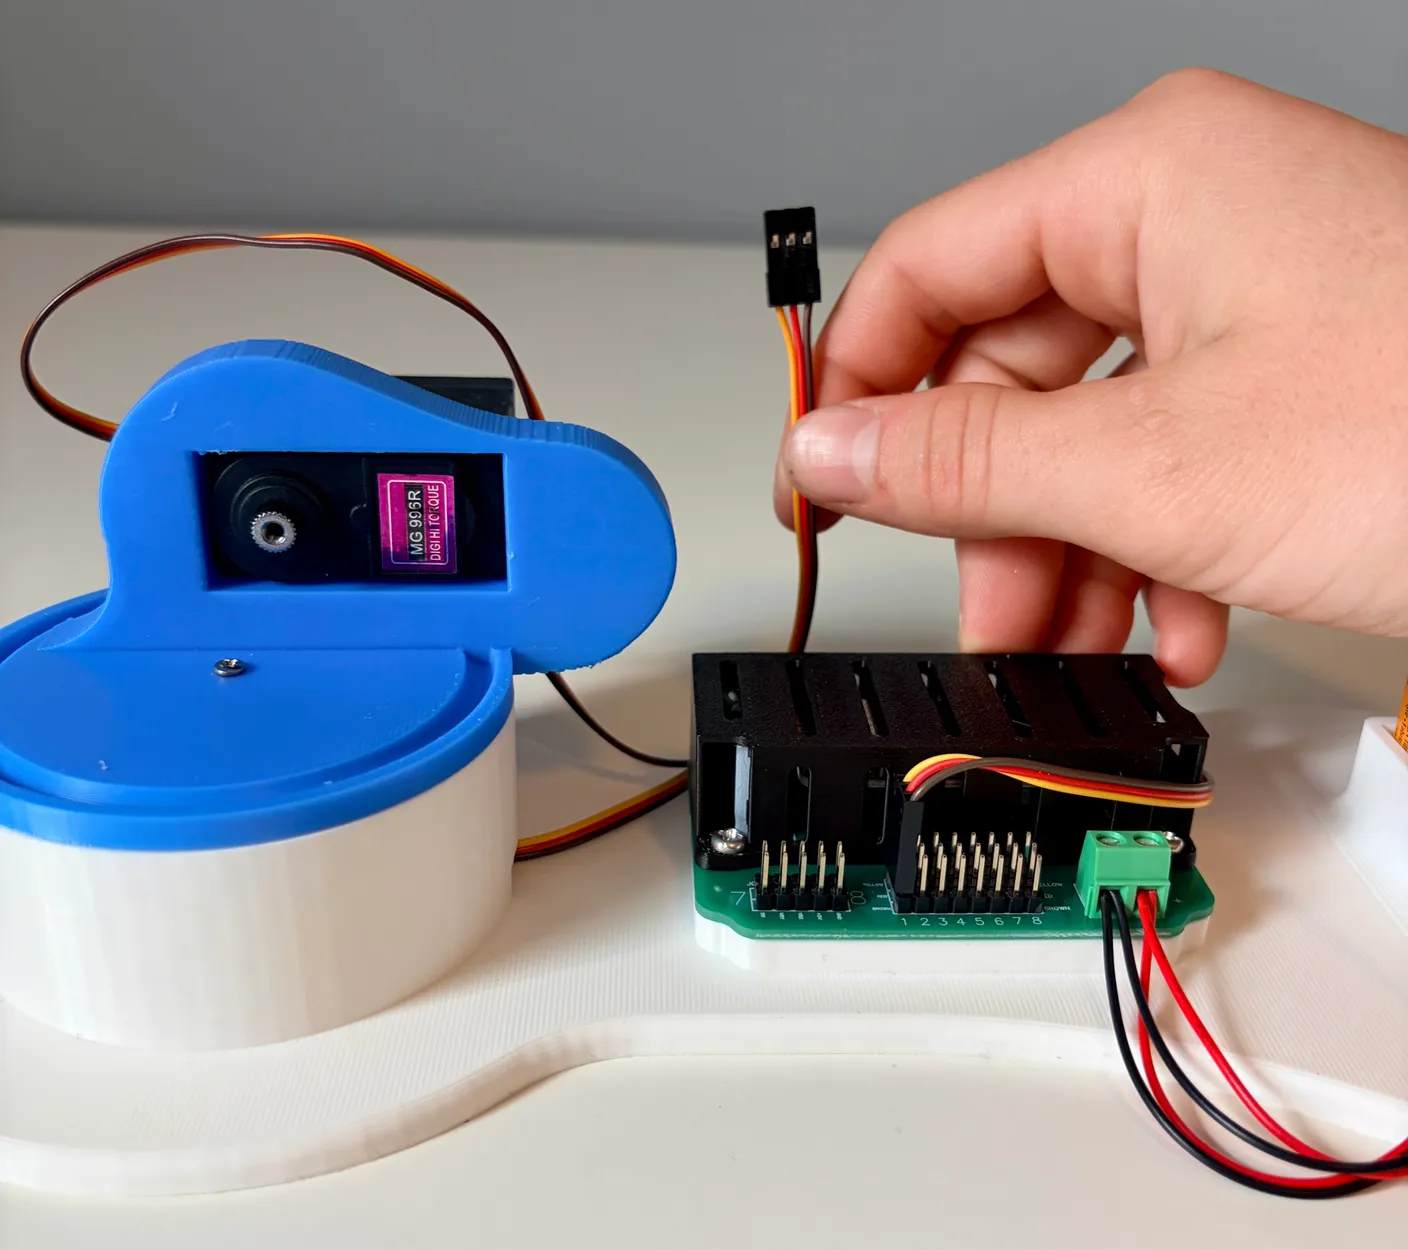
Now it’s time to connect this motor to the circuit board.
Make sure that the wire stays behind the motor as shown, don’t wrap it around the front. This applies to all future wires so that they don’t get tangled up!
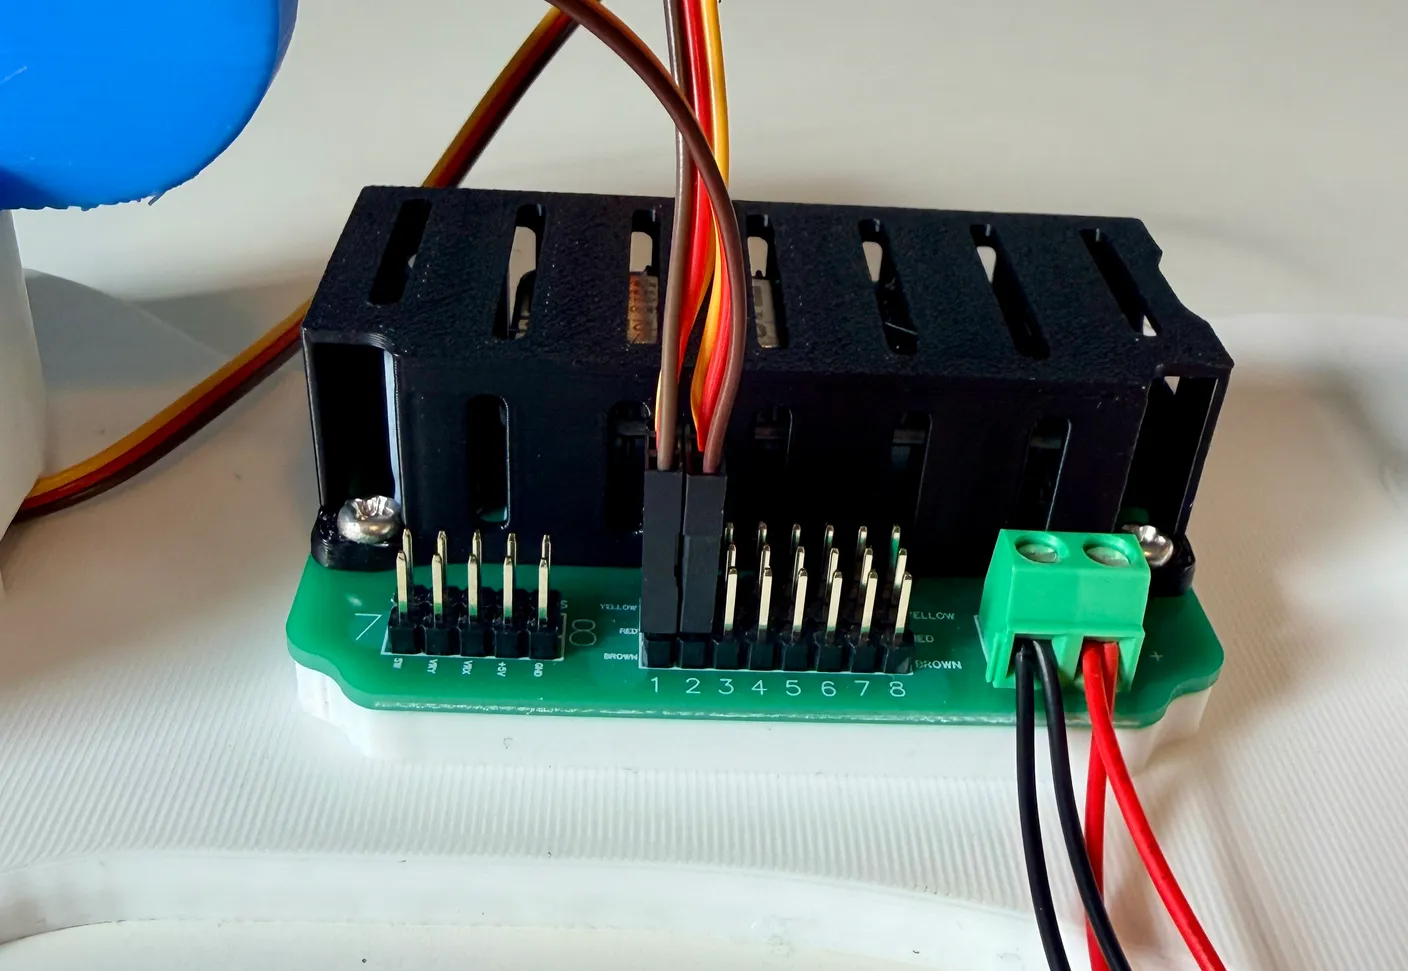
Plug it into column 2 — remember the color orientation! The yellow end faces the black box and the brown end faces away (scroll up to the “Wire orientation” note if you need a refresher). Make sure it’s in column 2, shown by the number below the wire.
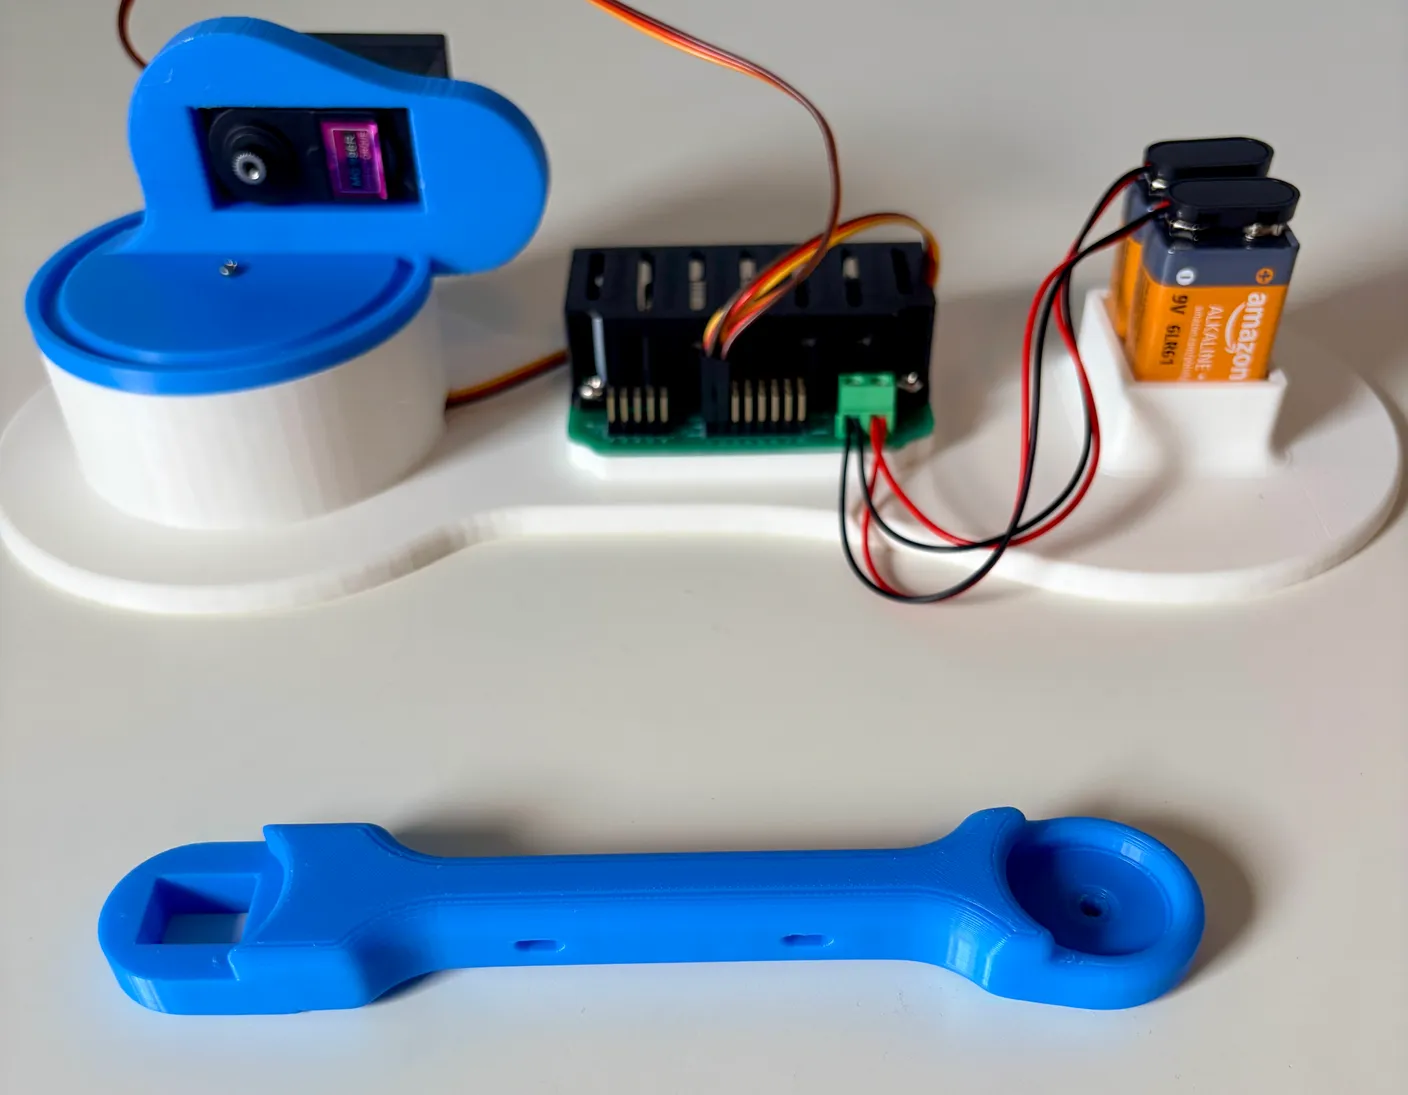
Now get this blue arm piece.
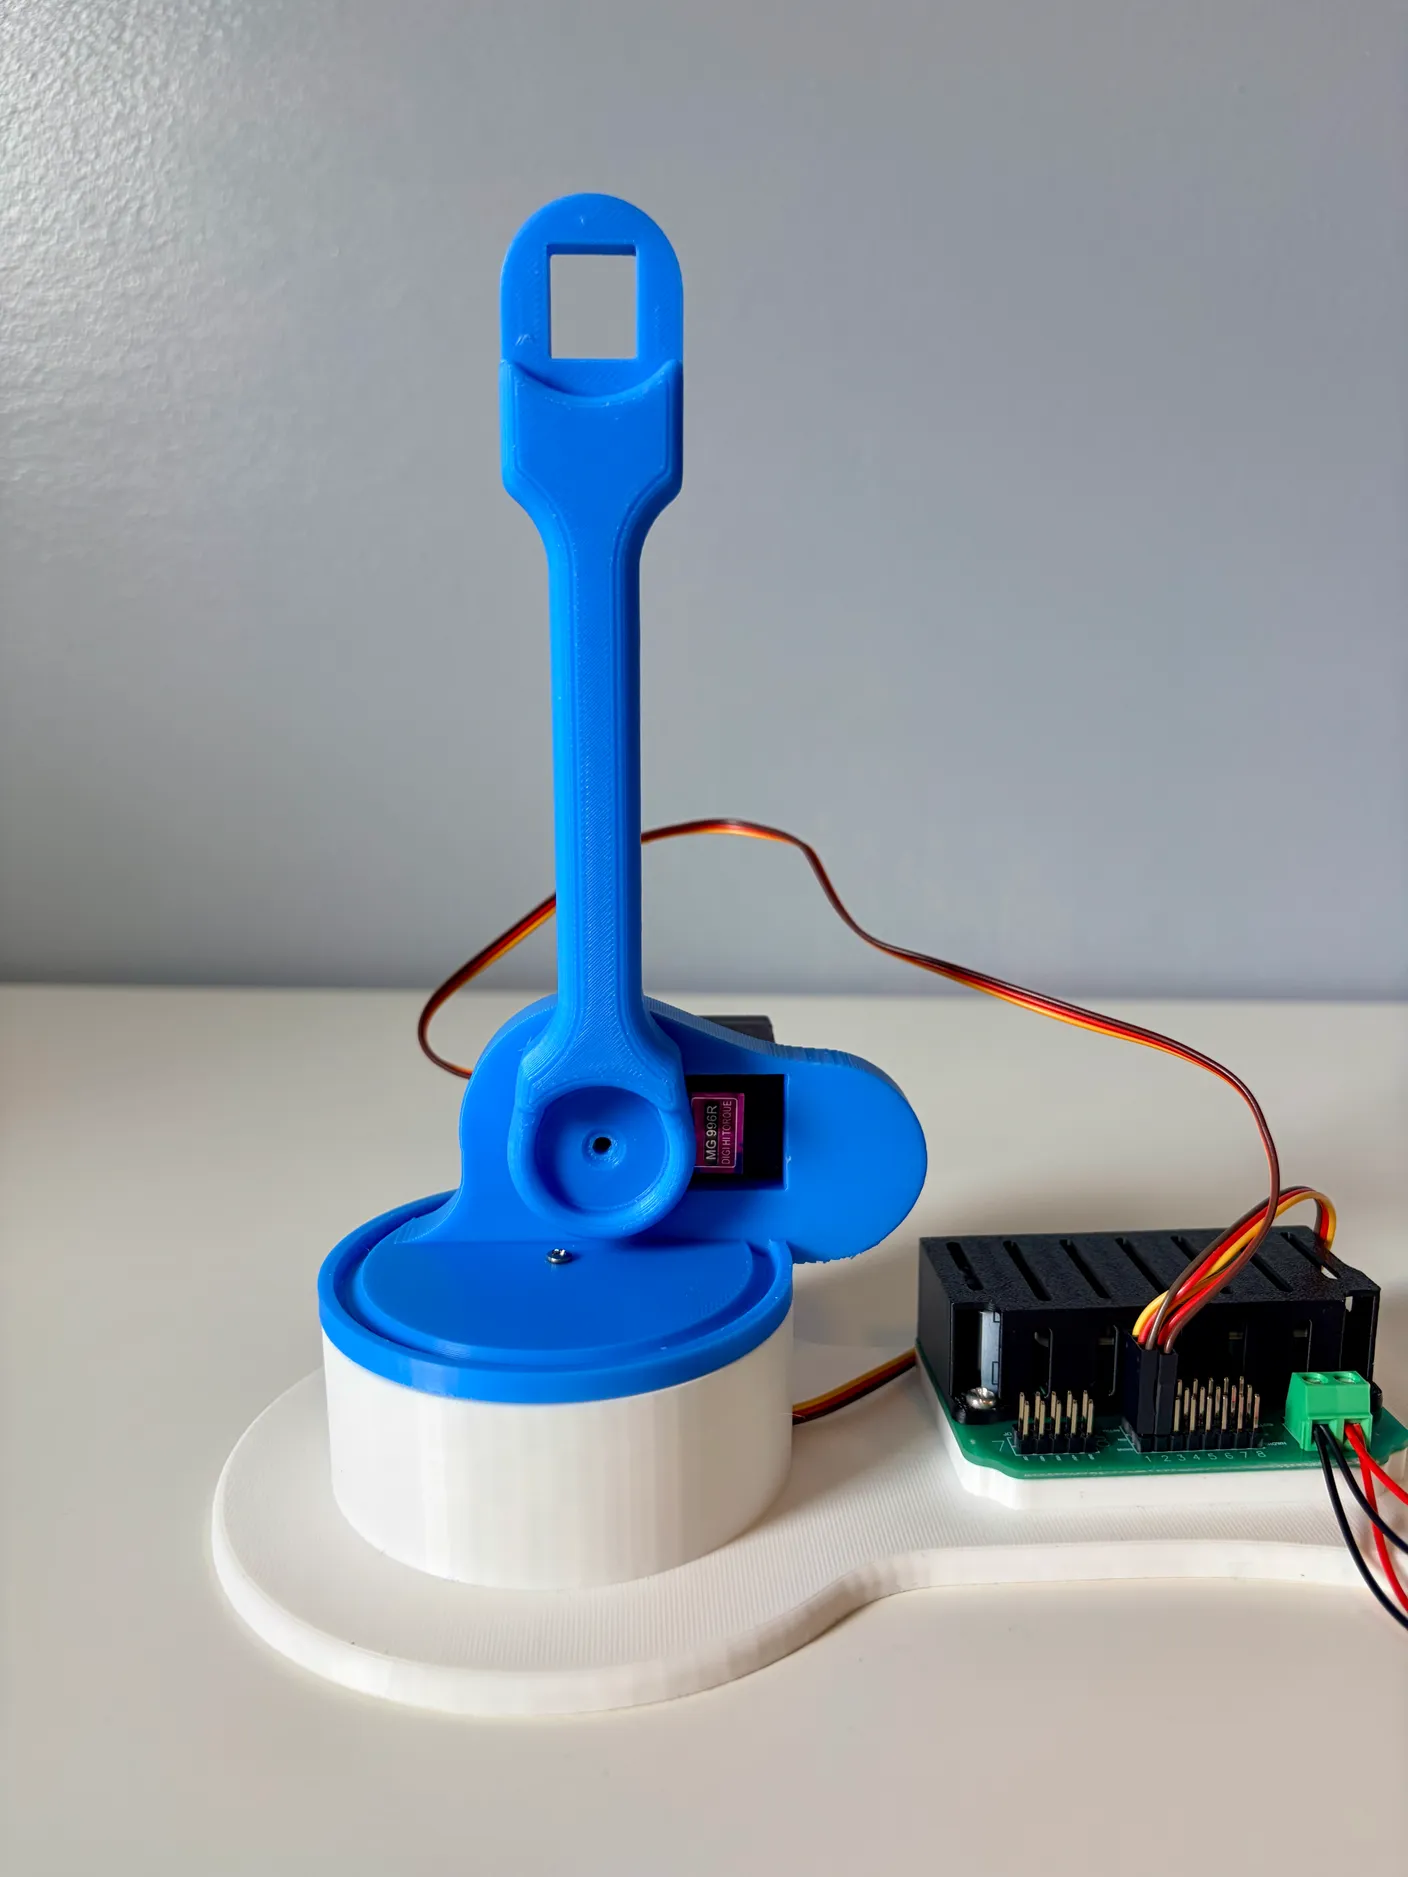
Attach it to the big servo the same way you attached the base — line up the hole on the back with the servo. Orient it to point straight up, at a 90-degree angle to the ground. Make it look just like the image above.
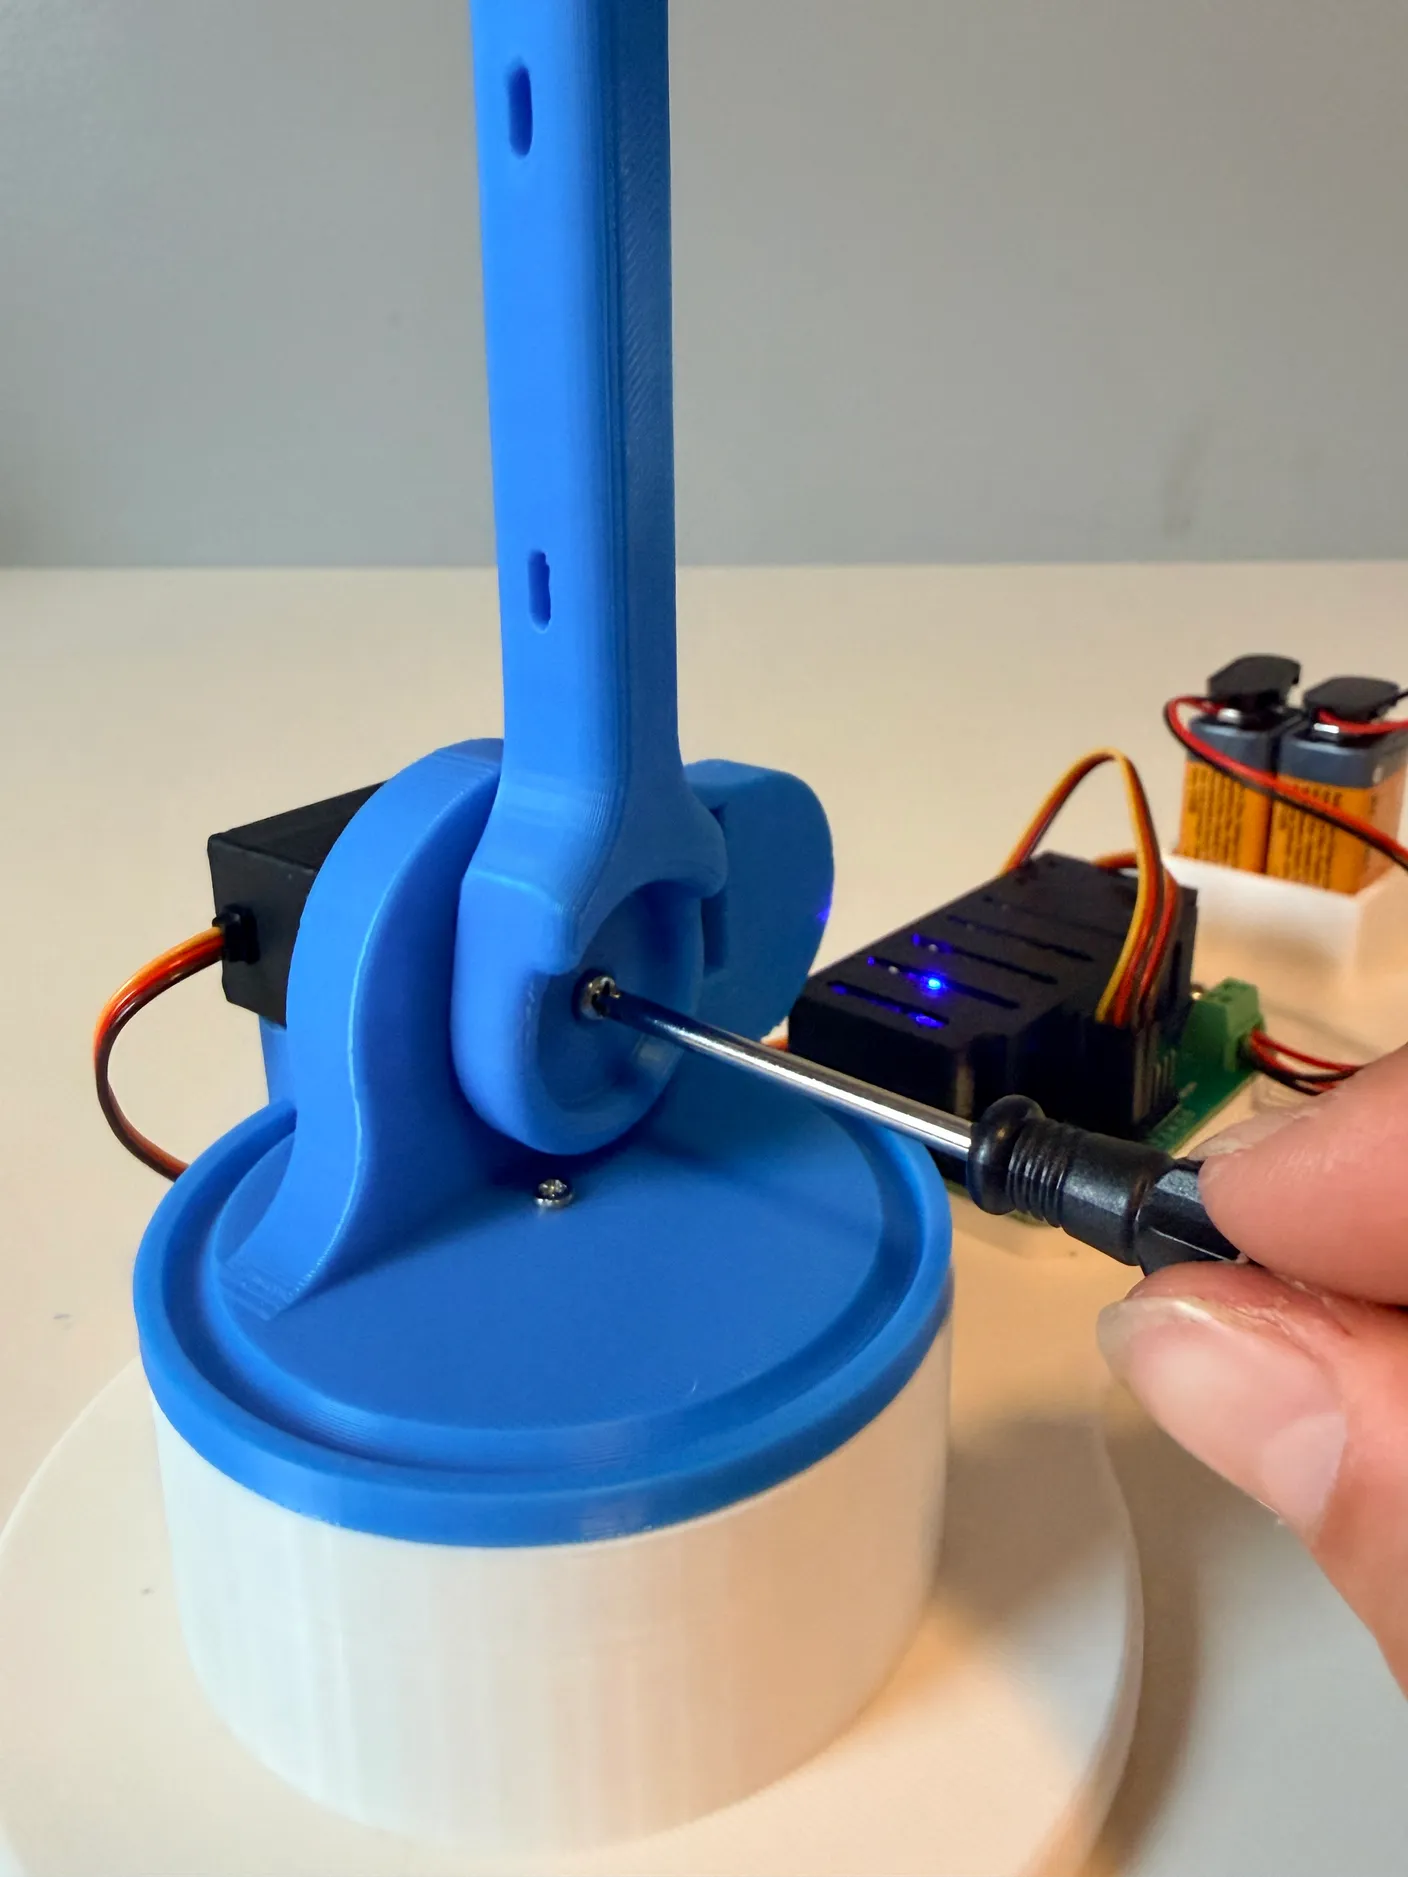
1× 6mm screw
Once it’s oriented correctly, use a 6mm screw to screw it in tight! This screw needs to be the tightest — it supports the whole arm. It’s also the one that comes loose most often, which we’ll cover in a later section. If you’re having trouble getting it as tight as possible, we recommend using a bigger screwdriver where you can get a better grip, if you have one.
Assemble the Other Half of the Arm
The robot is getting big now, and the servo wires won’t reach the board on their own — they’ll need an extender.
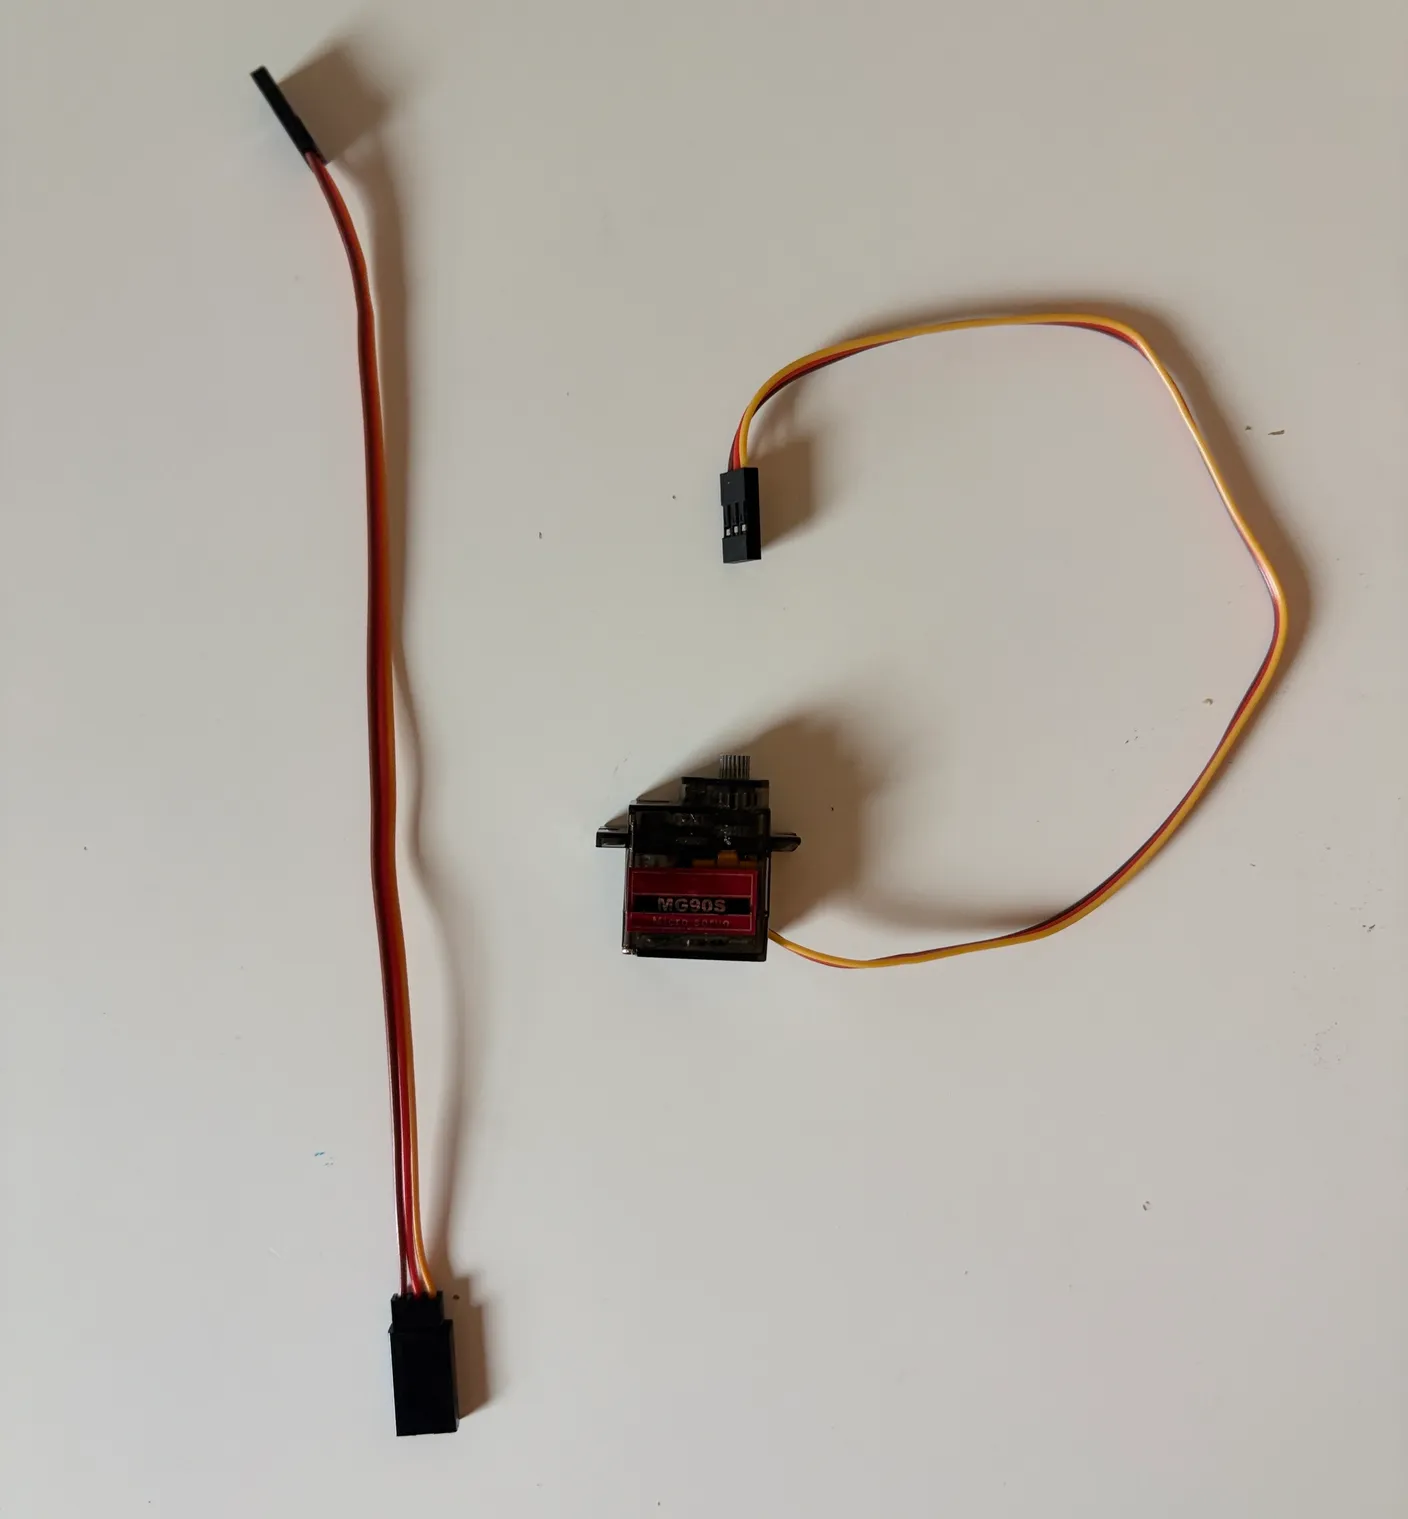
Get another servo and the first of three servo wire extenders, as shown above.
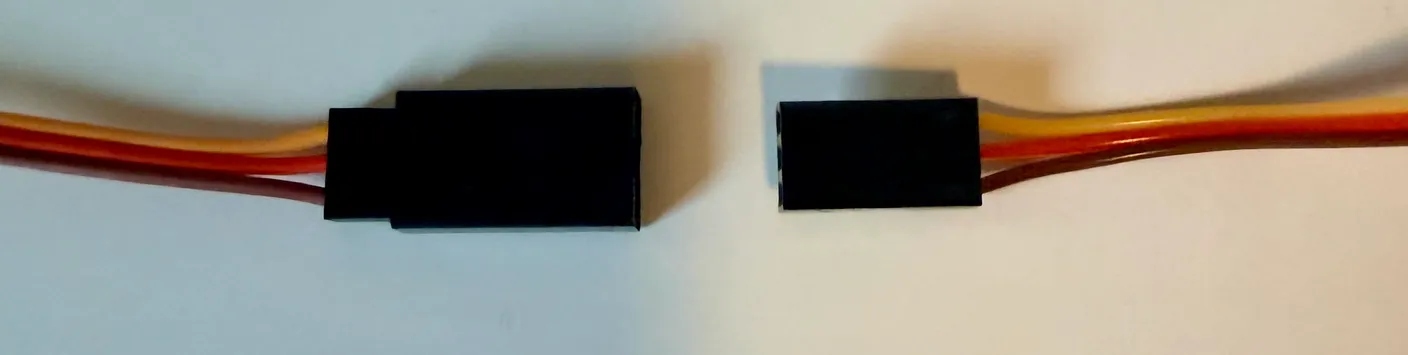
The wire extender is color-coded too, and it follows the same rule as the board: the colors have to match. Pair yellow to yellow, red to red, and brown to brown.
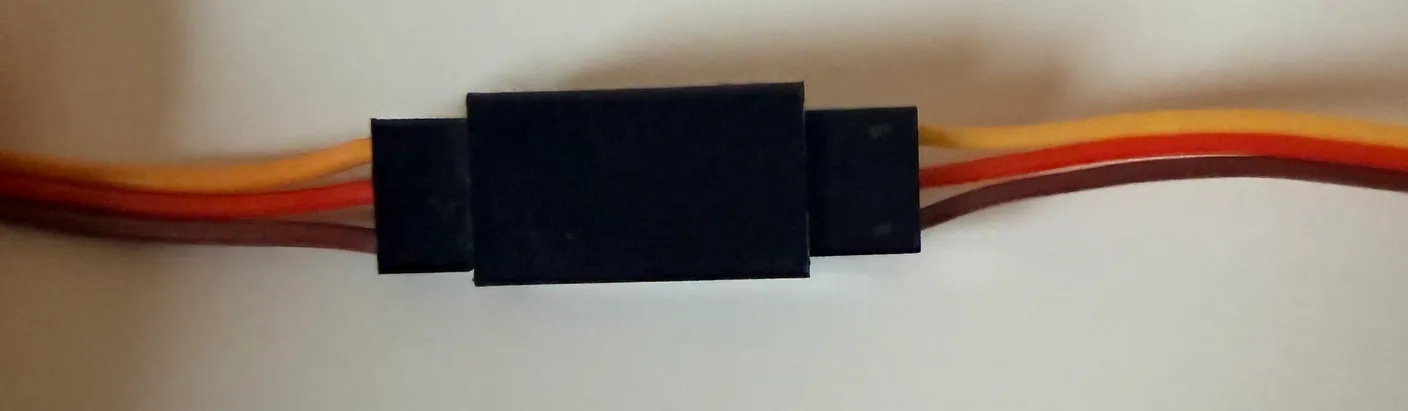
Connected, they’ll look like the image above. Double-check the colors match on both sides — otherwise you’ll damage the robot.
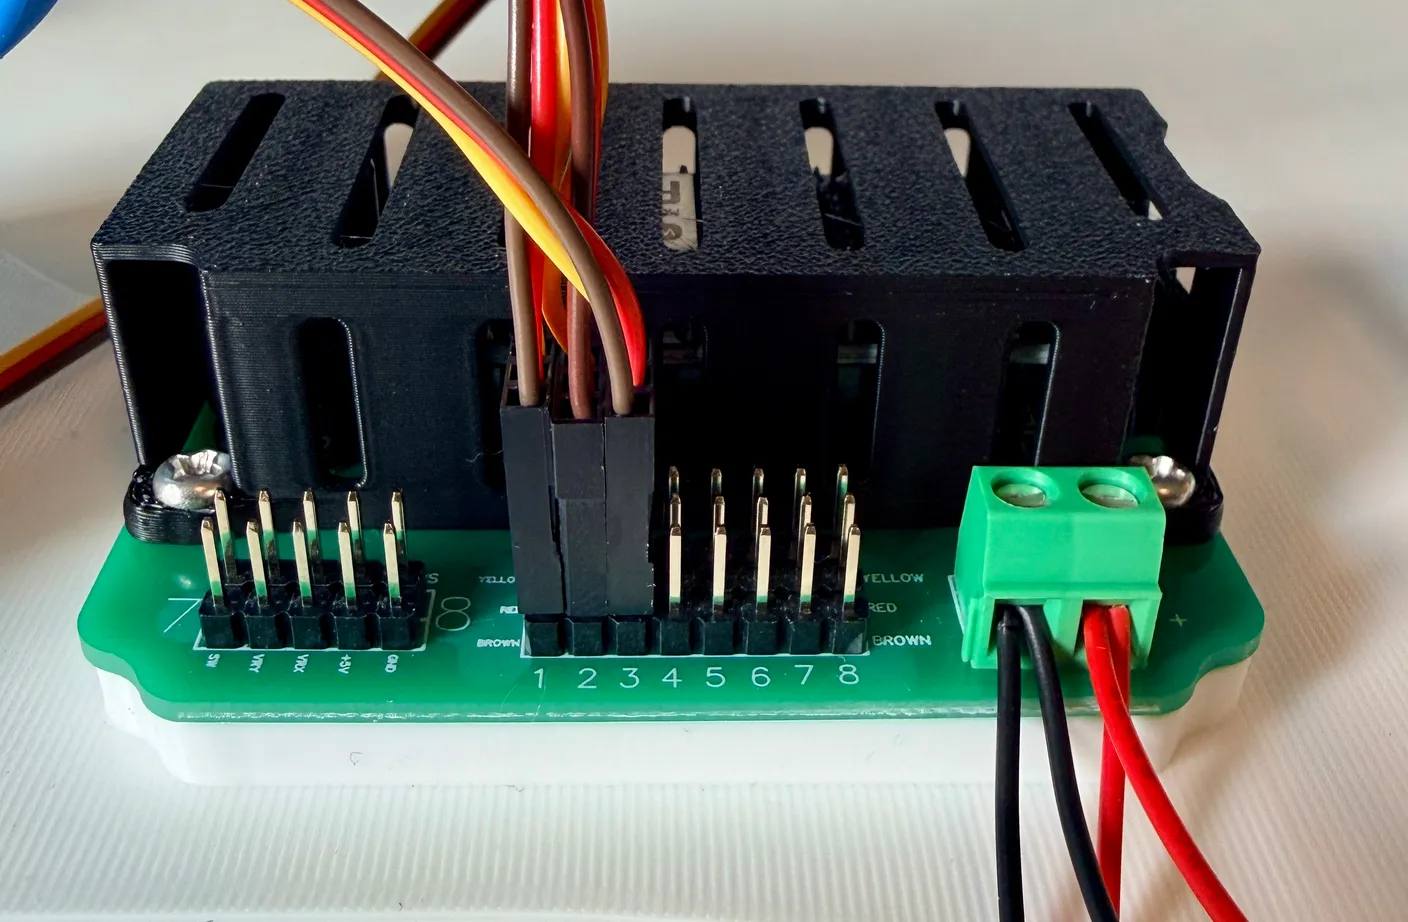
Plug this servo into column 3, with the yellow end toward the black box and the brown end facing you — same as before.
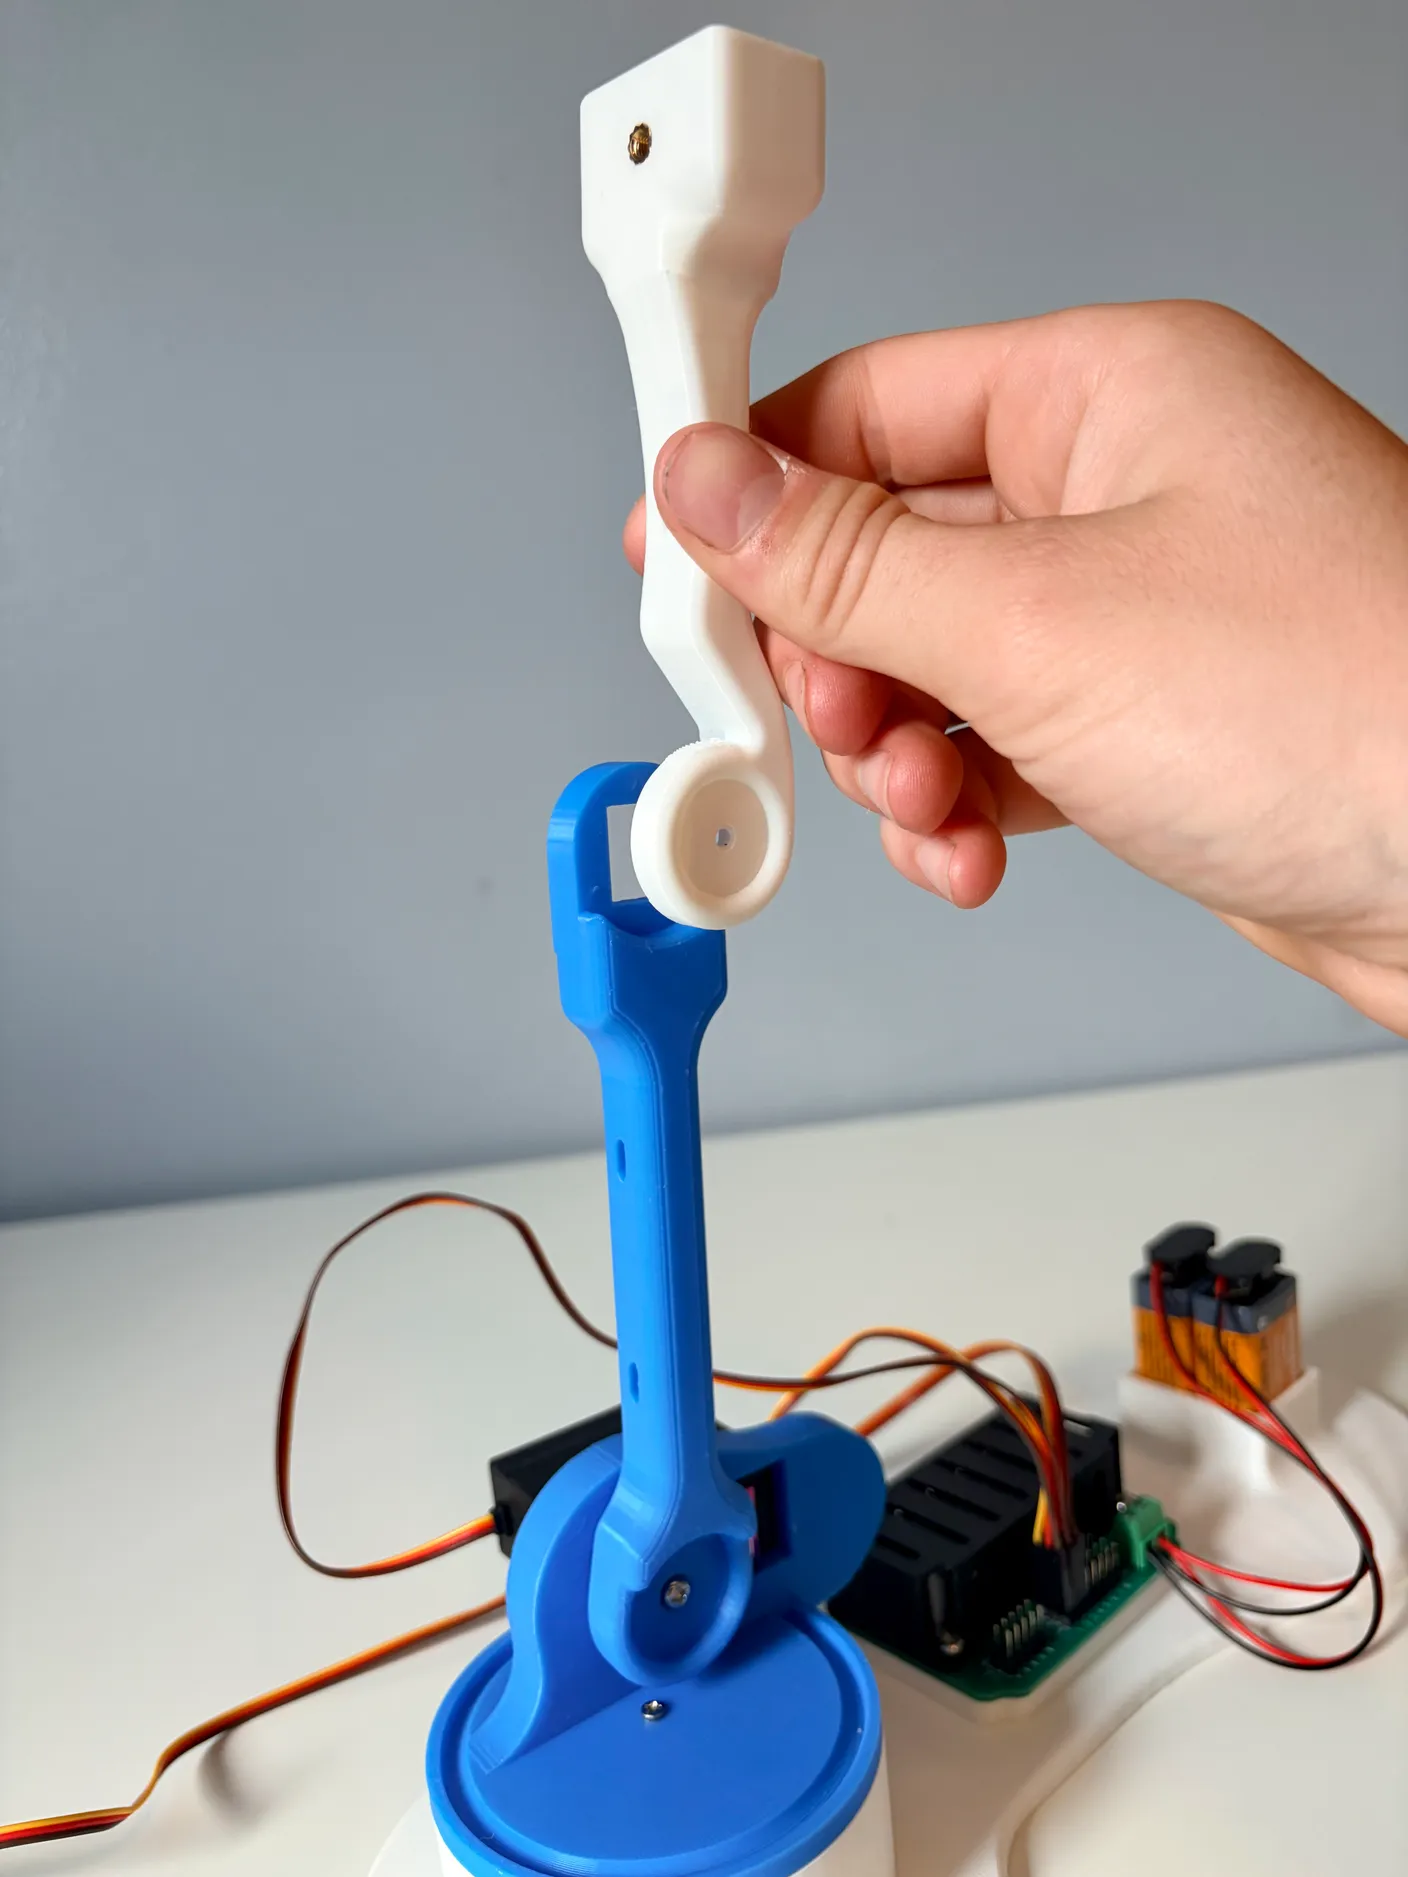
Now we’re going to attach the “Elbow” joint. First, get the white piece and hold it like it’s held in the image above.
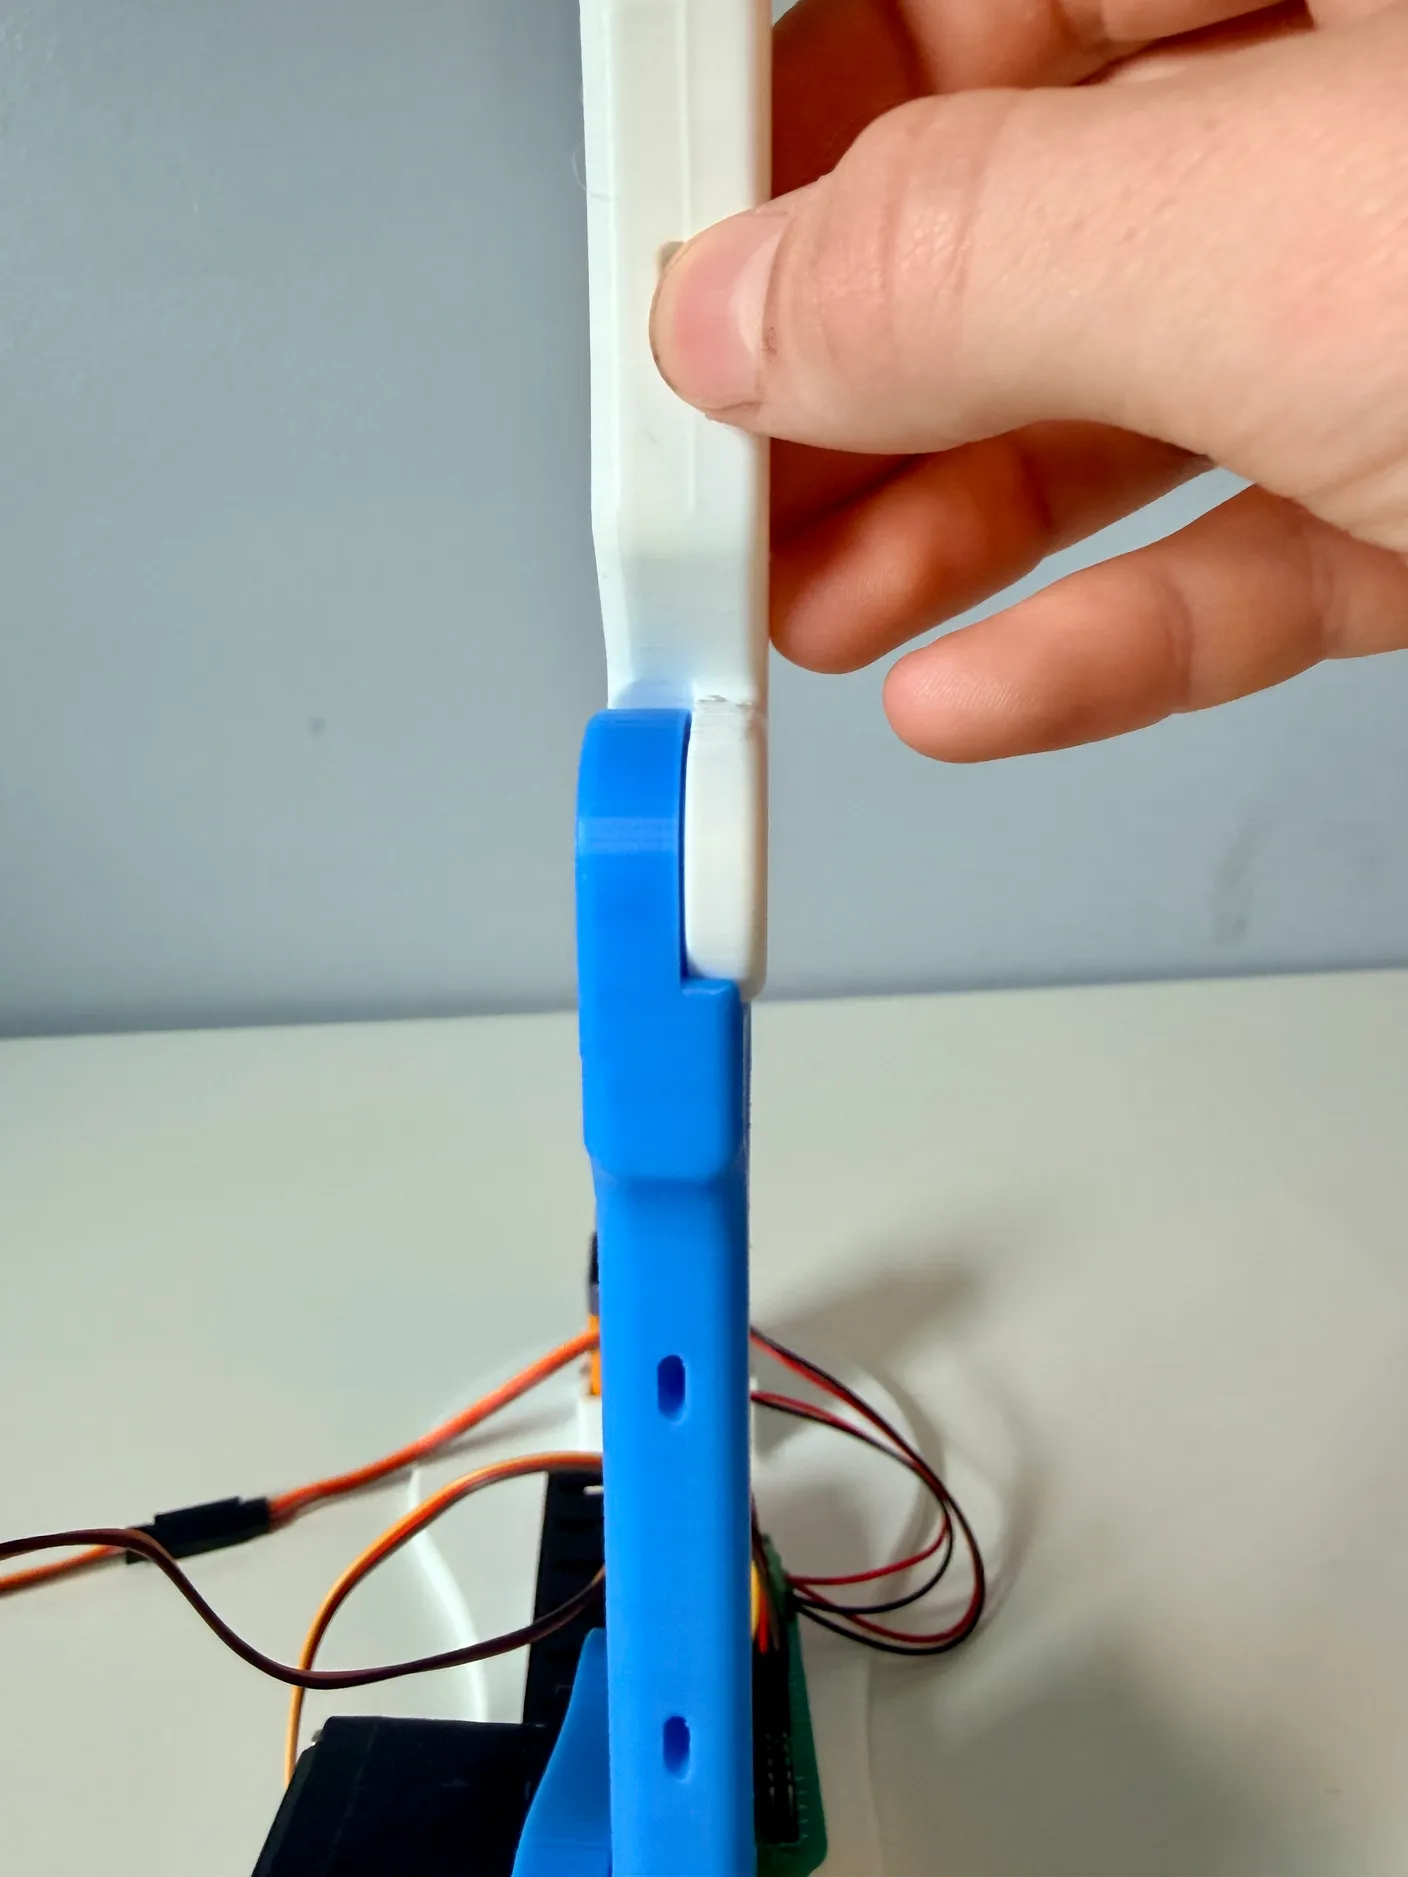
The white elbow piece will connect to the arm as shown above. Hold it in this position, because in the next step we’ll use a servo to secure it in place.
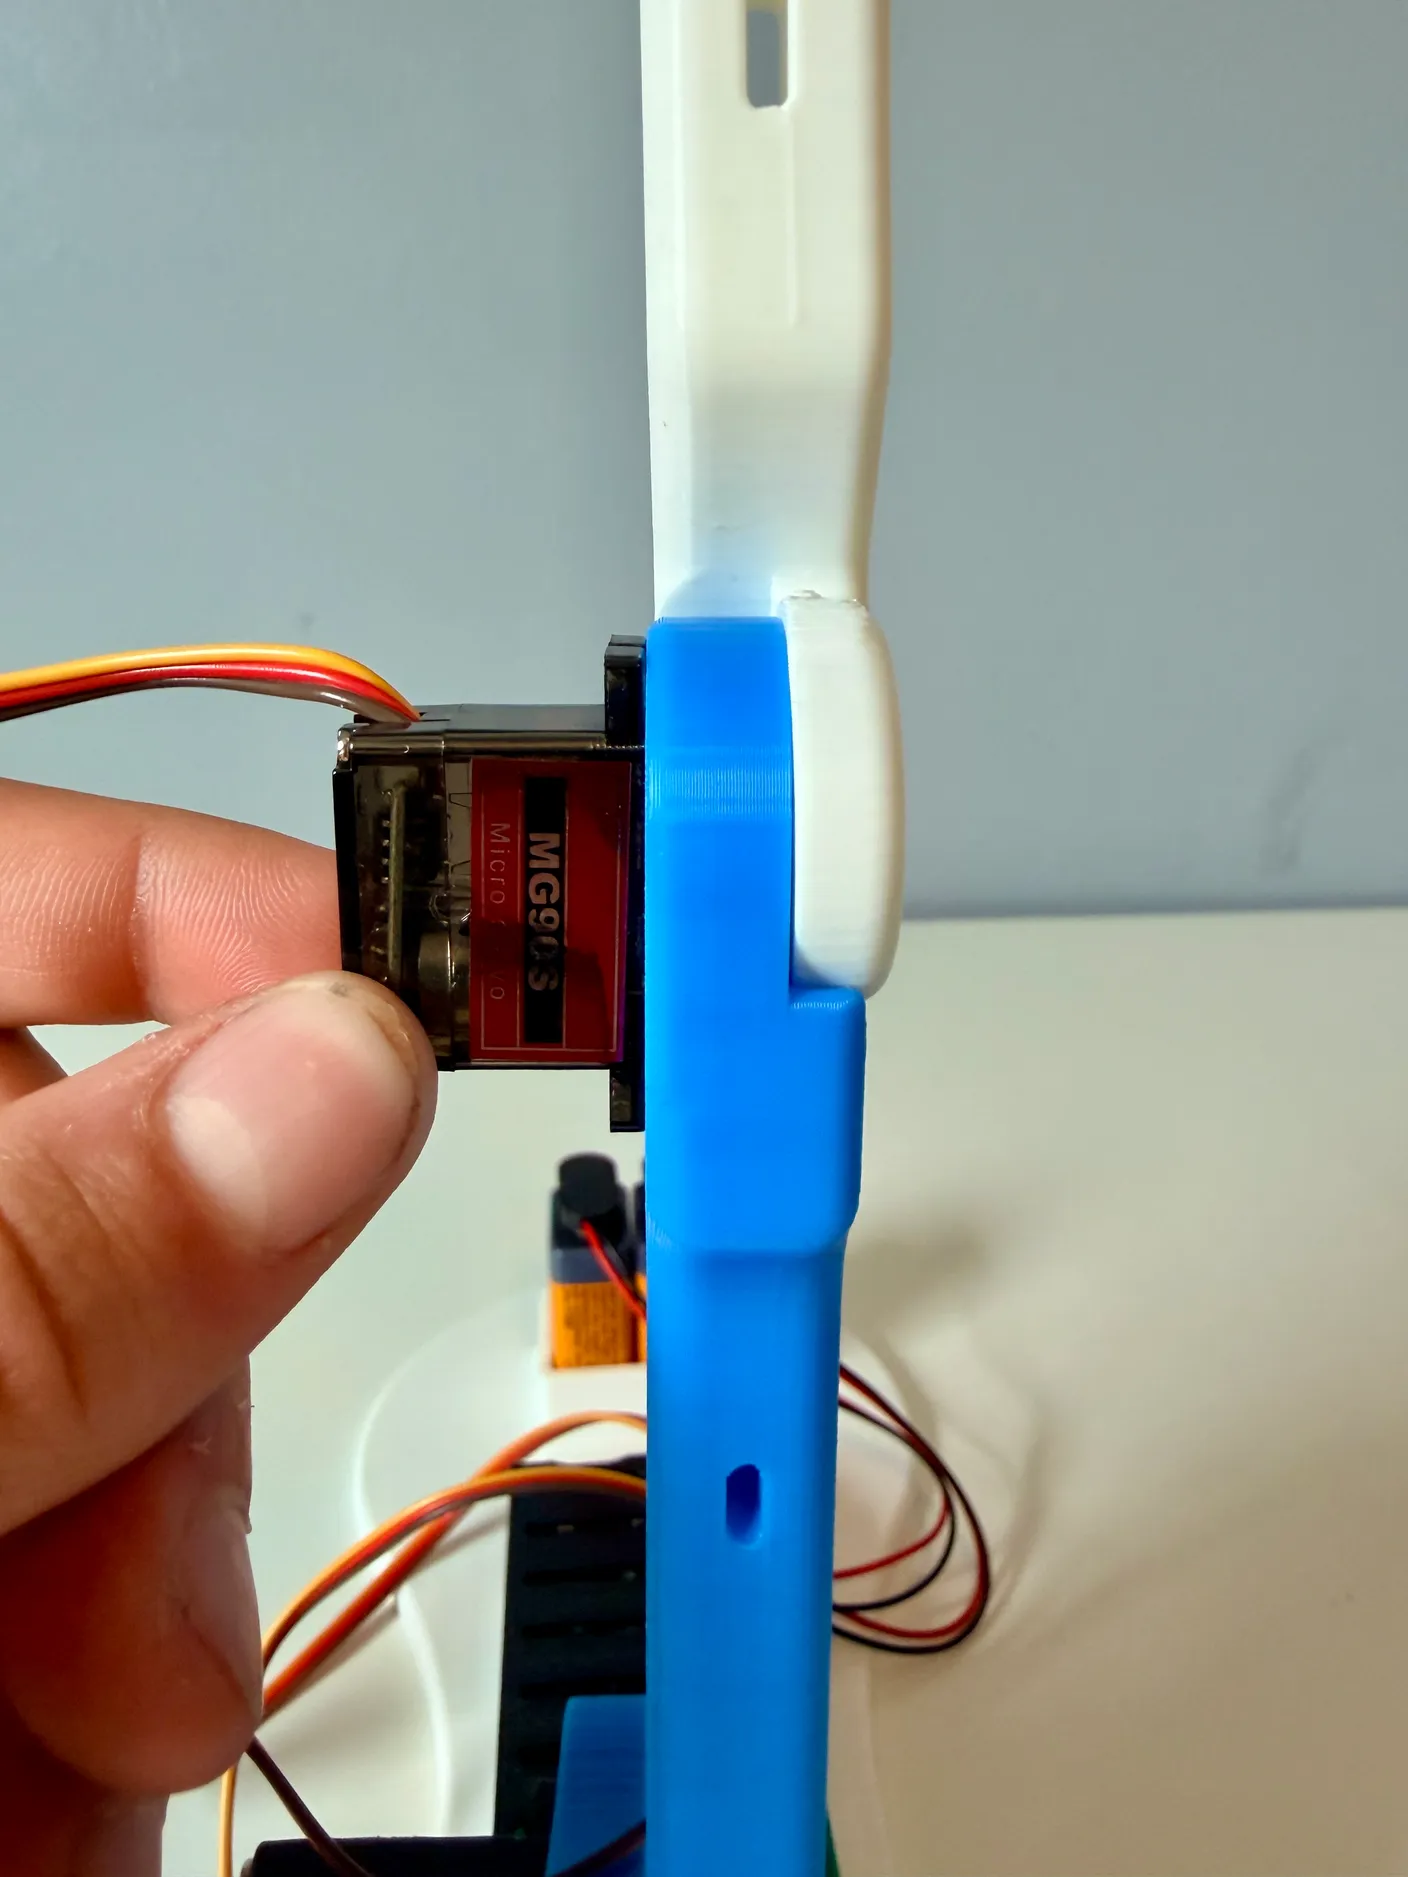
Now get another small servo, and put it in place, as shown above. Ensure the wire on the servo is facing up (that’s the correct orientation). You may still need to hold the servo and the elbow joint together until you screw it in.
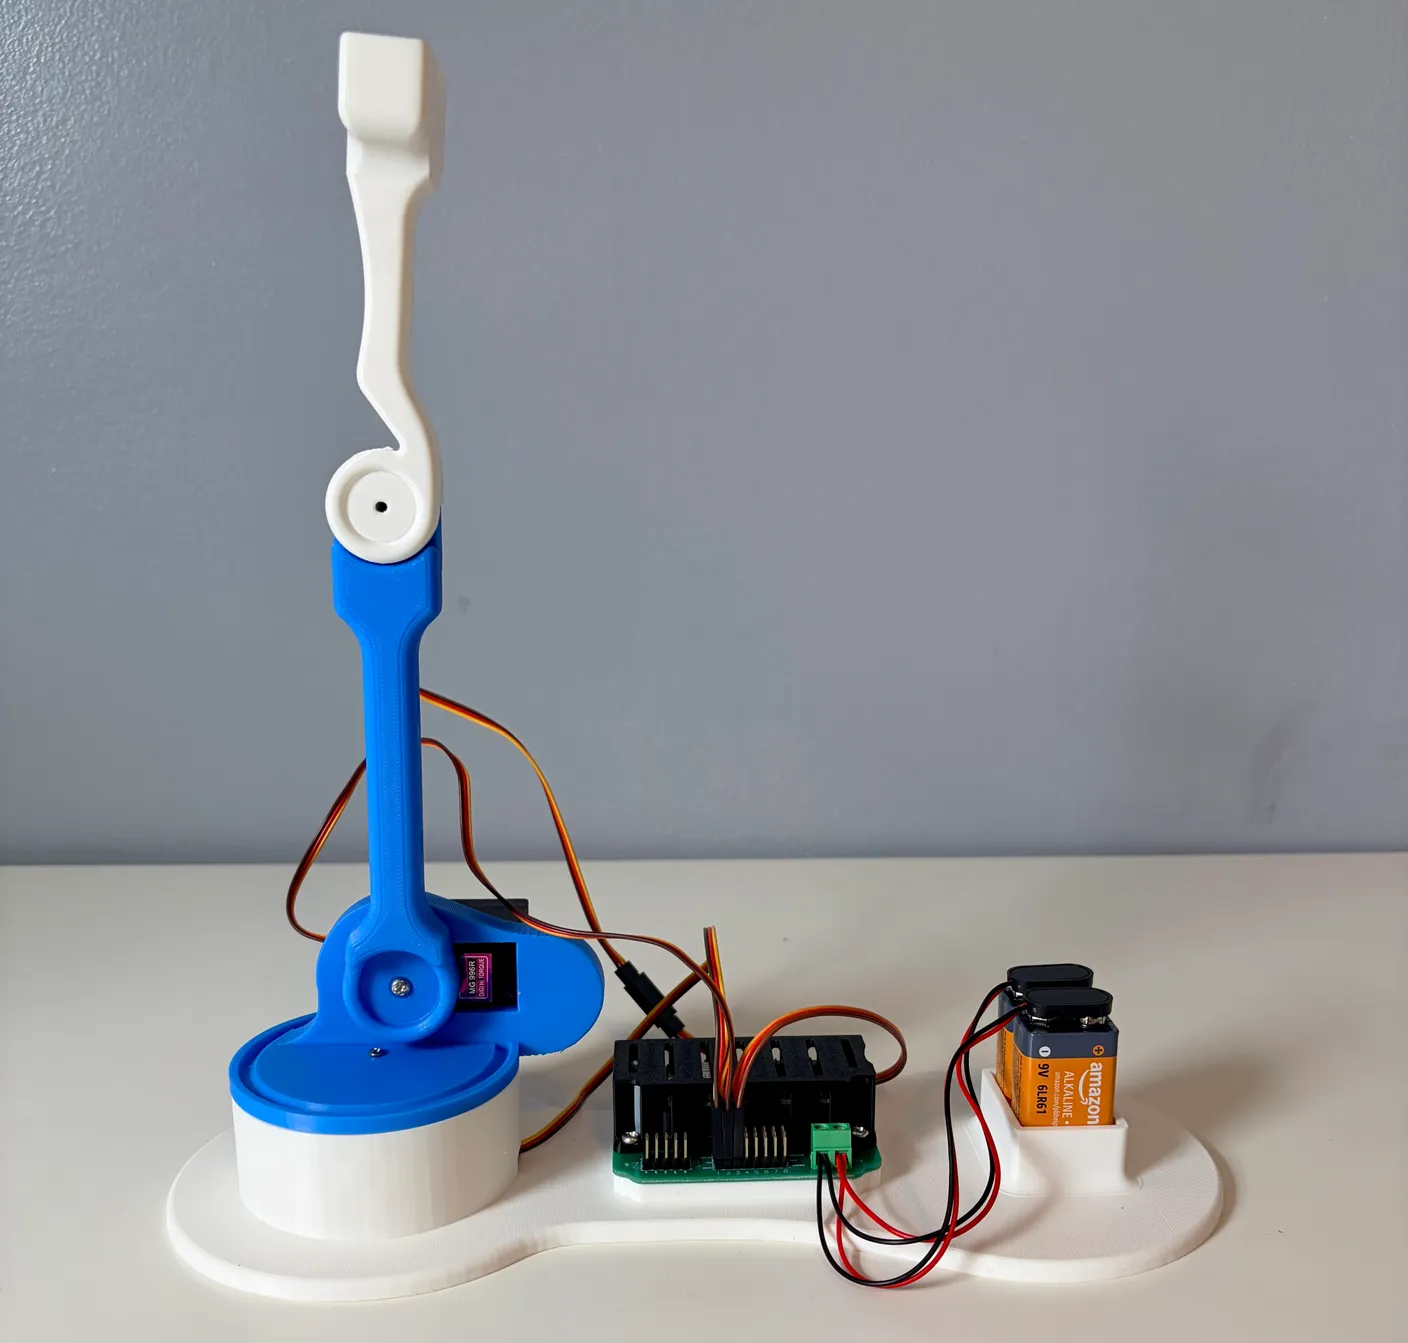
Make sure this arm is also pointing straight up. This is how the robot is meant to be built, so it works correctly when you use it.
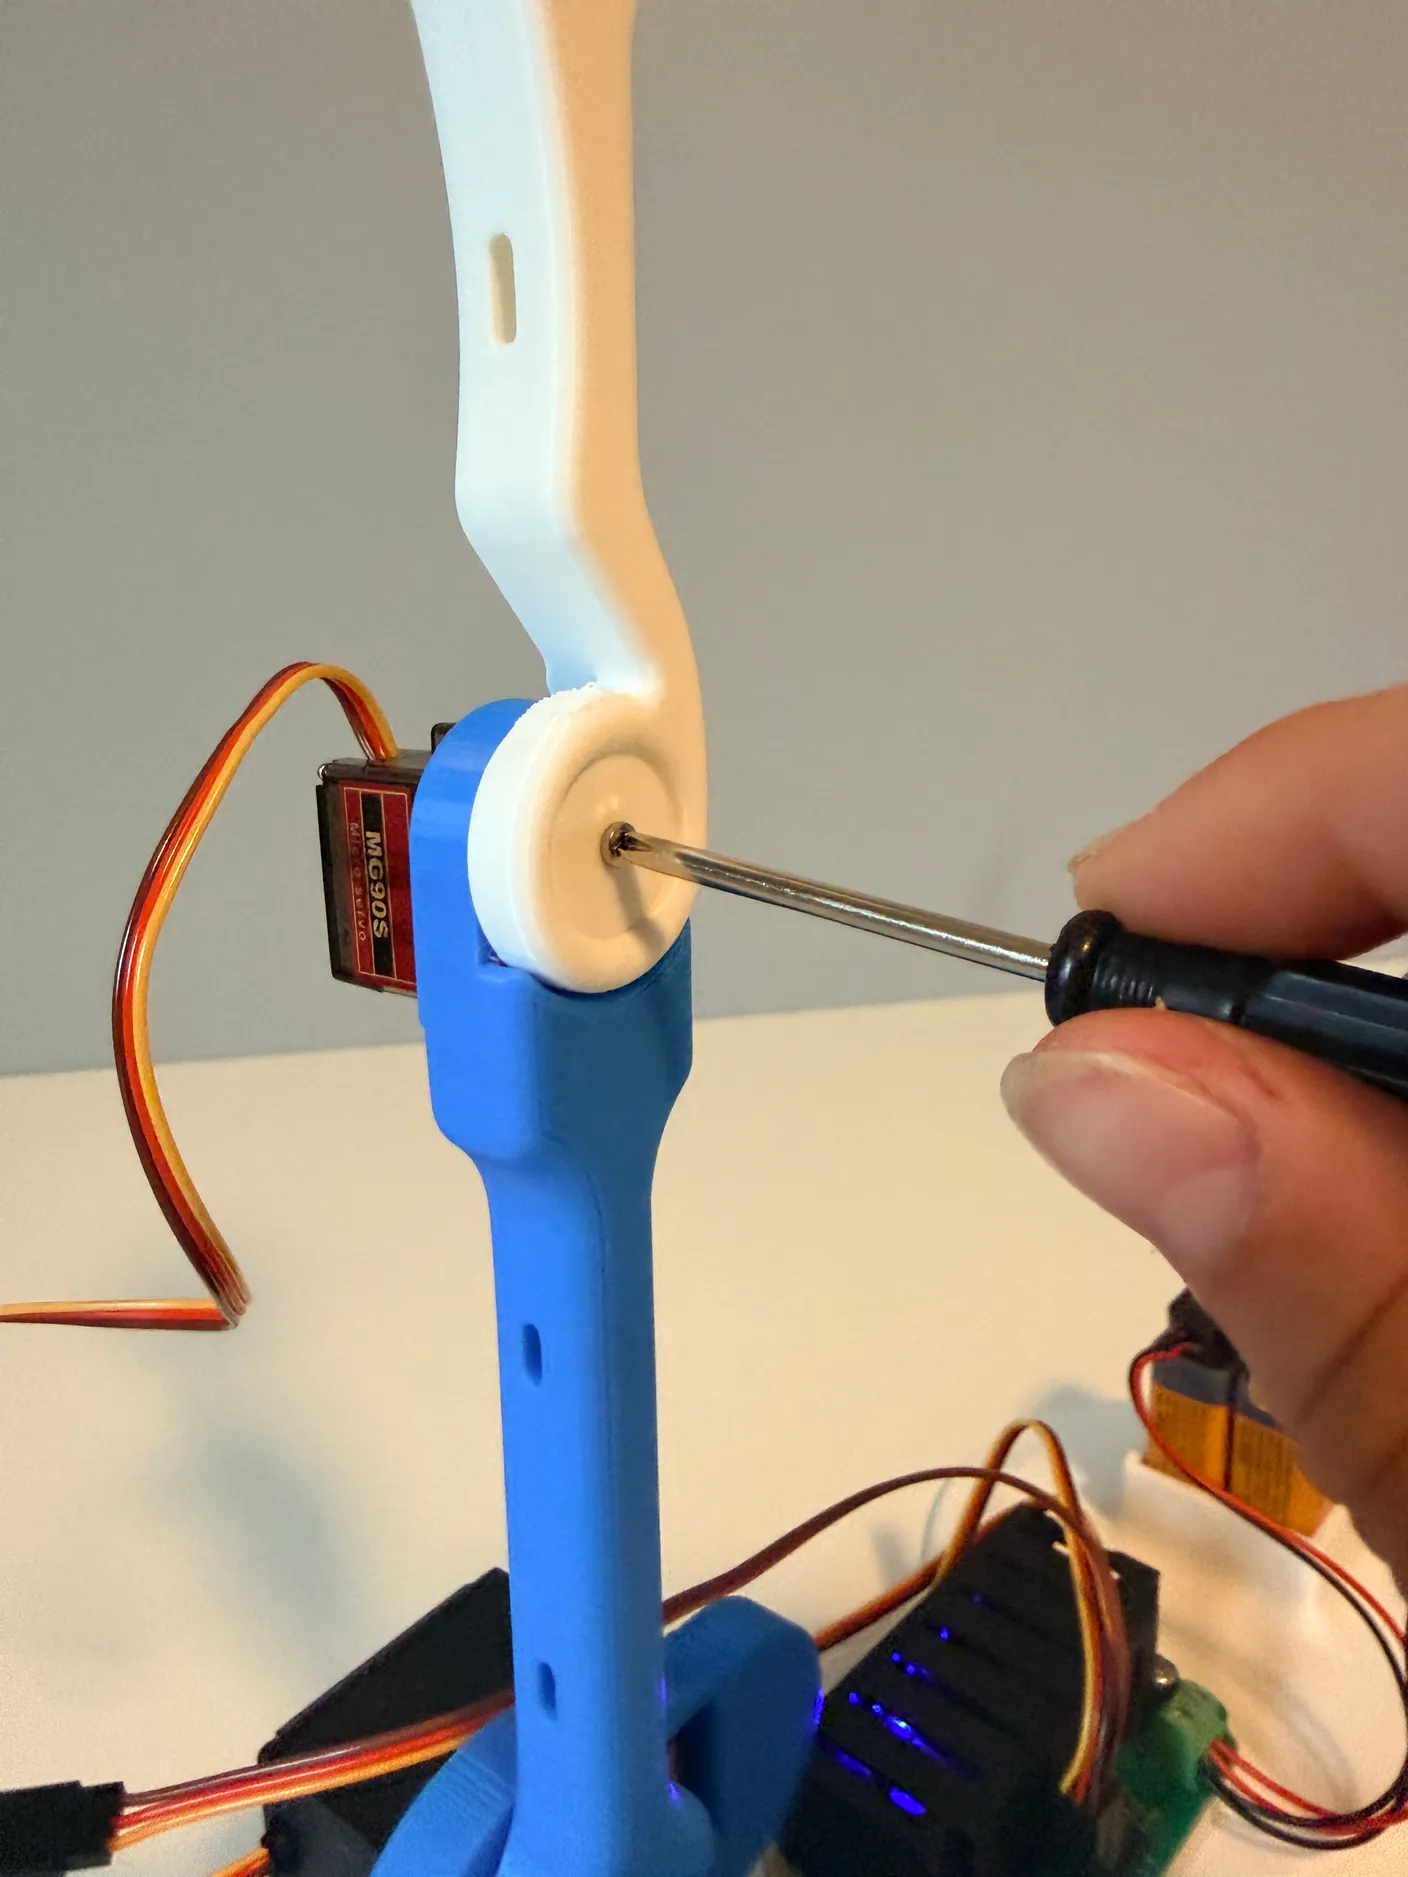
1× Servo Screw
Once the arm points straight up, use another small screw from the servo bag to tighten it in place — again, screw it as tight as you can.
If your arm is shaking back and forth, don’t stress — this is normal. During this setup step, it keeps trying to correct itself to stay perfectly centered for building. If it bugs you, gently center it by hand so it stays still.
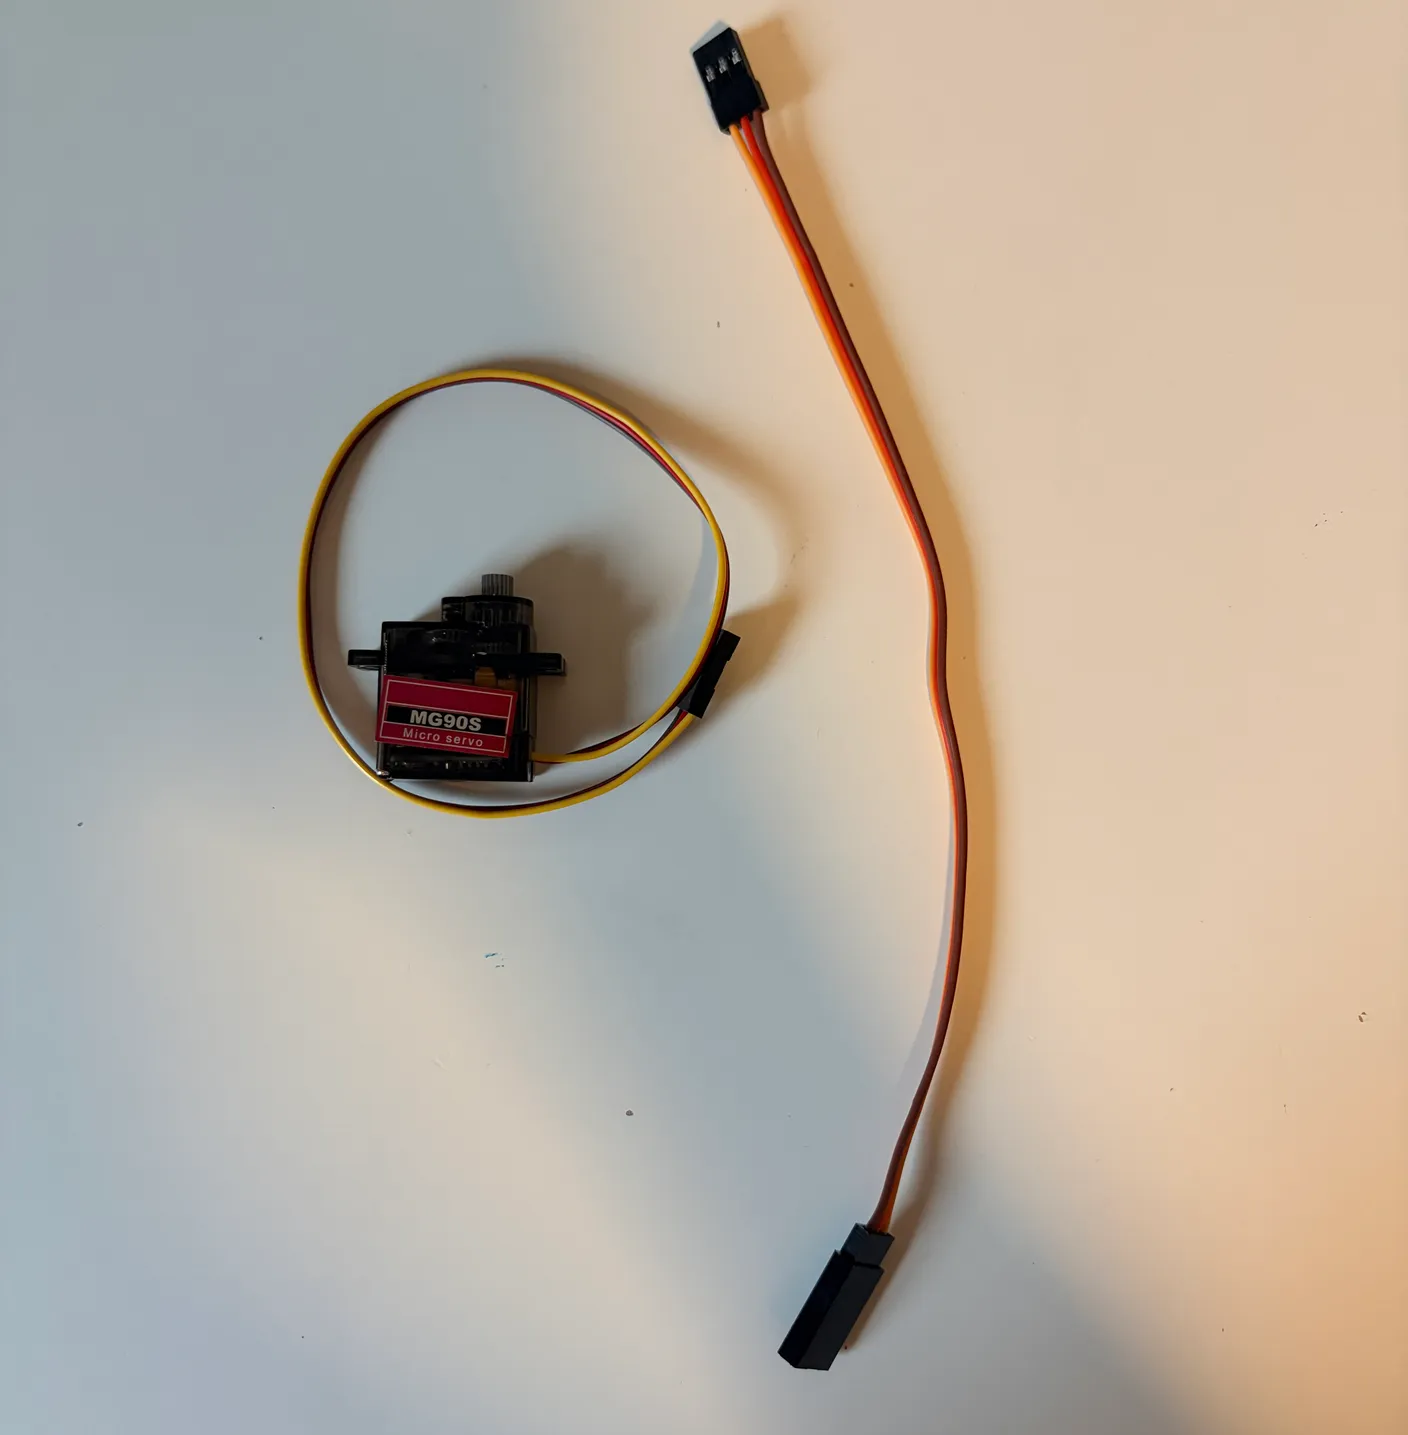
Now get another servo and servo wire extender.
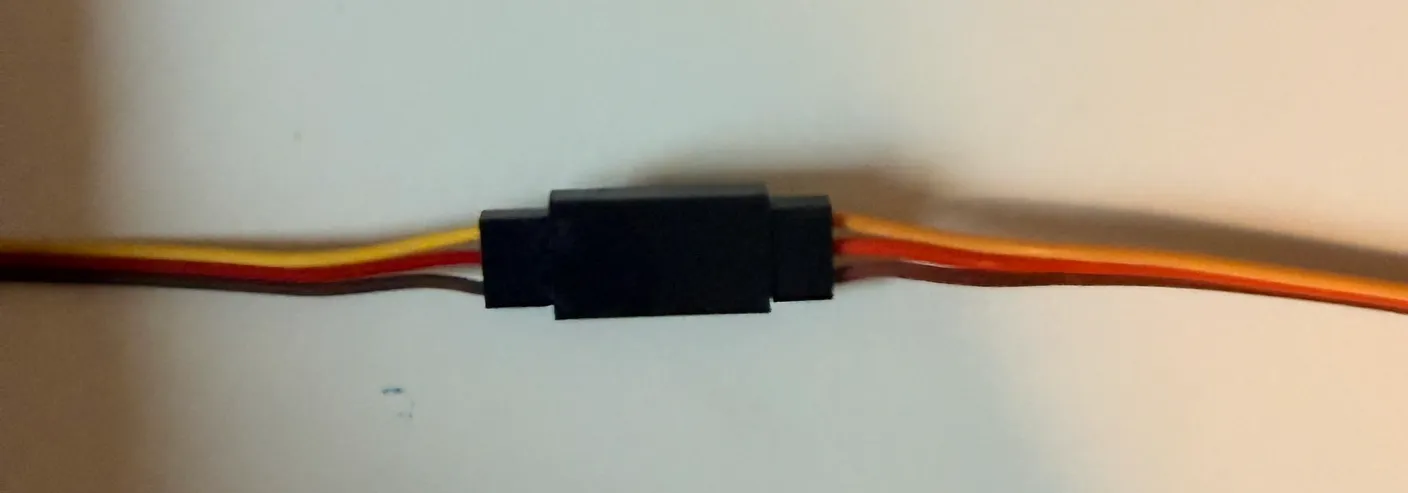
Connect the wire extender to the servo wire the same way as before, making sure the colors match up.
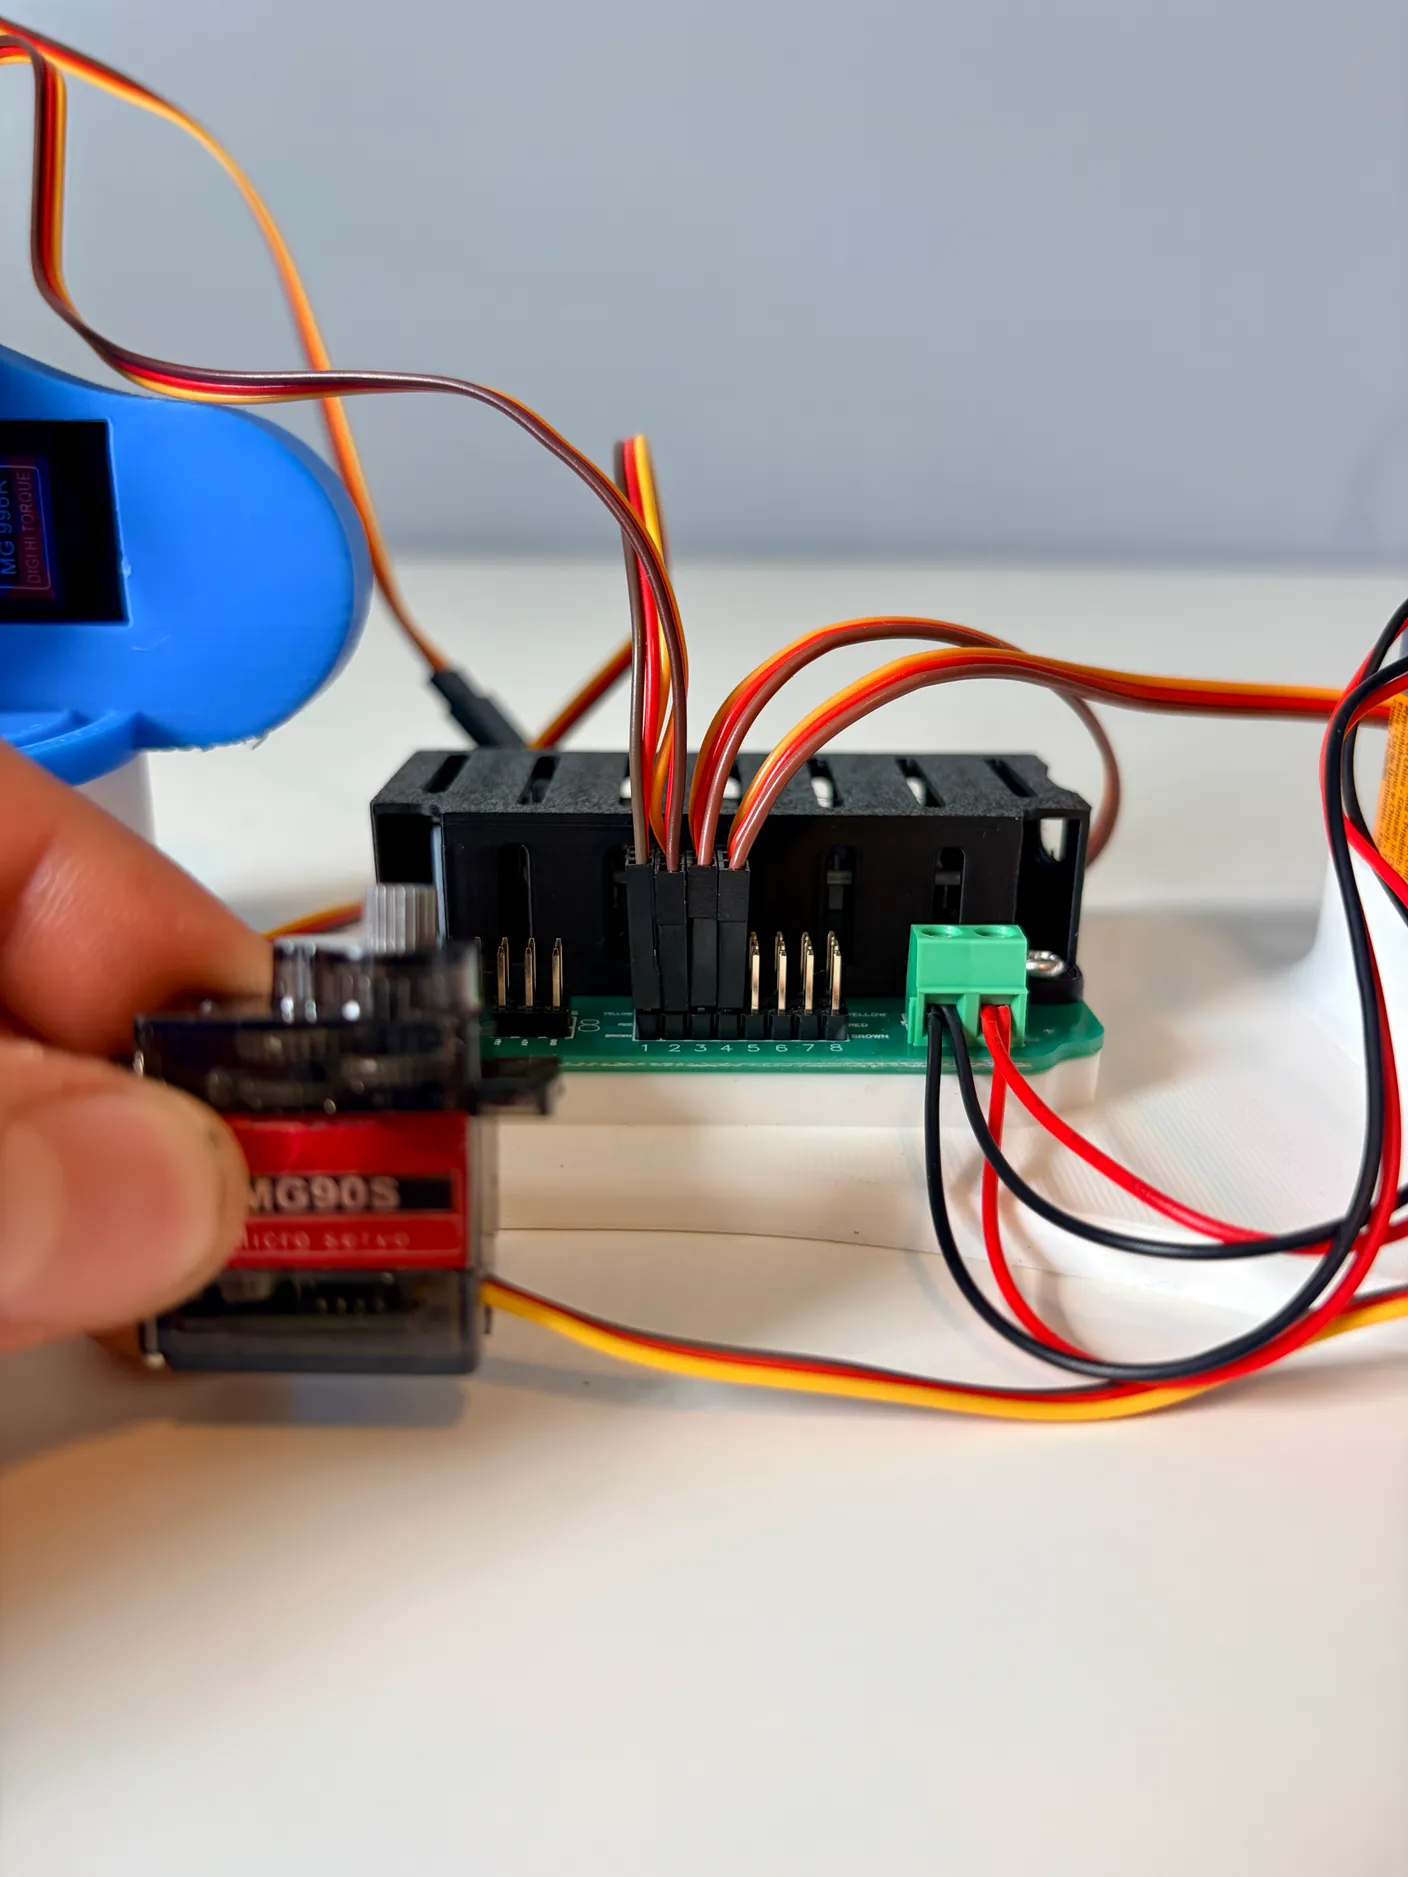
Now plug that servo into the circuit board, in column 4. (Remember the color orientation rule!)
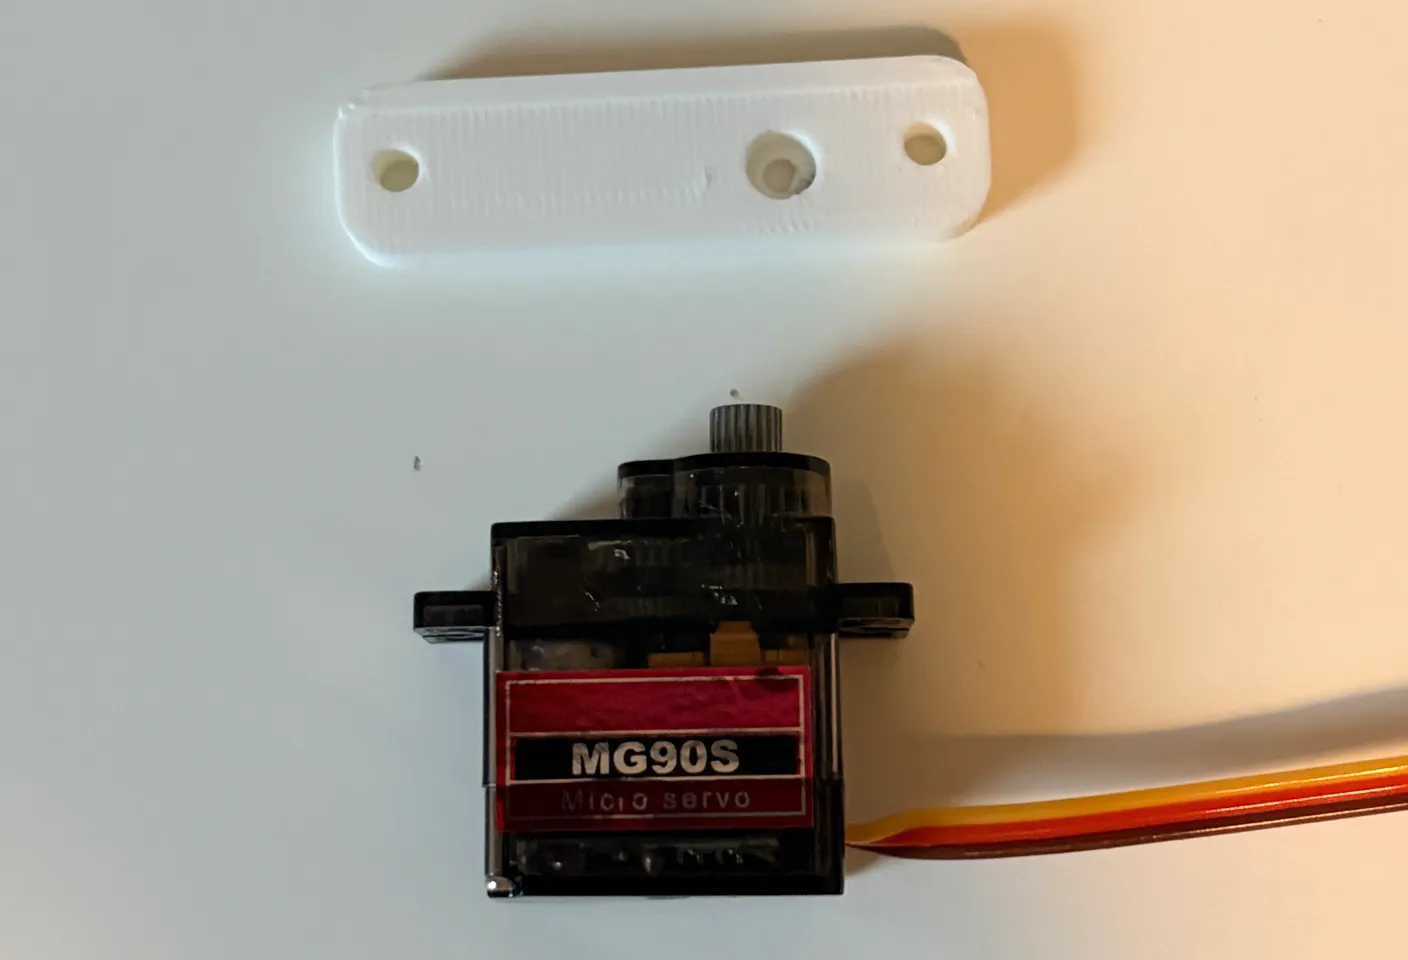
Lay the servo down as shown, get the small rectangle piece, and position it the same way as in the image.
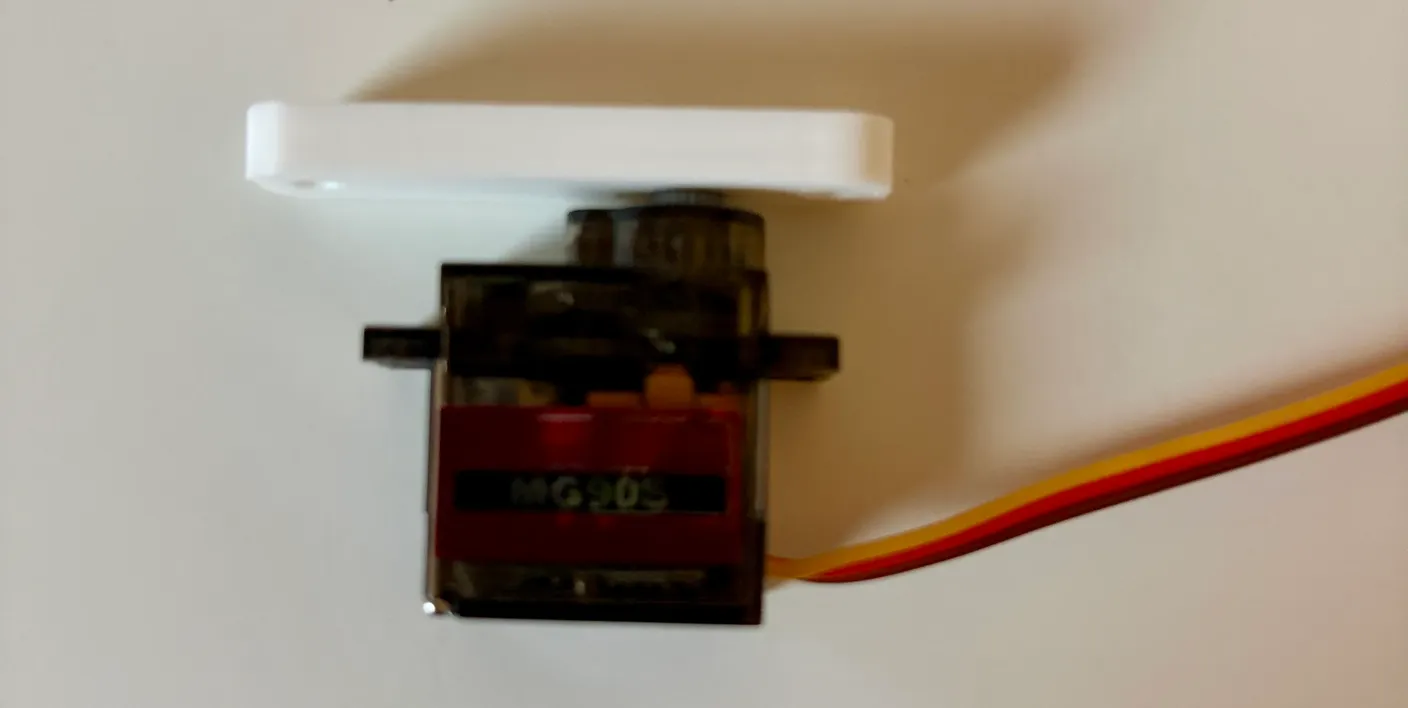
Now flip it up and attach it to the servo, so it looks like the image above.
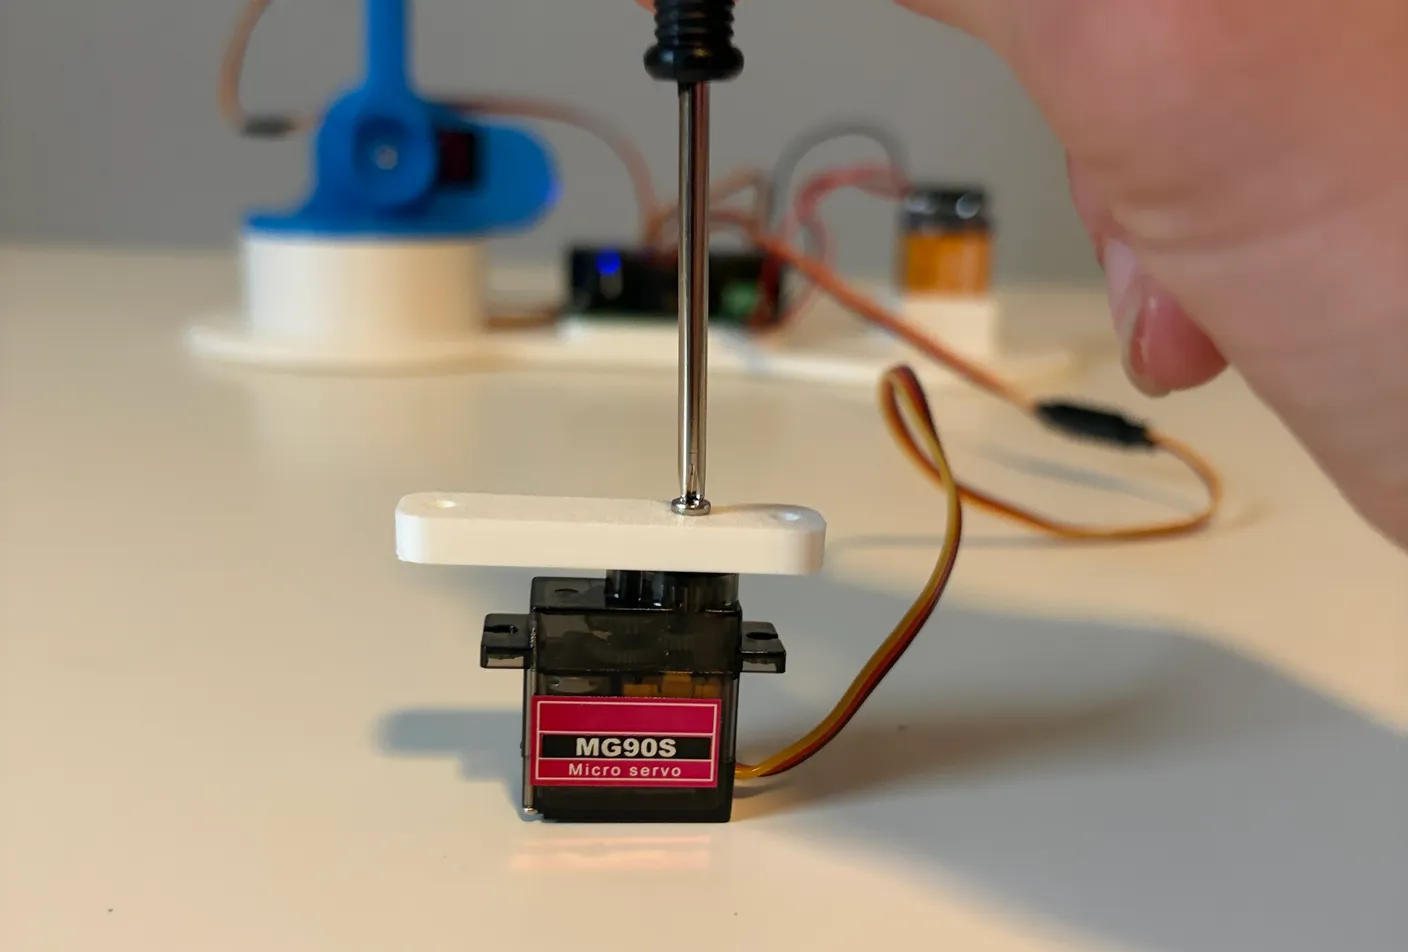
1× Servo Screw
Once it’s in place, use another small screw from the servo screw bags to tighten it — again, screw it tight.
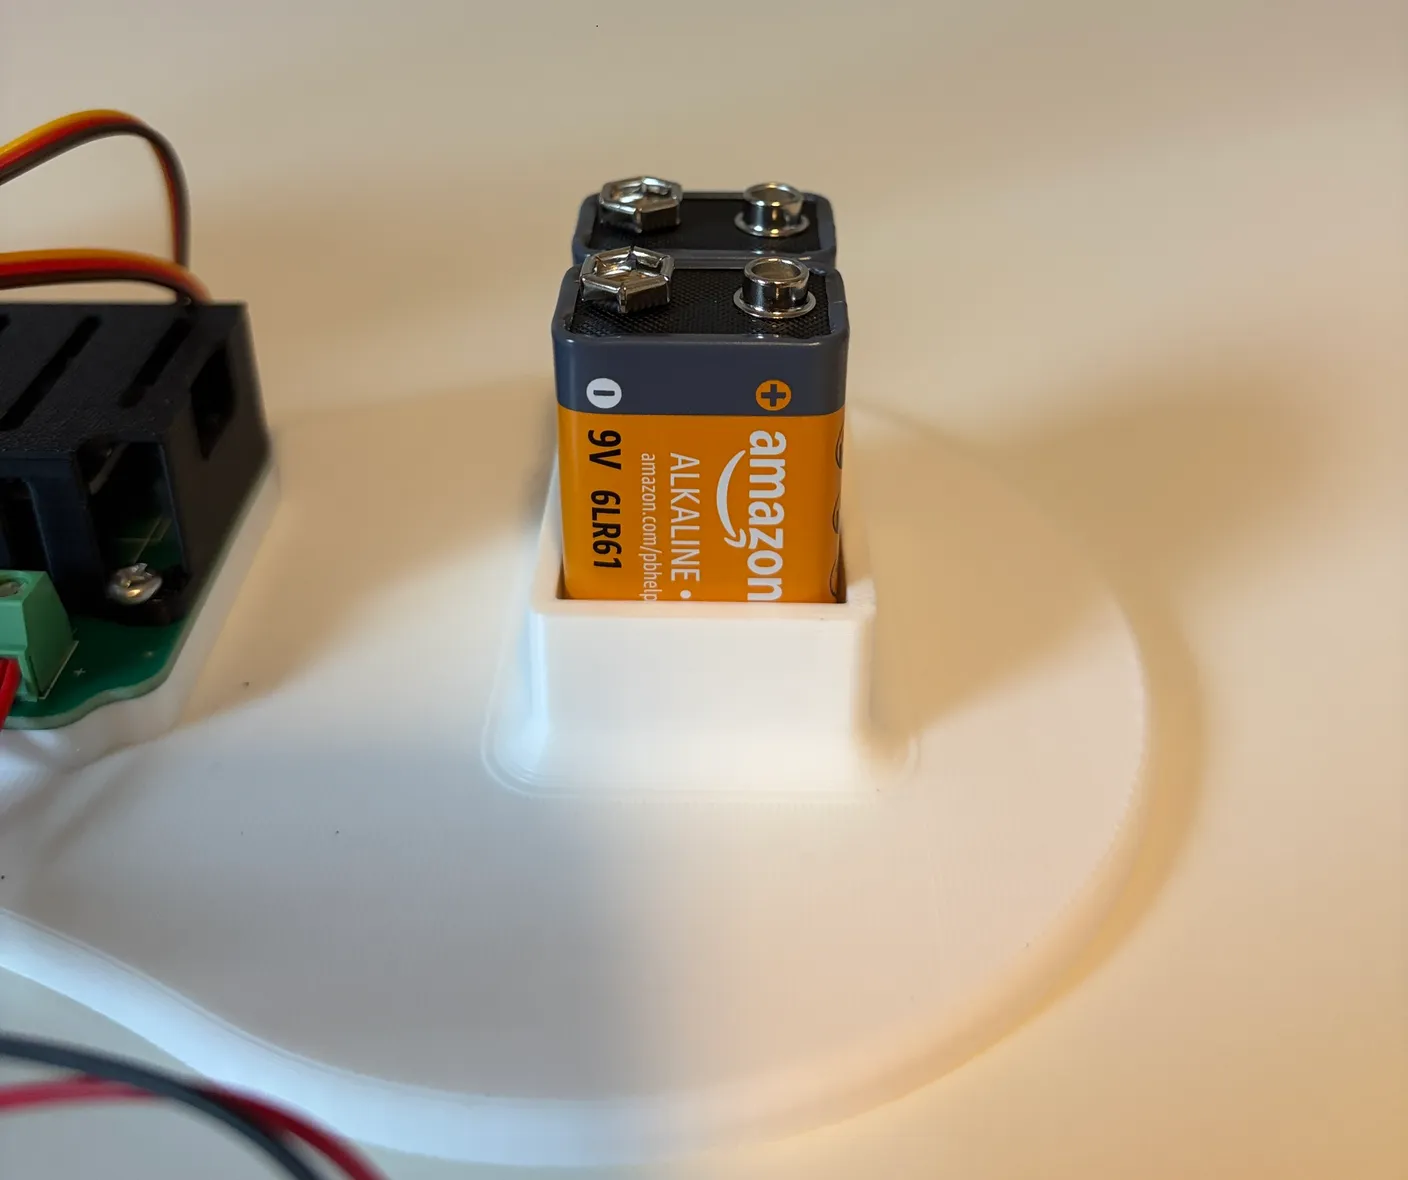
Now unplug the batteries — the robot doesn’t need power again until it’s finished.
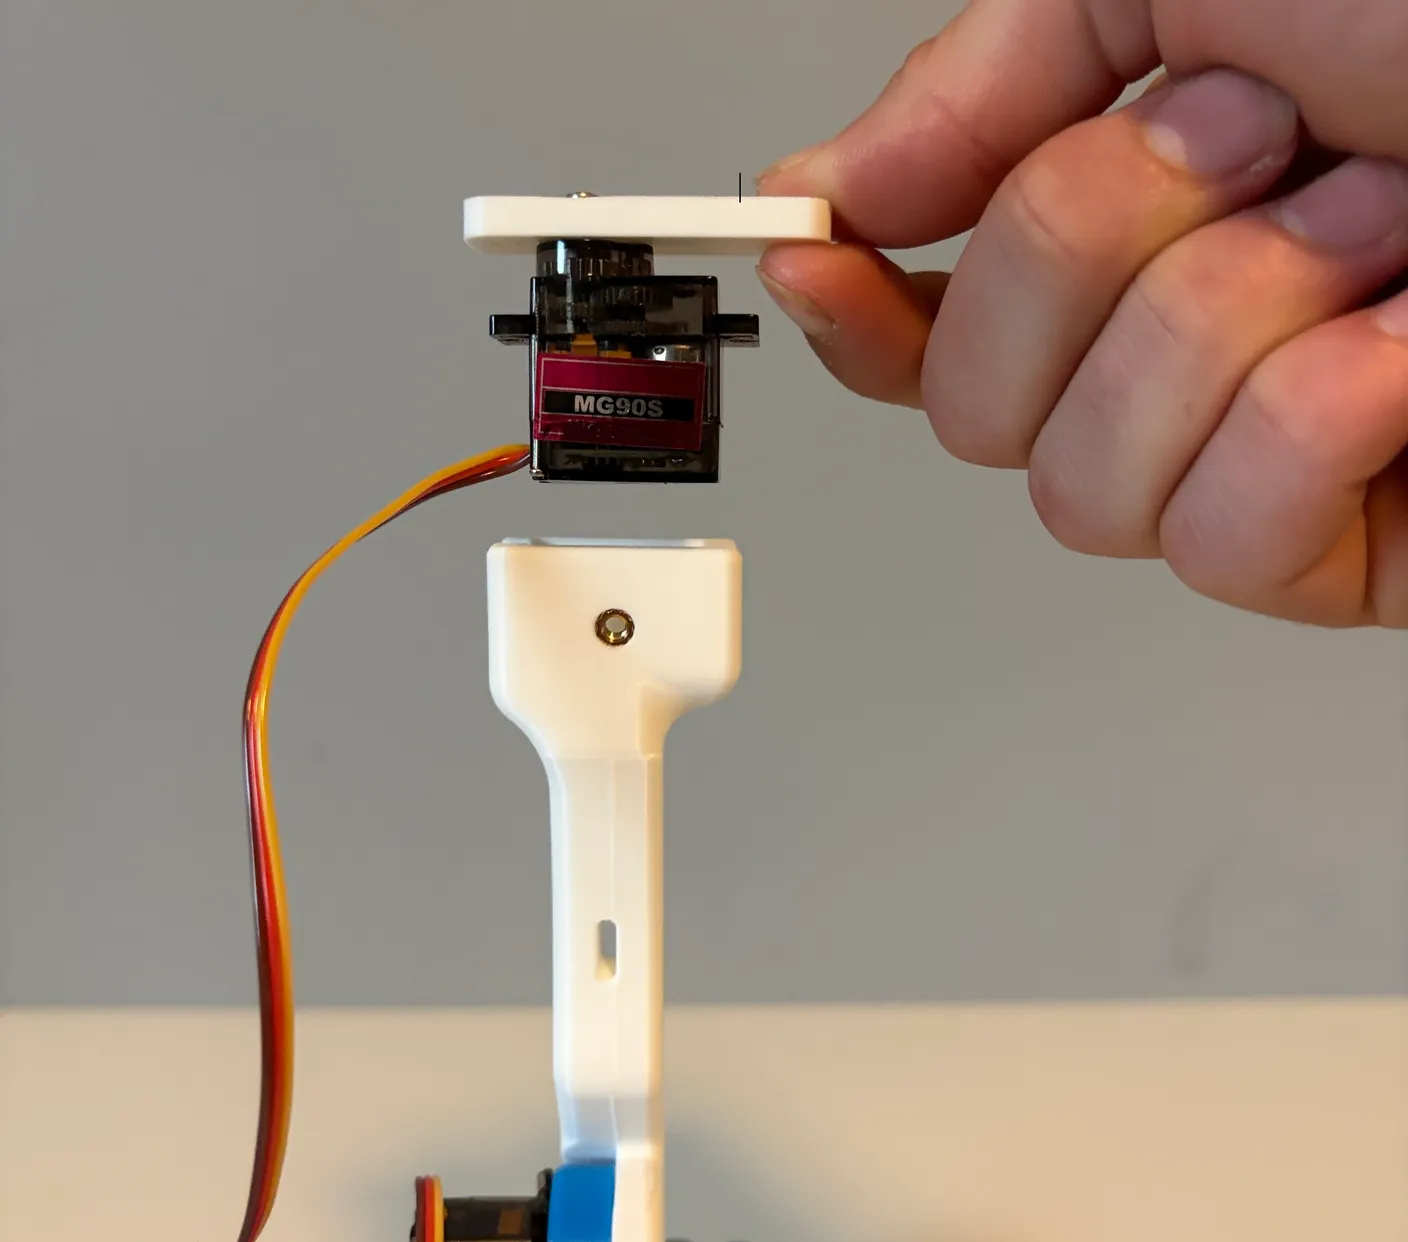
Now orient the servo as shown above.
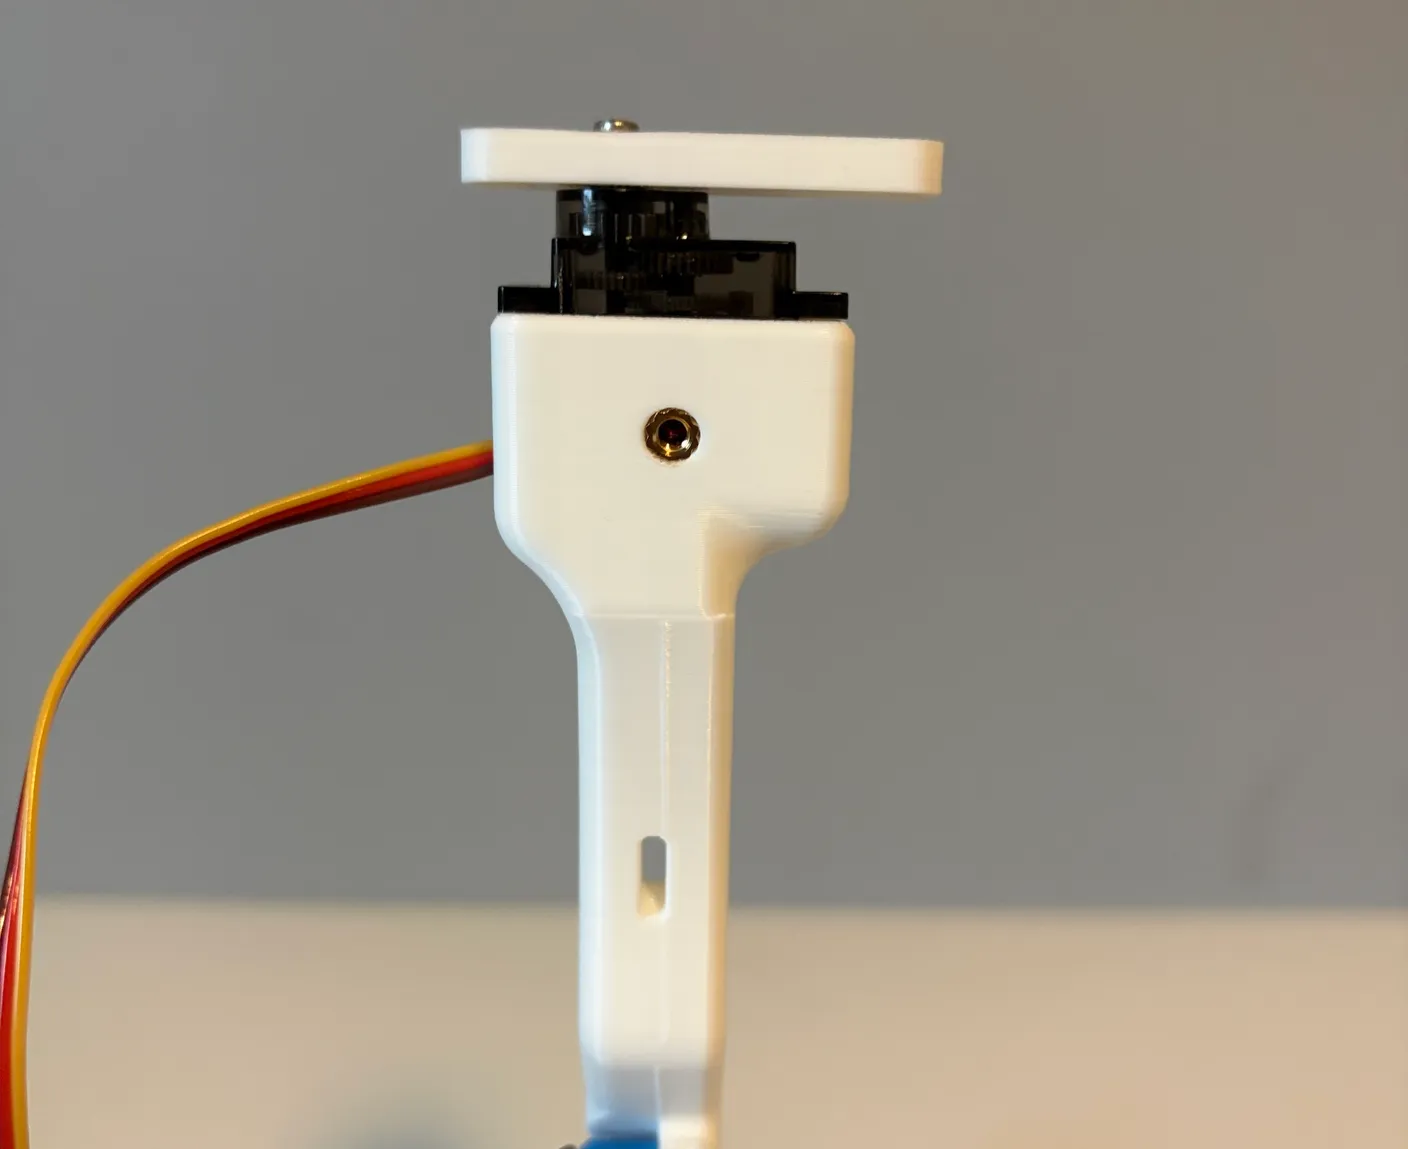
Gently slide it down into its spot, being careful not to move the rest of the robot.
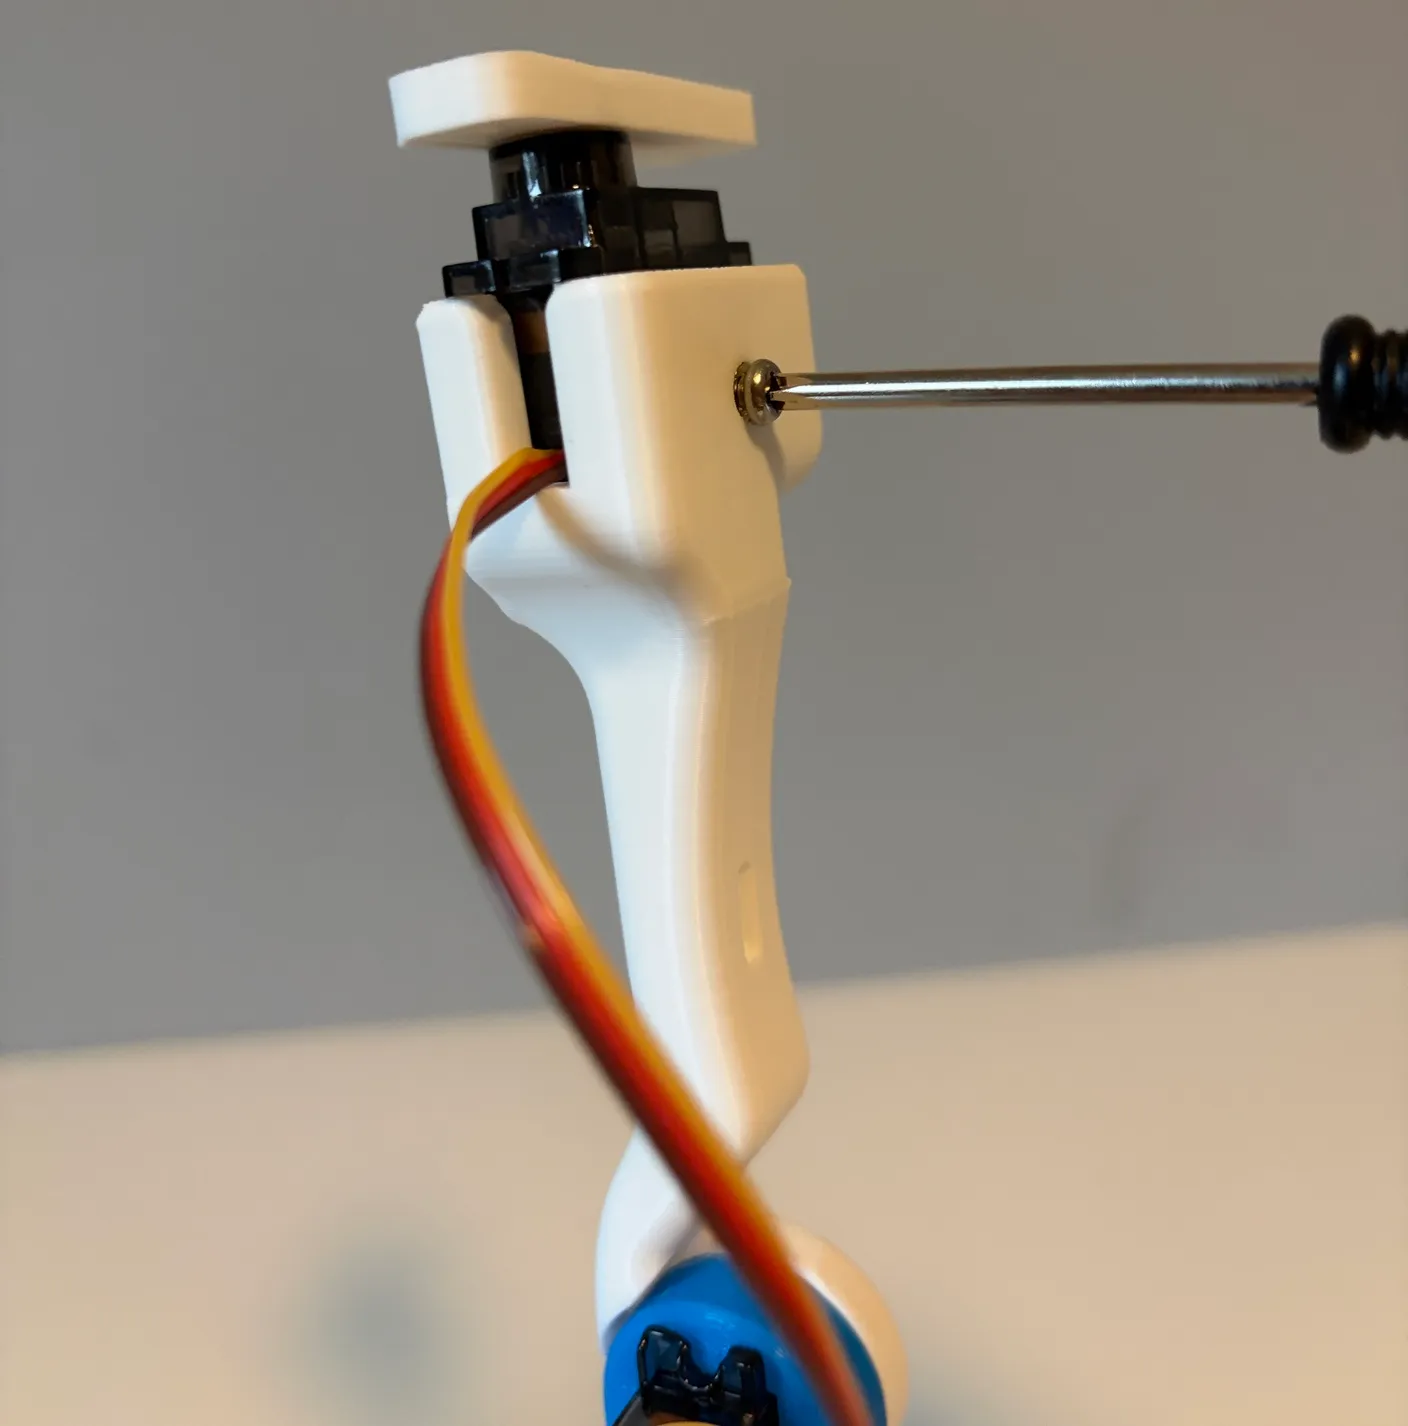
1× 6mm screw
Use a 6mm screw to lock the servo in place, as shown above. This screw should NOT be tight — just snug enough to keep the servo from moving. Screwing it too tight will break the servo. Just screw it until you feel it touch the servo — the friction keeps the servo in place.
Attach the Gripper
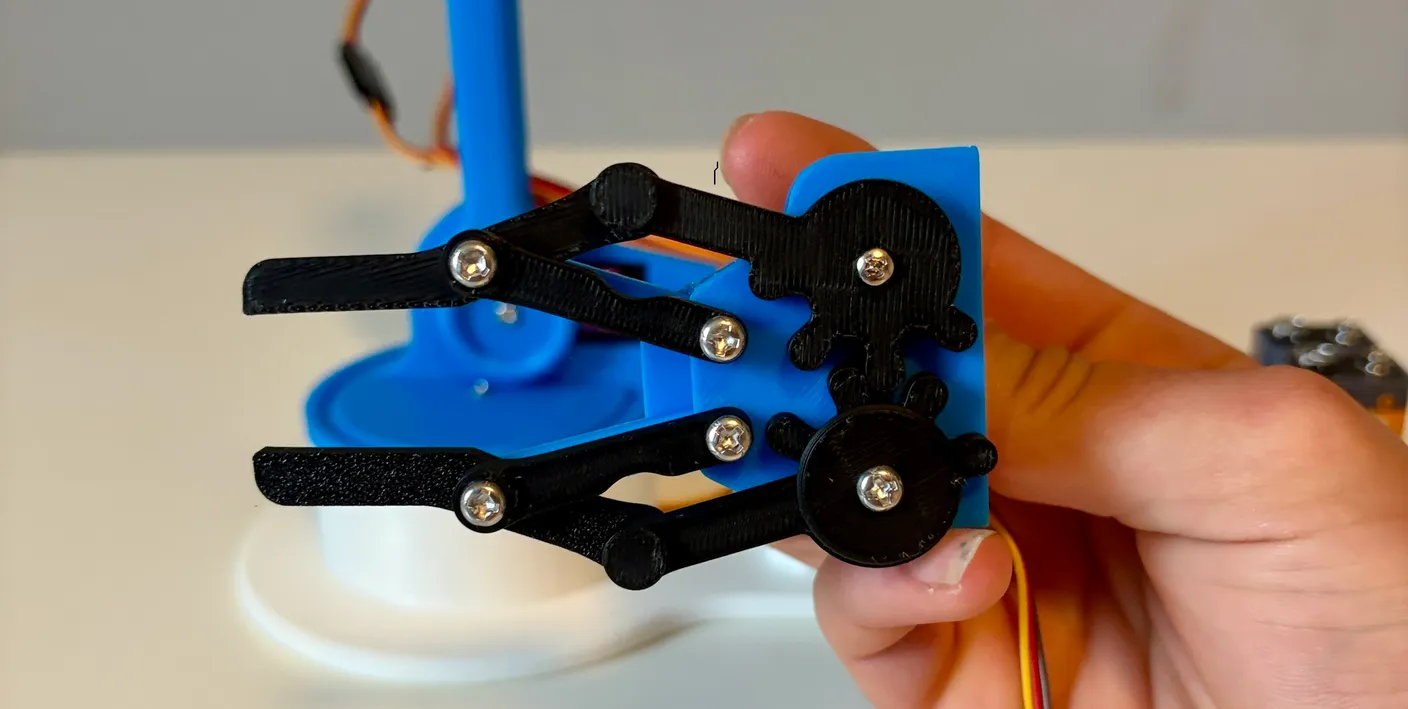
Now it’s time to attach the gripper to your robotic arm — the part that interacts with the world!
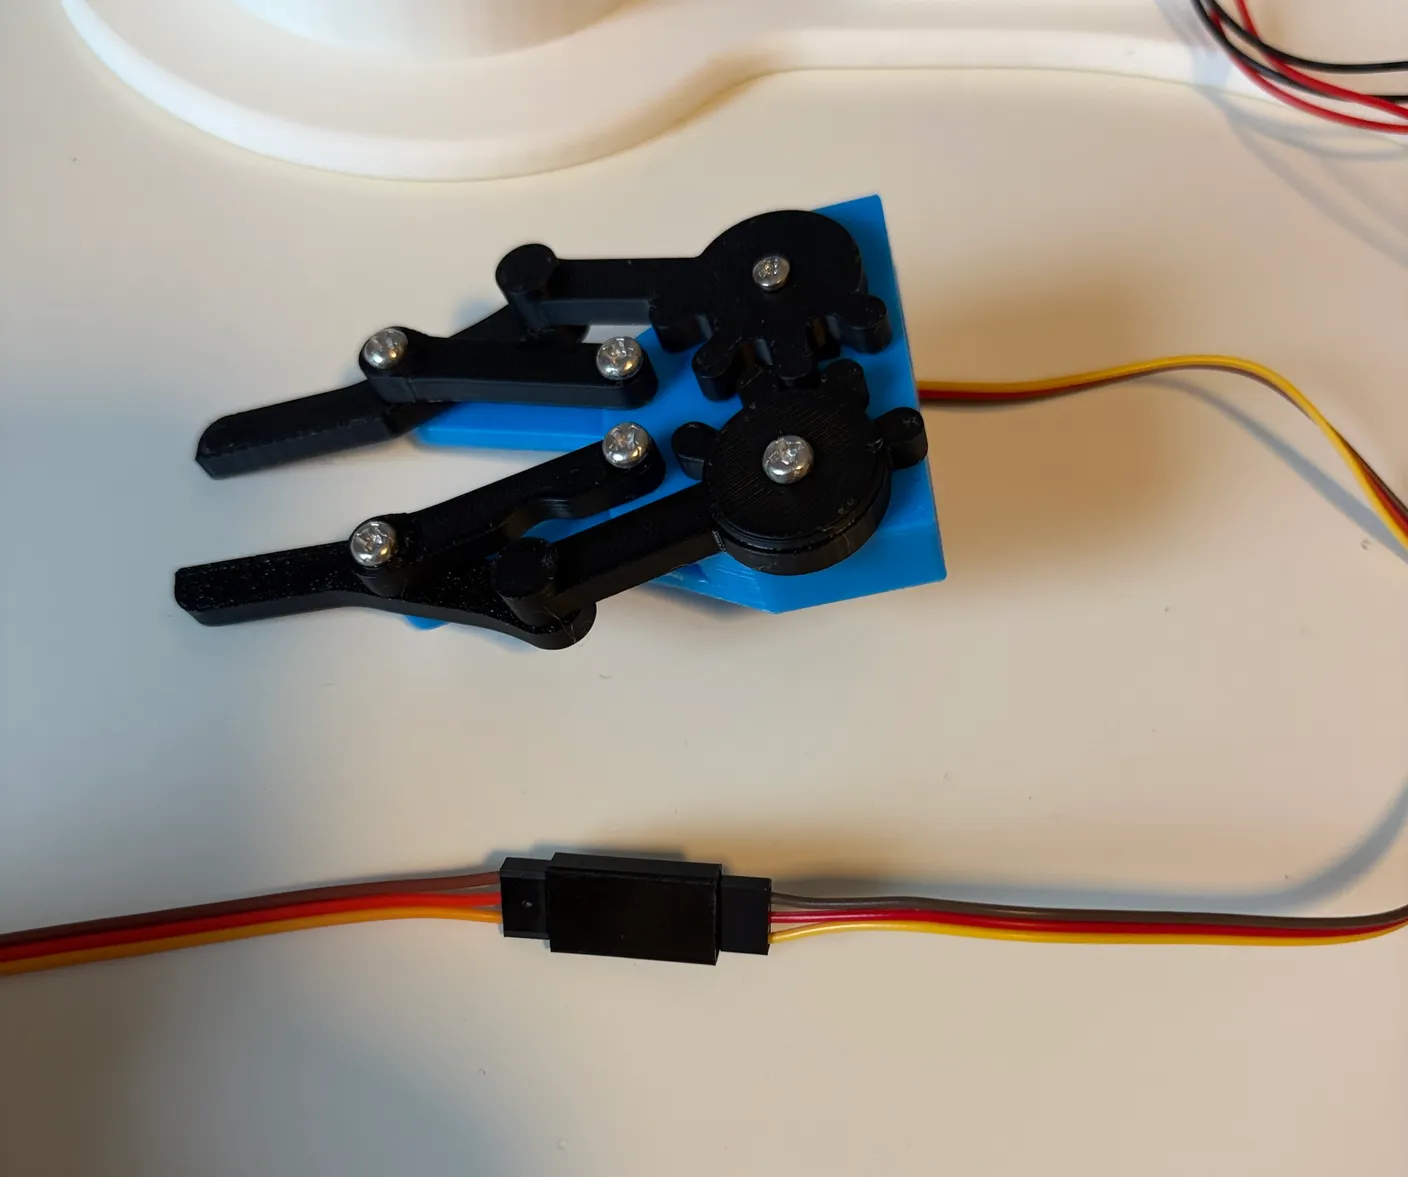
Start by connecting the gripper’s servo wire to a servo wire extender, the same way as before. Make sure the colors match!
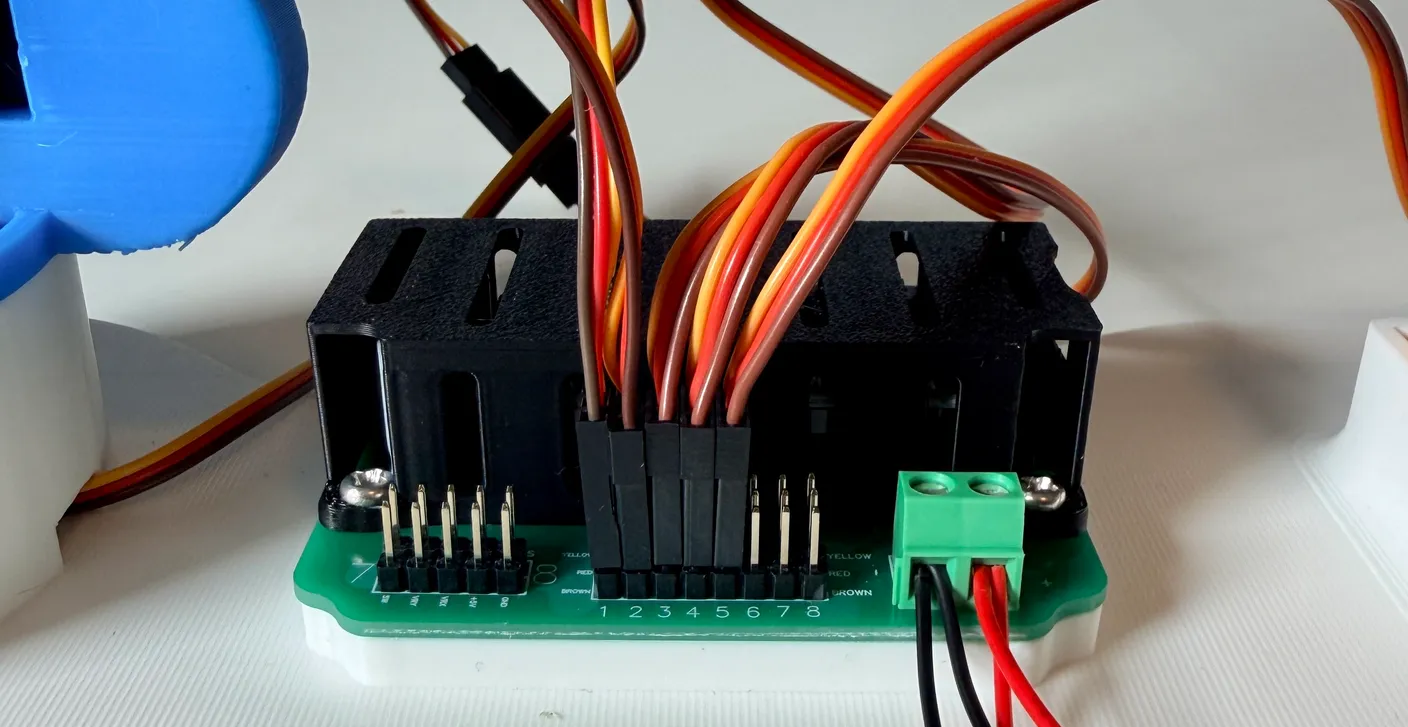
Now plug it into column 5, keeping the same color orientation as the other wires.
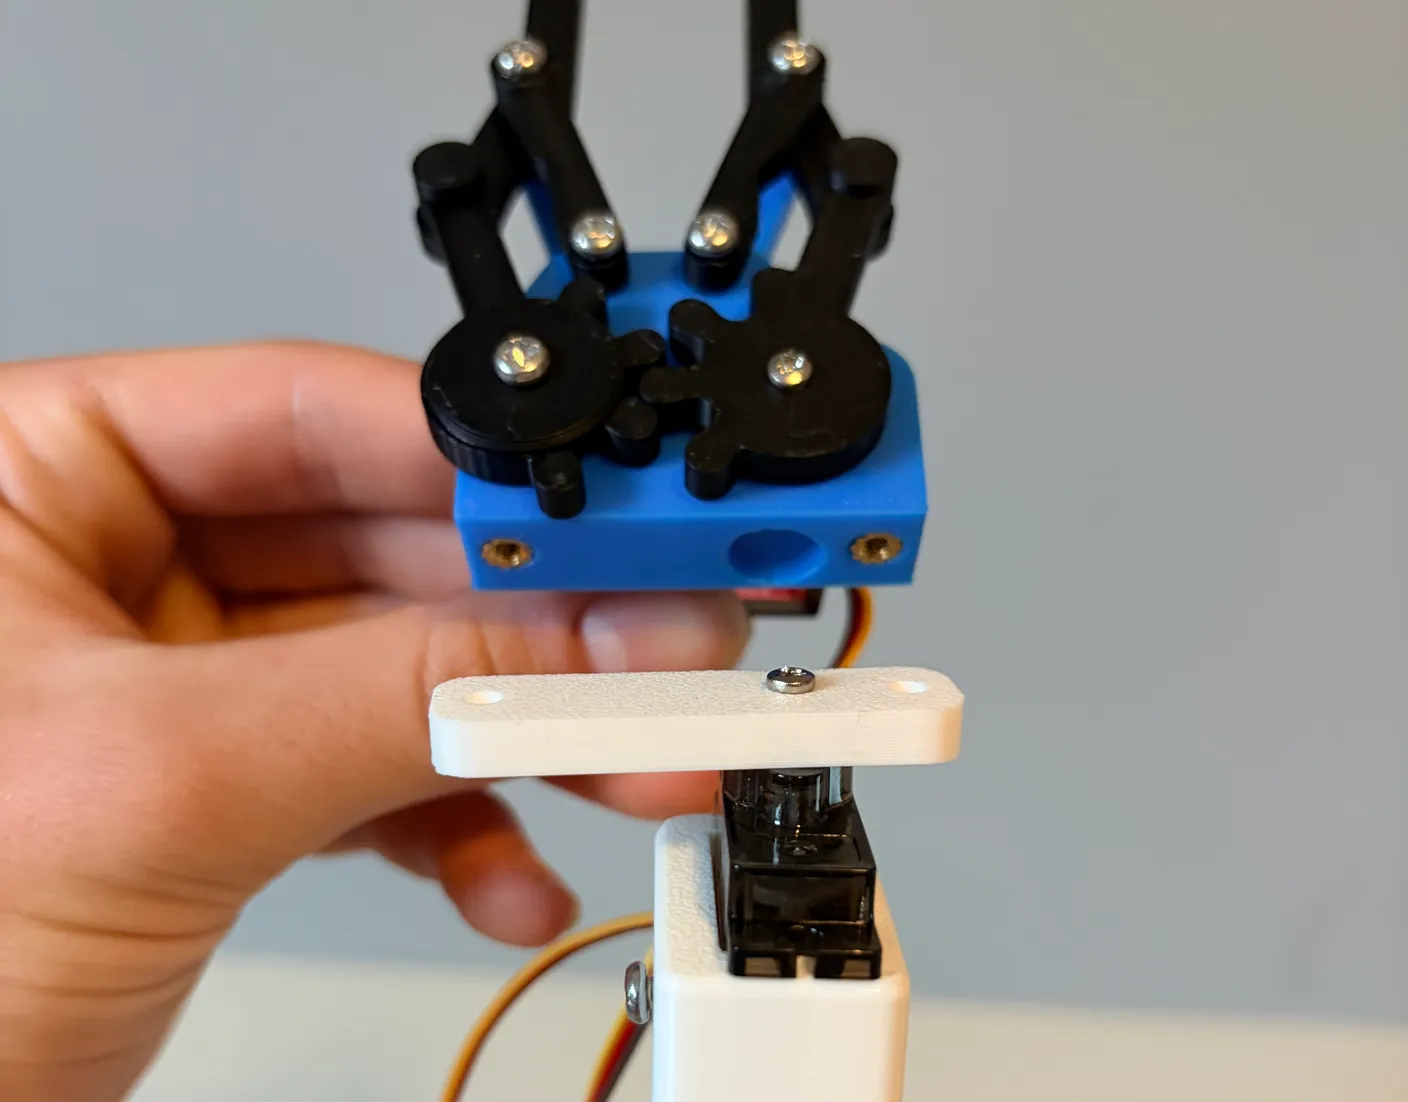
First, gently rotate the white bar by hand into the position shown above (we know we told you not to do this earlier, but for this step it’s fine). If the servo does not move easily and smoothly — read the note below, do NOT try to force it!
Servo doesn’t turn
If the bar does not move gently, don’t worry — this is common. Sometimes these servos do not like to be moved manually, which is why we recommend not moving them manually. If it gets stuck, do not force it. Simply plug the robot back in, and plug this servo’s wire into pin 8 (remembering the correct color orientation) — your servo will move into place. This is a failsafe we implemented in case it does not want to turn on its own. So if it cooperates and gently turns, you don’t have to do this step. Once it’s turned, unplug the robot again and plug the servo wire back into its original spot, number 4.
Line the gripper up with the top of the robot as it’s shown above. There’s a small hole on the gripper that aligns with the screw on the “wrist” servo it attaches to.
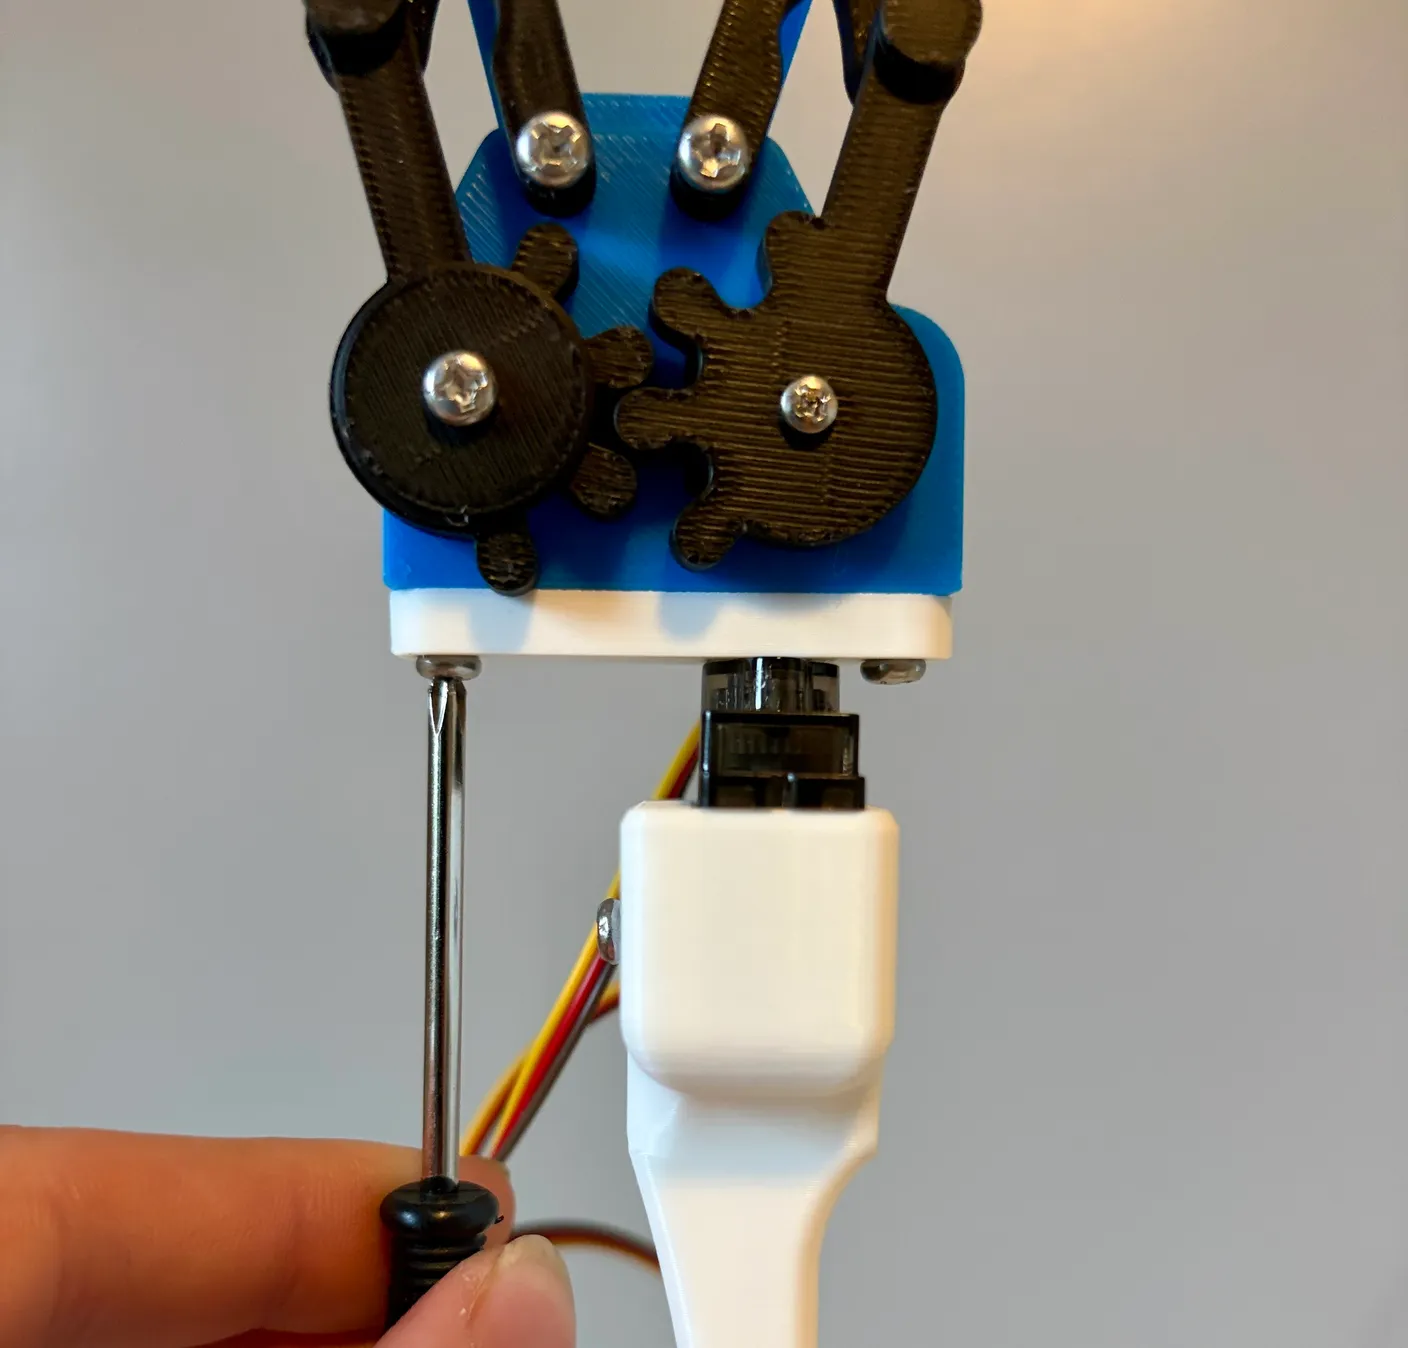
2× 10mm screws
Now use two 10mm screws to attach the gripper to the wrist servo. Screw them tight, but they don’t need to be over-tight.
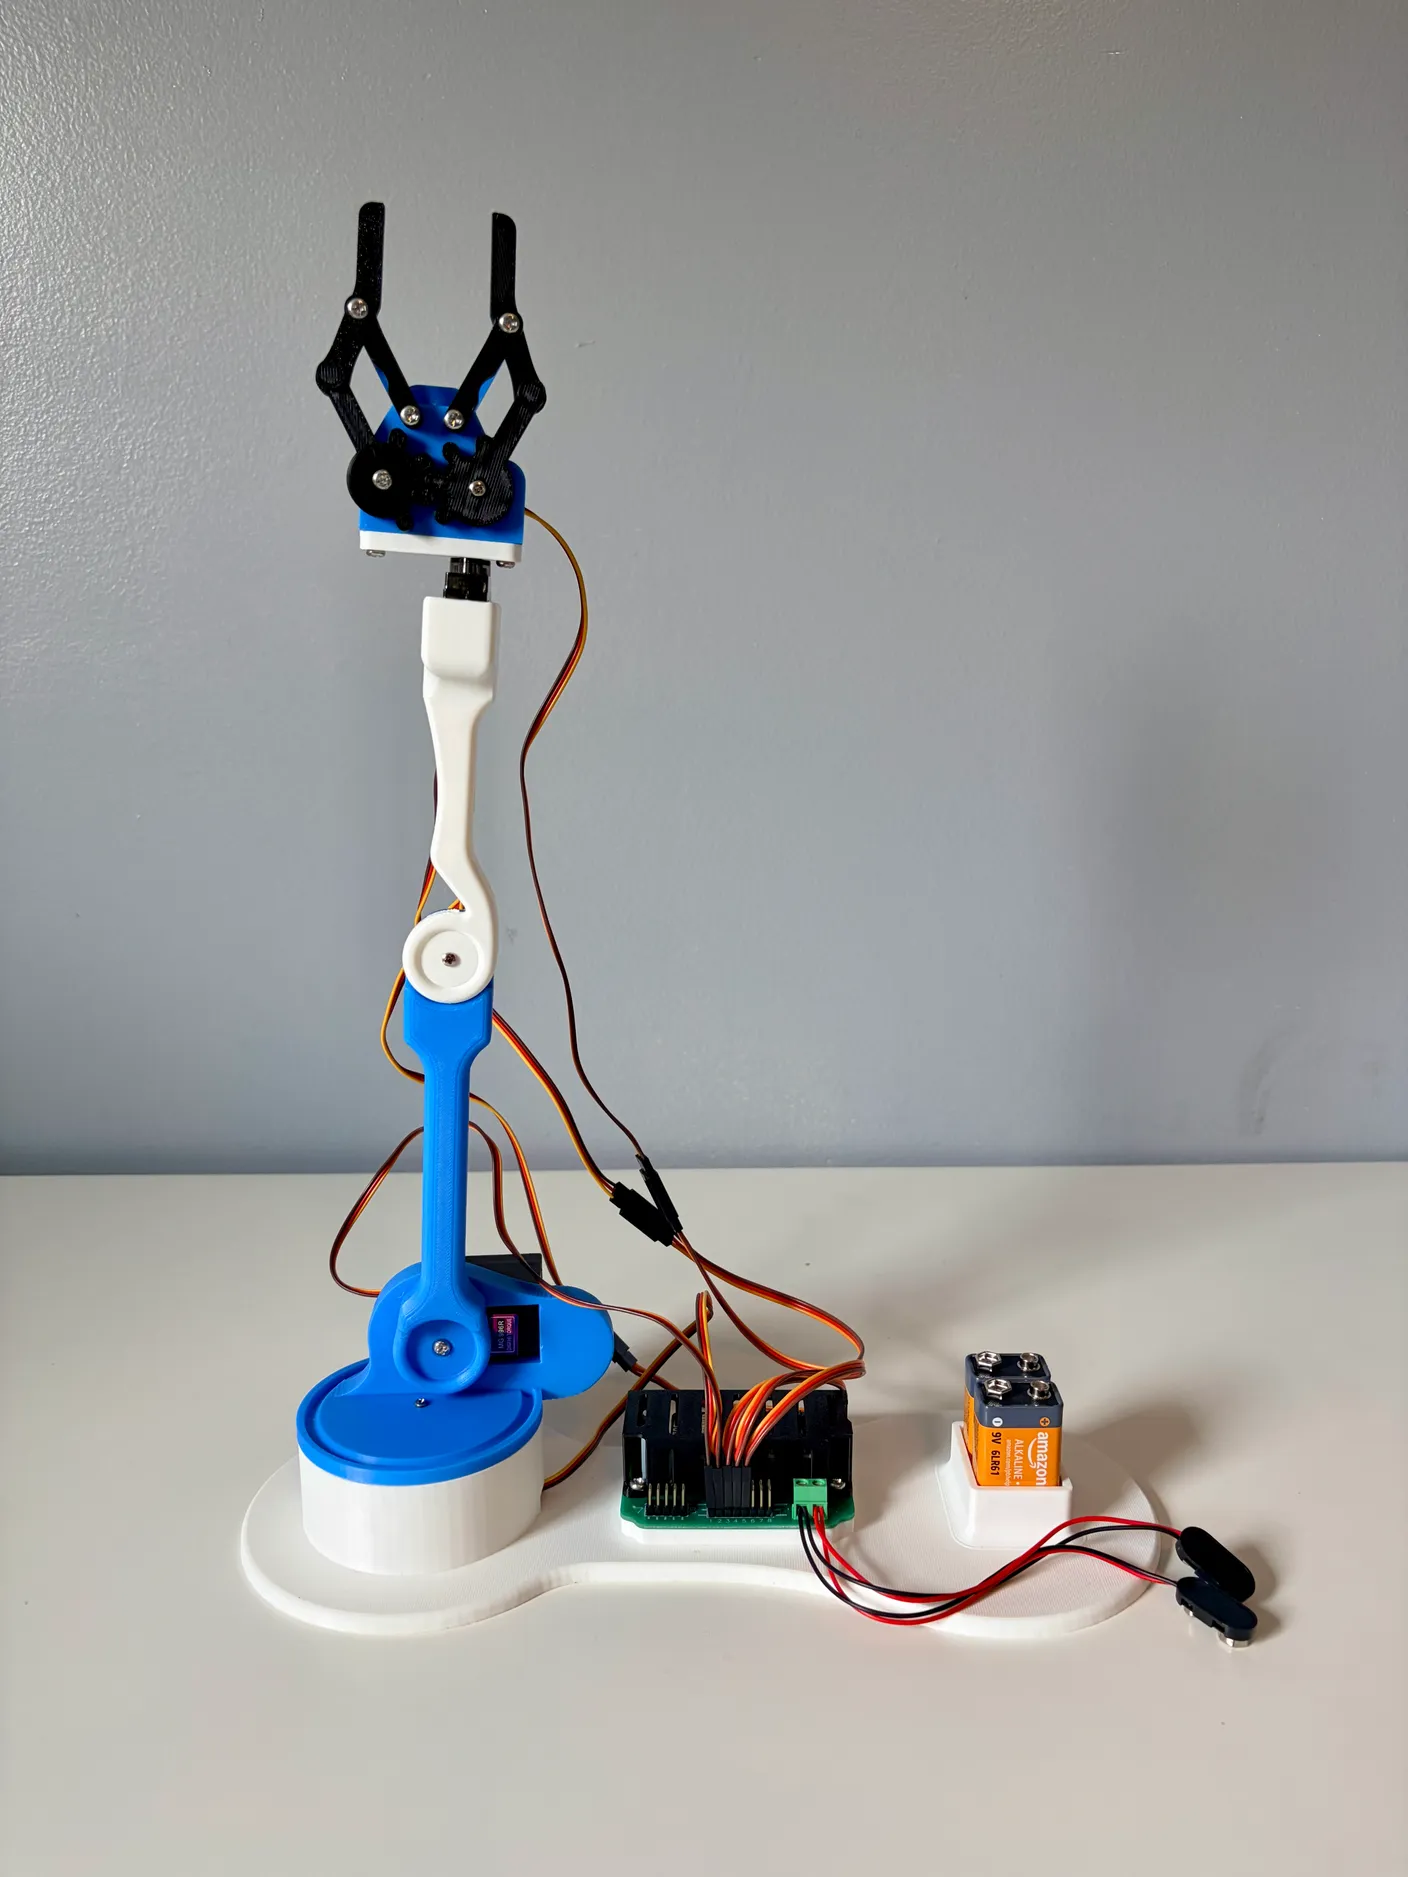
Once the gripper is screwed on, you’ve officially finished building your robotic arm! Next, it’s time to zip-tie it up and learn how to use it.
Connect to the Arm
It’s almost time to control your robot! There are just a few more things to do first.
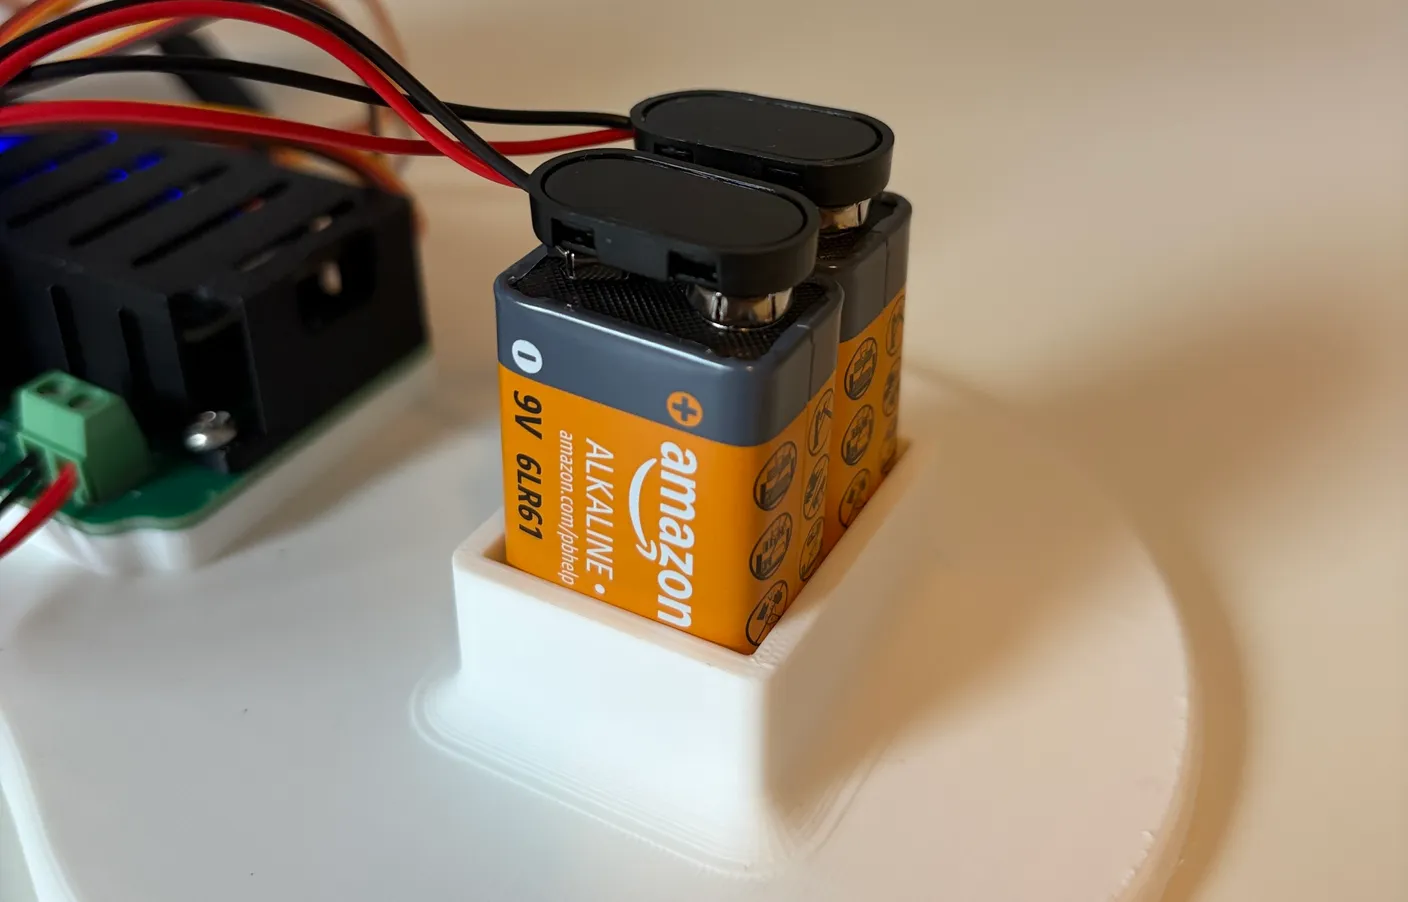
Start by plugging both batteries in, and make sure the blue light on the circuit board turns on. Sometimes it doesn’t turn on the first time.
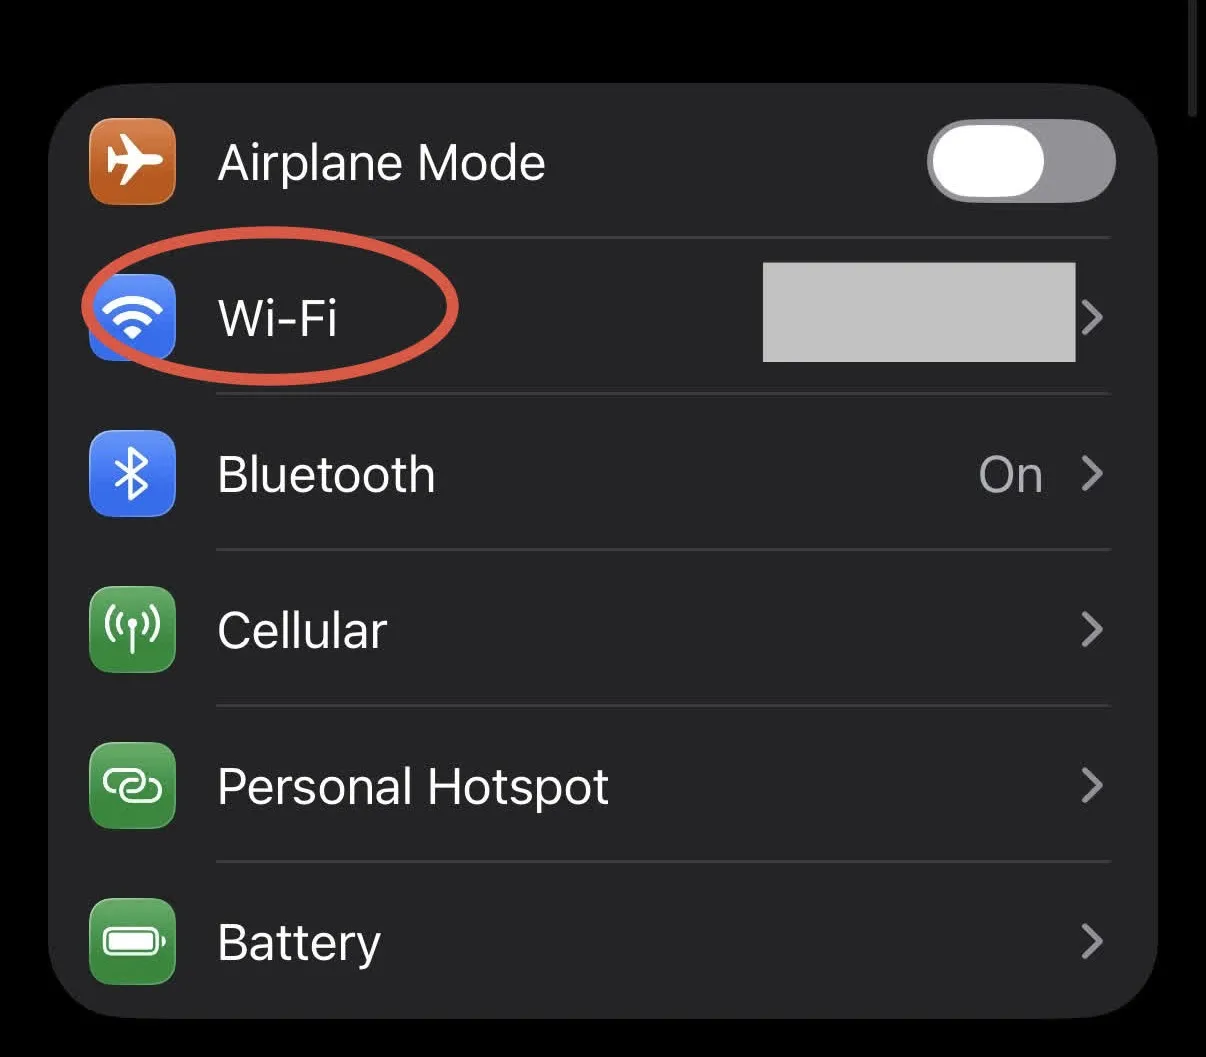
Now it’s time to connect your robot to a device. You’ll need a Wi-Fi–enabled device to control it. Keep in mind that whichever device you connect will lose internet access while it’s connected to the robot, so you won’t be able to keep reading this tutorial on it — we recommend using a different device to control the robot. This tutorial uses an iPhone, but the steps are about the same on Android and other systems. To start, open your Wi-Fi settings (circled in red above).
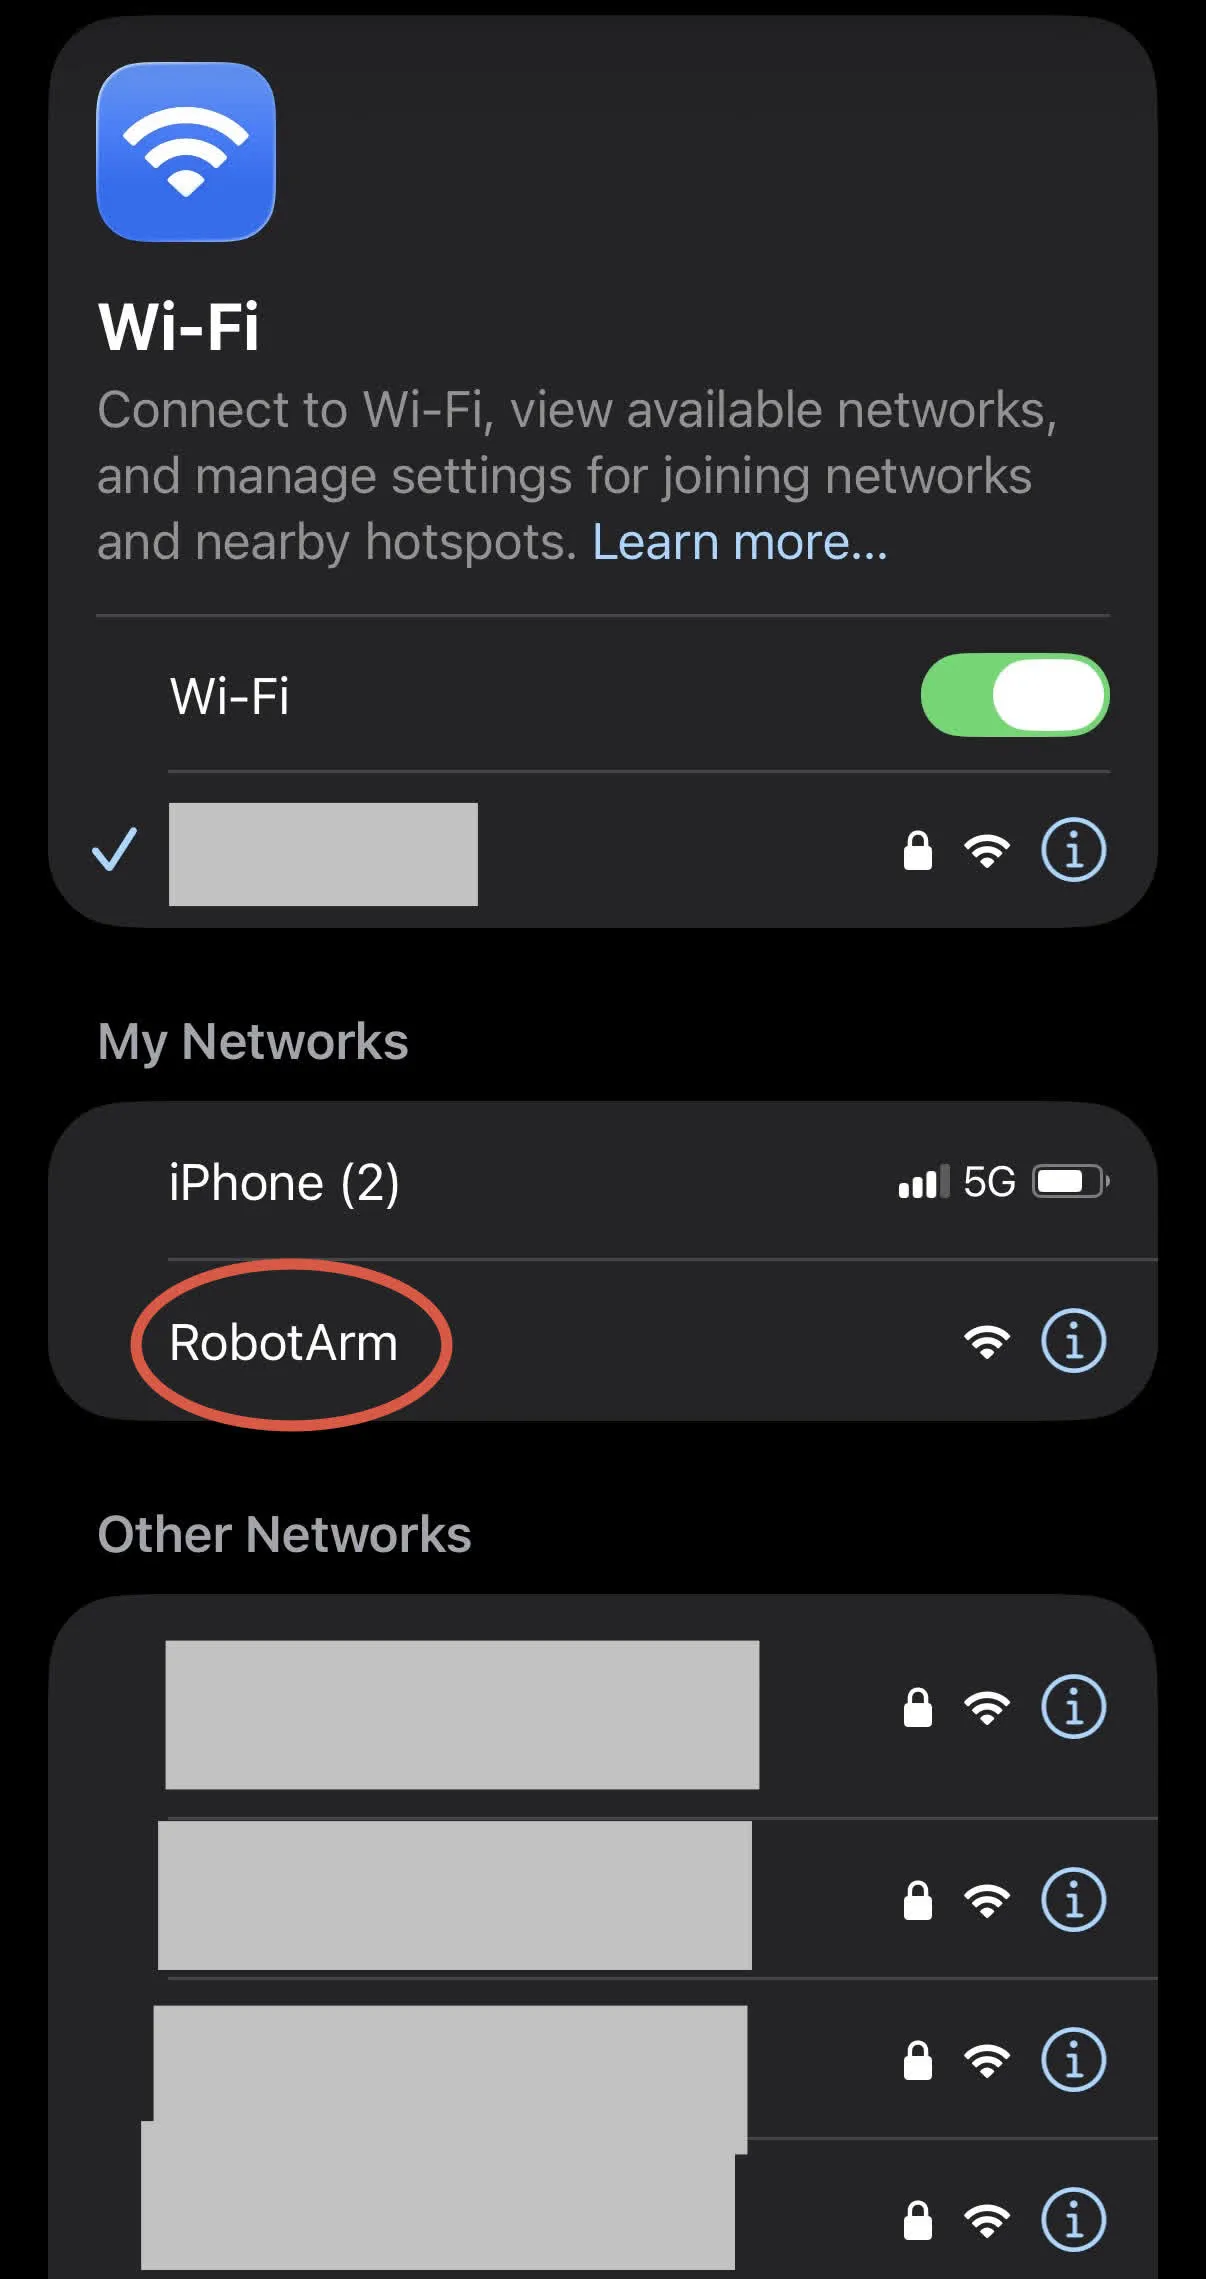
If your robot is plugged in, a network called RobotArm will appear in the list. Since you haven’t connected before, it’ll be under “Other Networks.” If you don’t see it right away, turn your Wi-Fi off and back on. Once it appears, tap it to connect.
Note — connection problems
If you’re having trouble connecting to the robot, there are a few common causes. First, make sure both batteries are plugged in and the light on the circuit board is on. If the RobotArm network doesn’t show up, try unplugging the batteries and plugging them back in. If you still don’t see it, turn your Wi-Fi off and back on, then wait a minute — sometimes it takes a while to be discovered. And if you can see the network but tapping it says it can’t connect, try a different device; this is usually caused by a setting on your device that’s blocking the network.
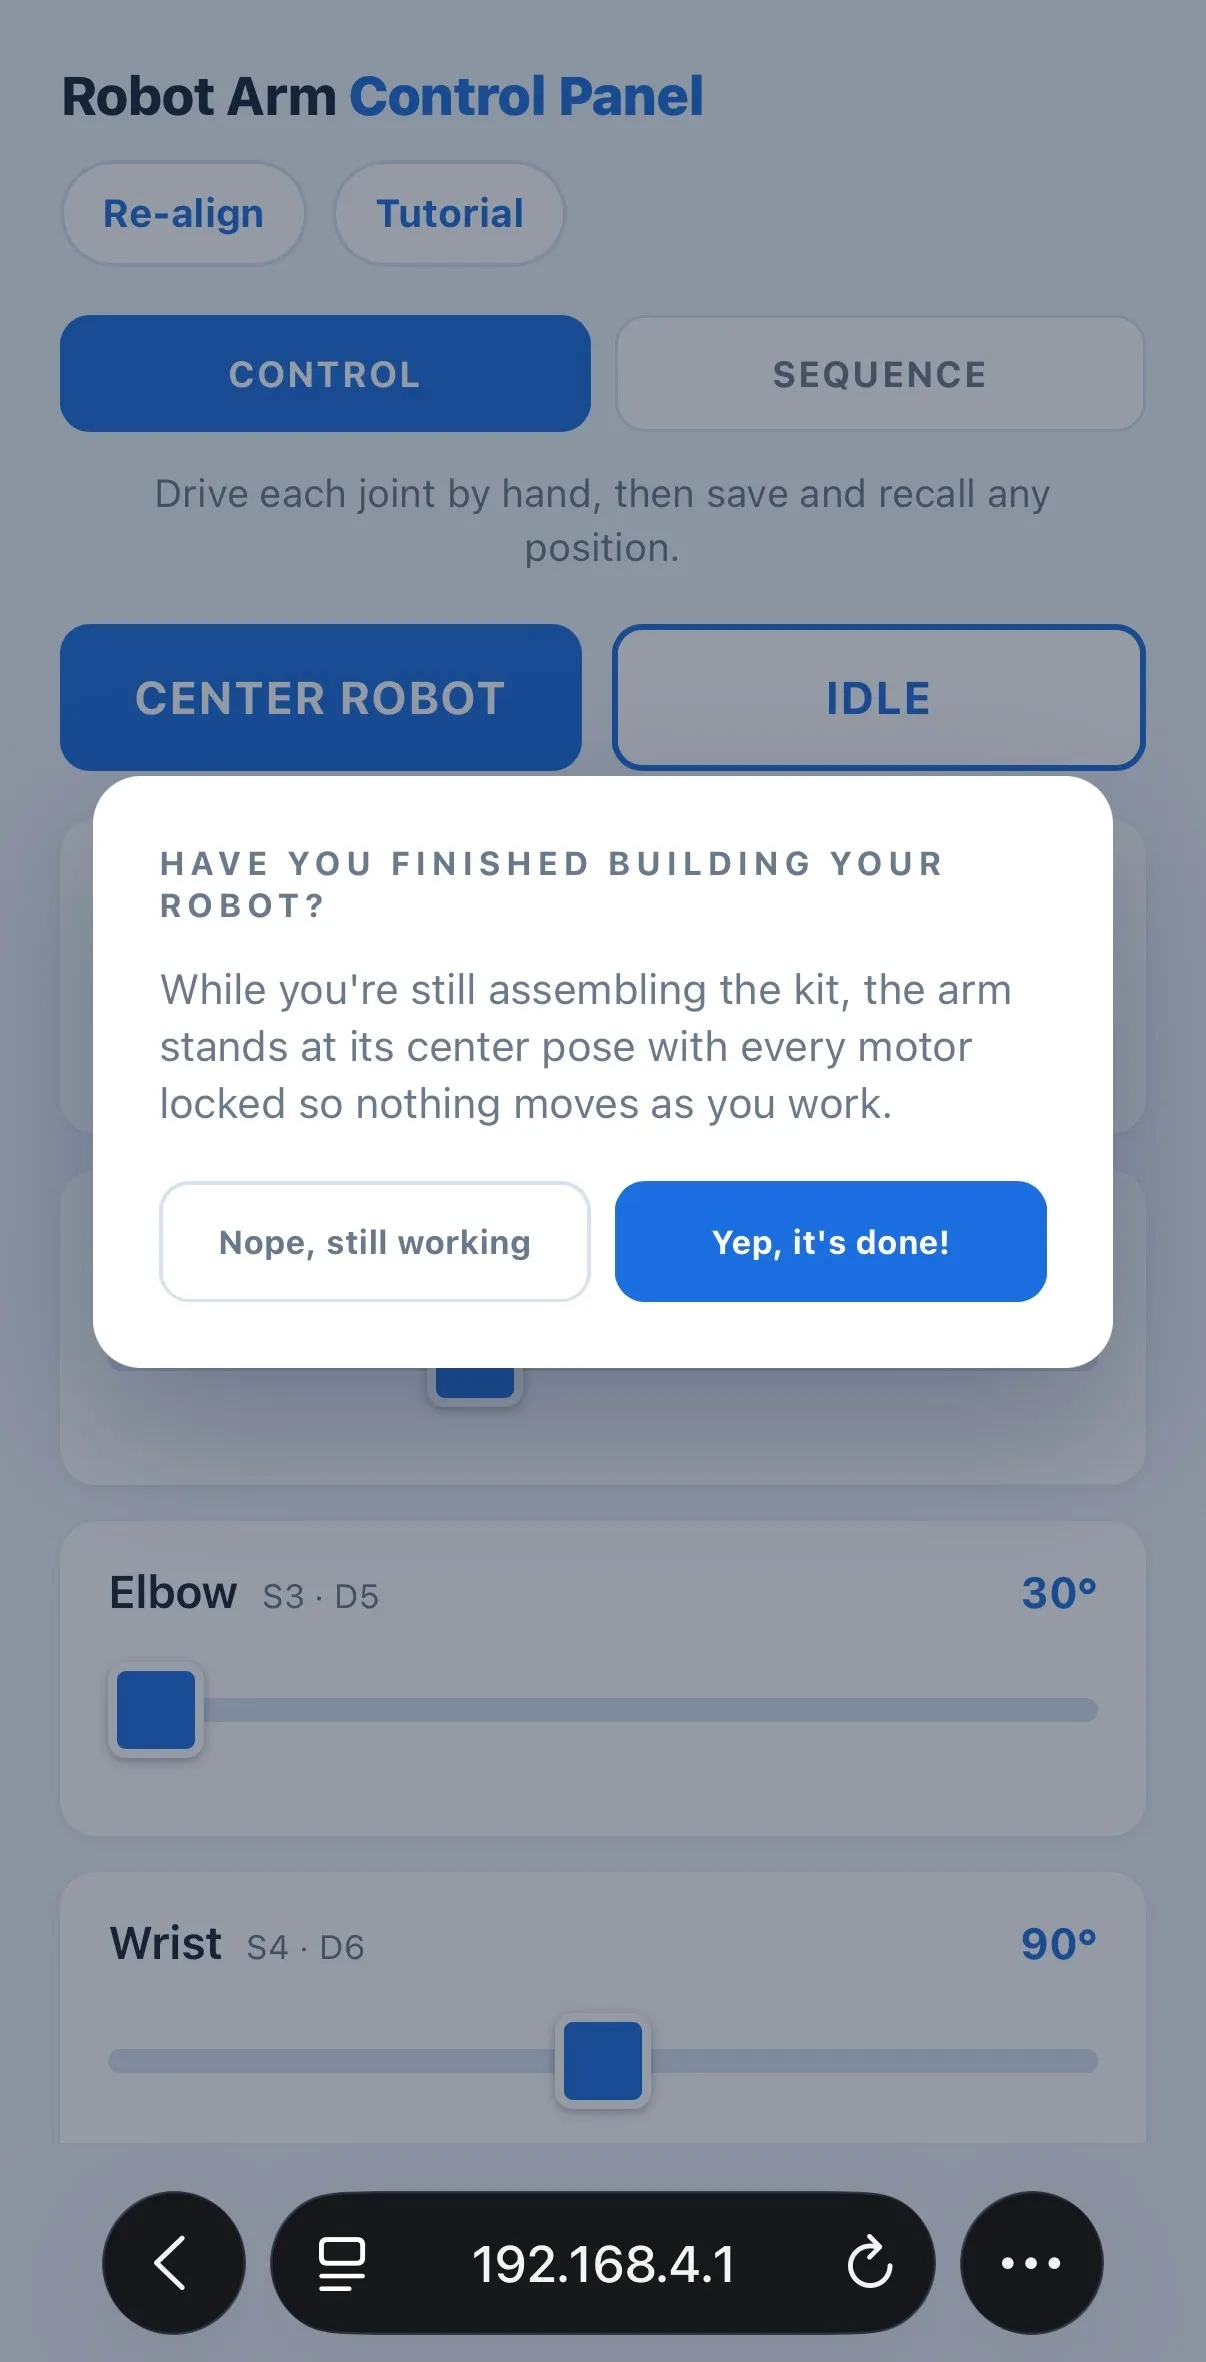
The first time you connect, the control page should pop up on its own. If it doesn’t, no worries — open Safari (or your browser of choice; we recommend Safari for these projects because it connects quickly and easily) and type in exactly: 192.168.4.1. Once you reach the control panel, you can press the button to mark your robot as finished building! When you press it, the robot moves to its default idle position — more on that later.
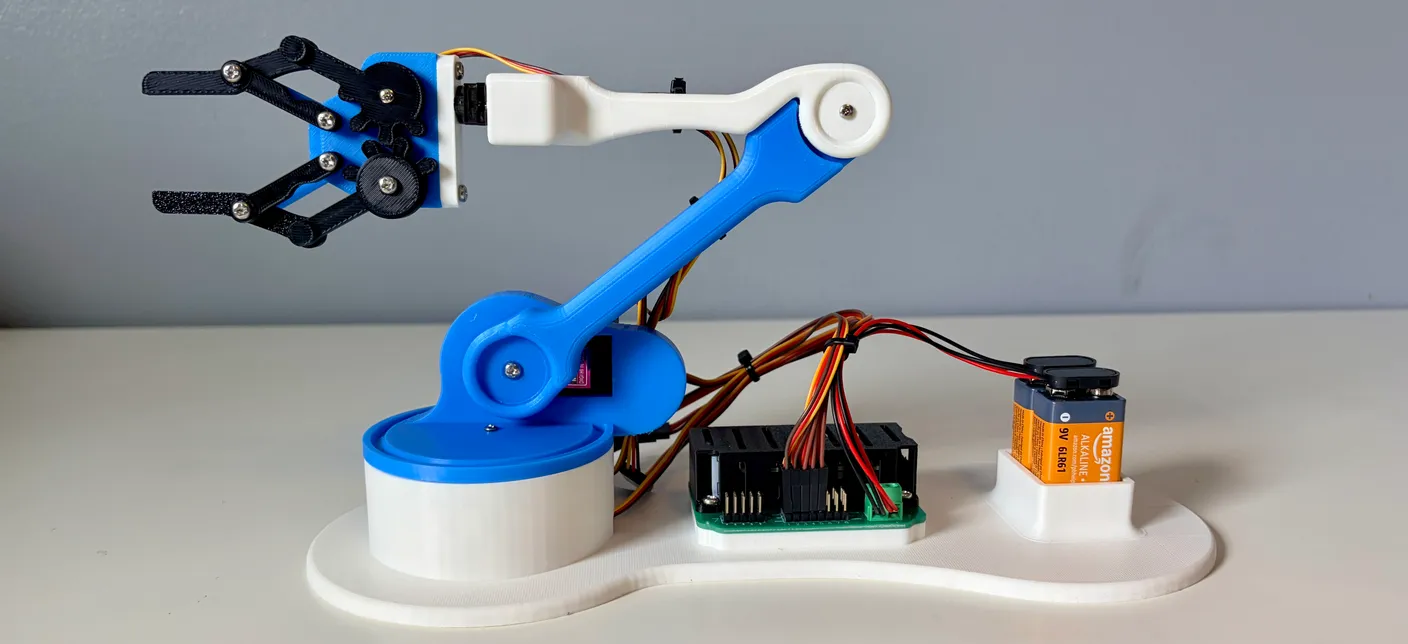
Now your robot should look like this! It’s almost done, but the wires are still pretty messy — not ideal in any robotics setup. Continue to the last section to learn how to organize them.
Important!
Loose joints are normal
If one of the joints goes limp or slips off the motor that drives it, don’t worry — this is normal. Your robot did not break! This simply happens when the screws aren’t tight enough (which is a common problem after building the robot for the first time), so the joint comes loose from the servo that controls it. To fix this, press the “Re-align” button on the control page (located near the top left). This sets the motors to the way they were when you were building the robot. With the motors like this, put the joints in the orientation they were in when you built it — pointing straight up toward the sky — then screw the screws in TIGHT! When finished, press the “Yep — it’s in its center position” button to get back to the control page. Keep this in mind in the next section while putting zip ties on — it’s easy to accidentally knock the screws off when handling the robot. This process will be gone over again later in the Operation Tips section.
Wire Management
Now let’s organize these wires! One thing to remember as you go: this is a moving machine, and the wires can get caught or pinched. To prevent that, tie every zip tie loosely — at least until you’ve experimented enough to know which wires might snag. Let’s dive in!
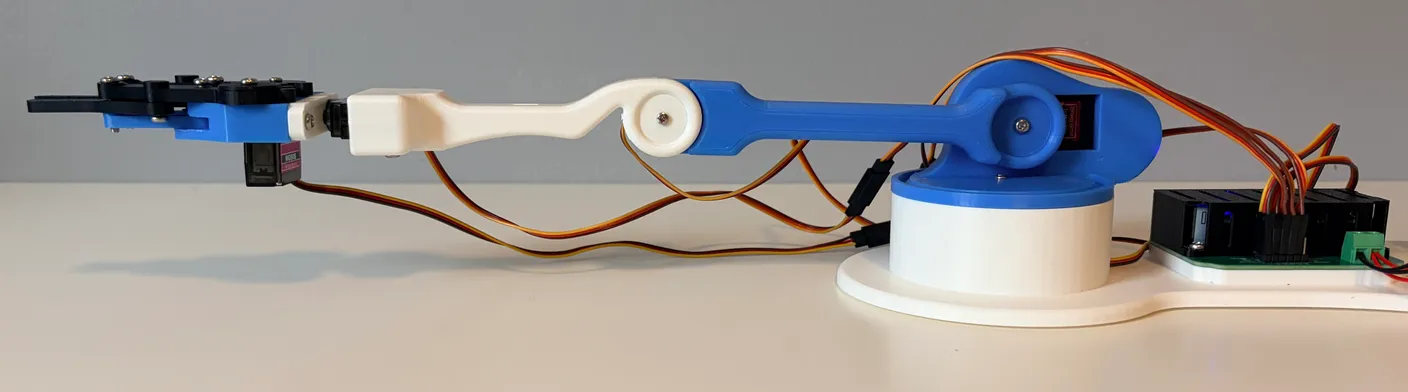
To start, we’ll move the robot to the farthest position it can reach, so we can see how to route the zip ties. To get the position shown above, press Center Robot, then move the shoulder slider to 180°.
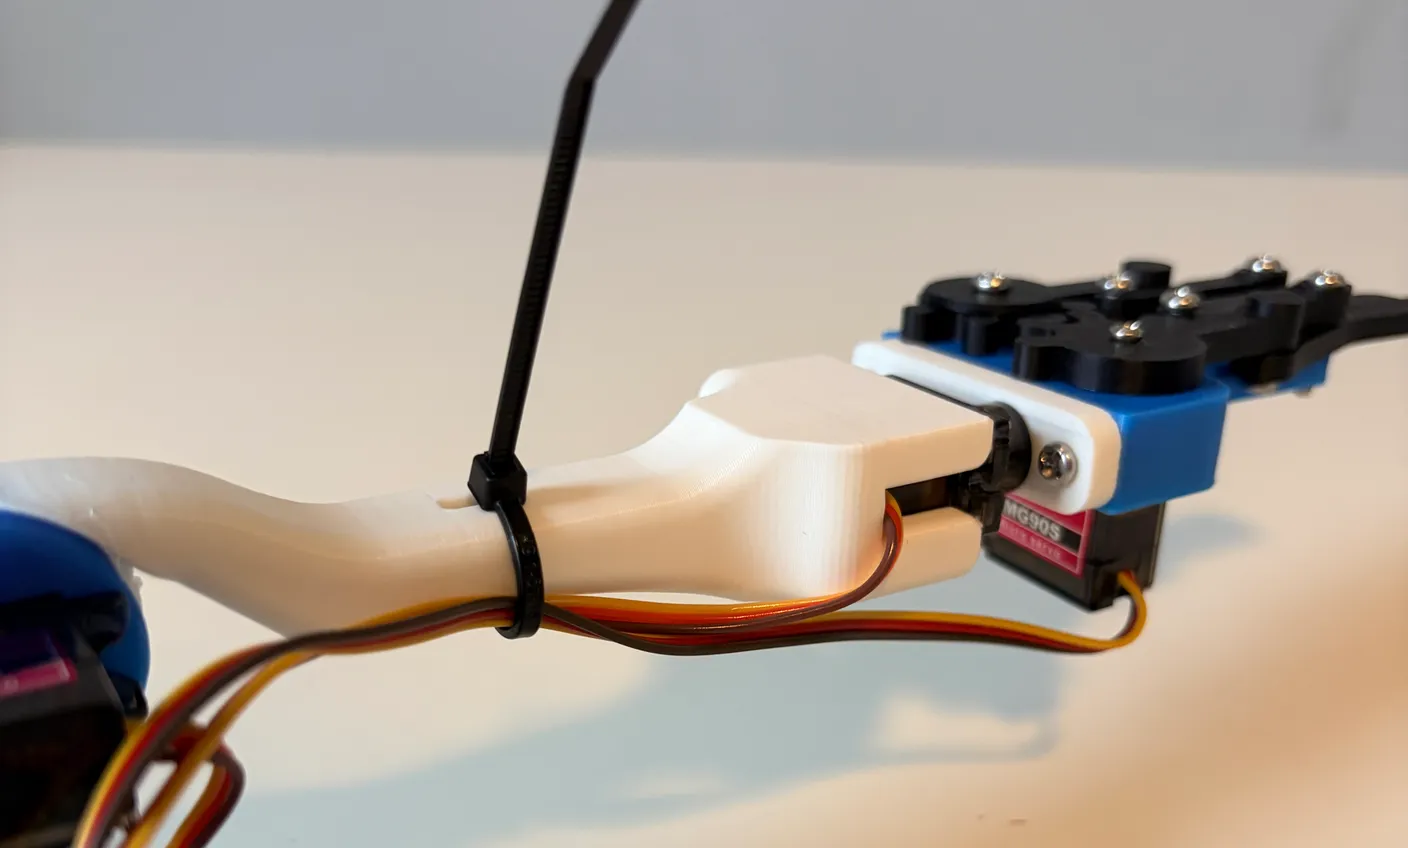
Let’s start with the zip ties at the end. Thread a zip tie through the middle of the white arm, around the wrist and gripper servo wires, as shown above. Remember to tie it fairly loosely to start.
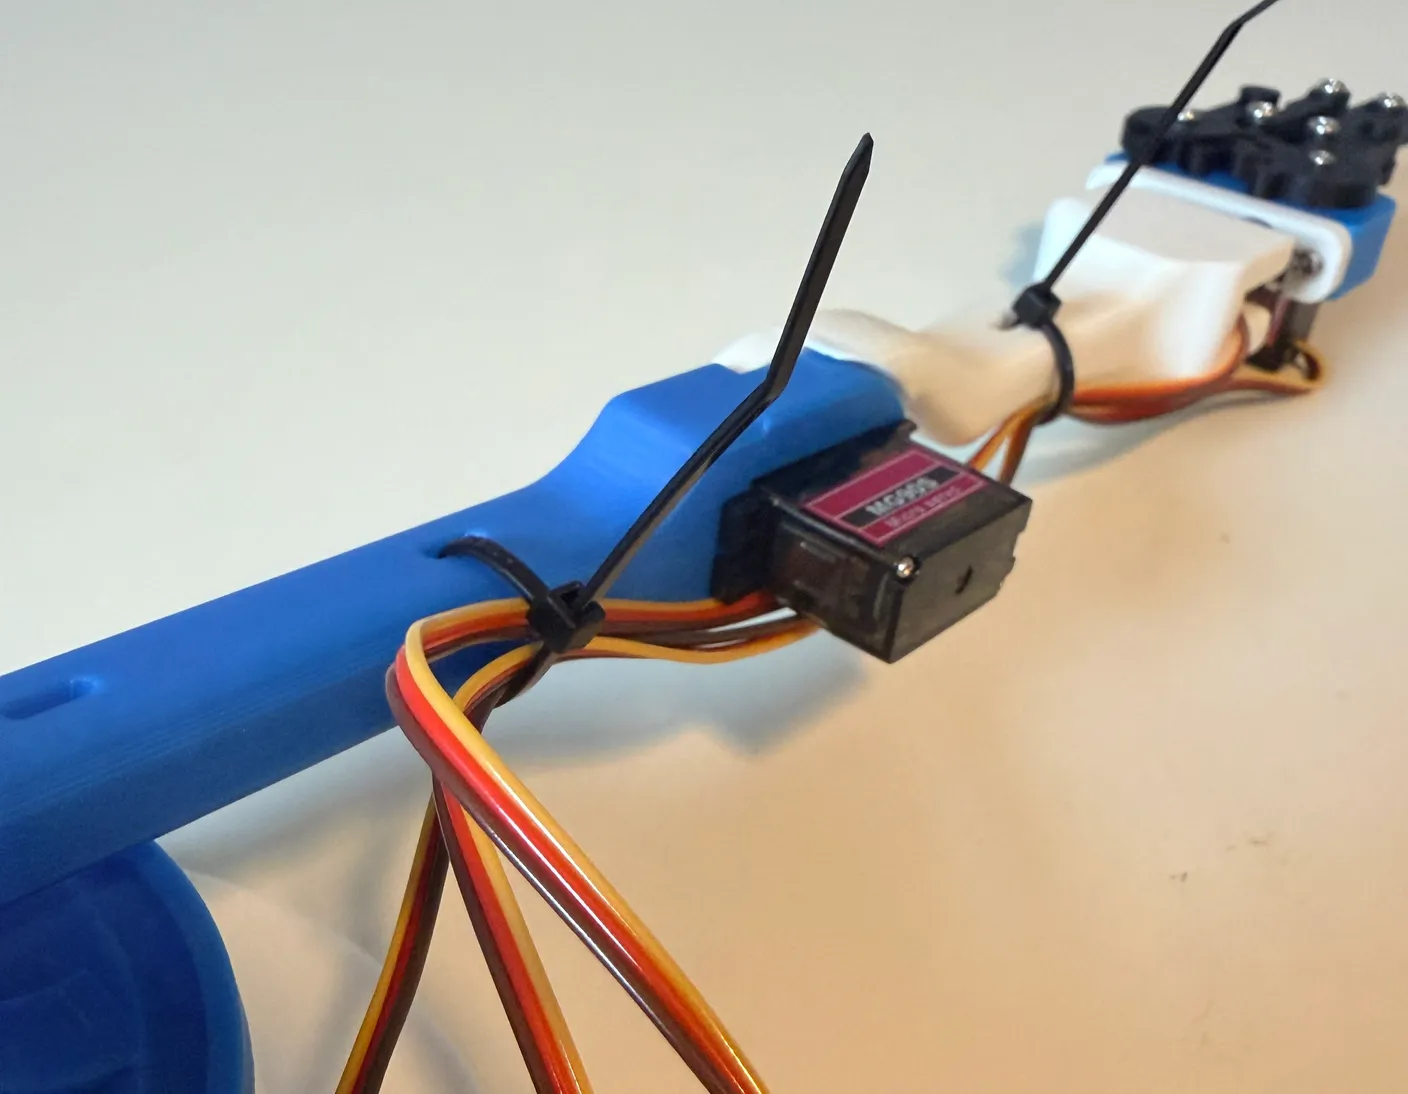
Moving down the arm, use another zip tie through the middle of the blue arm to bundle the elbow, wrist, and gripper wires.
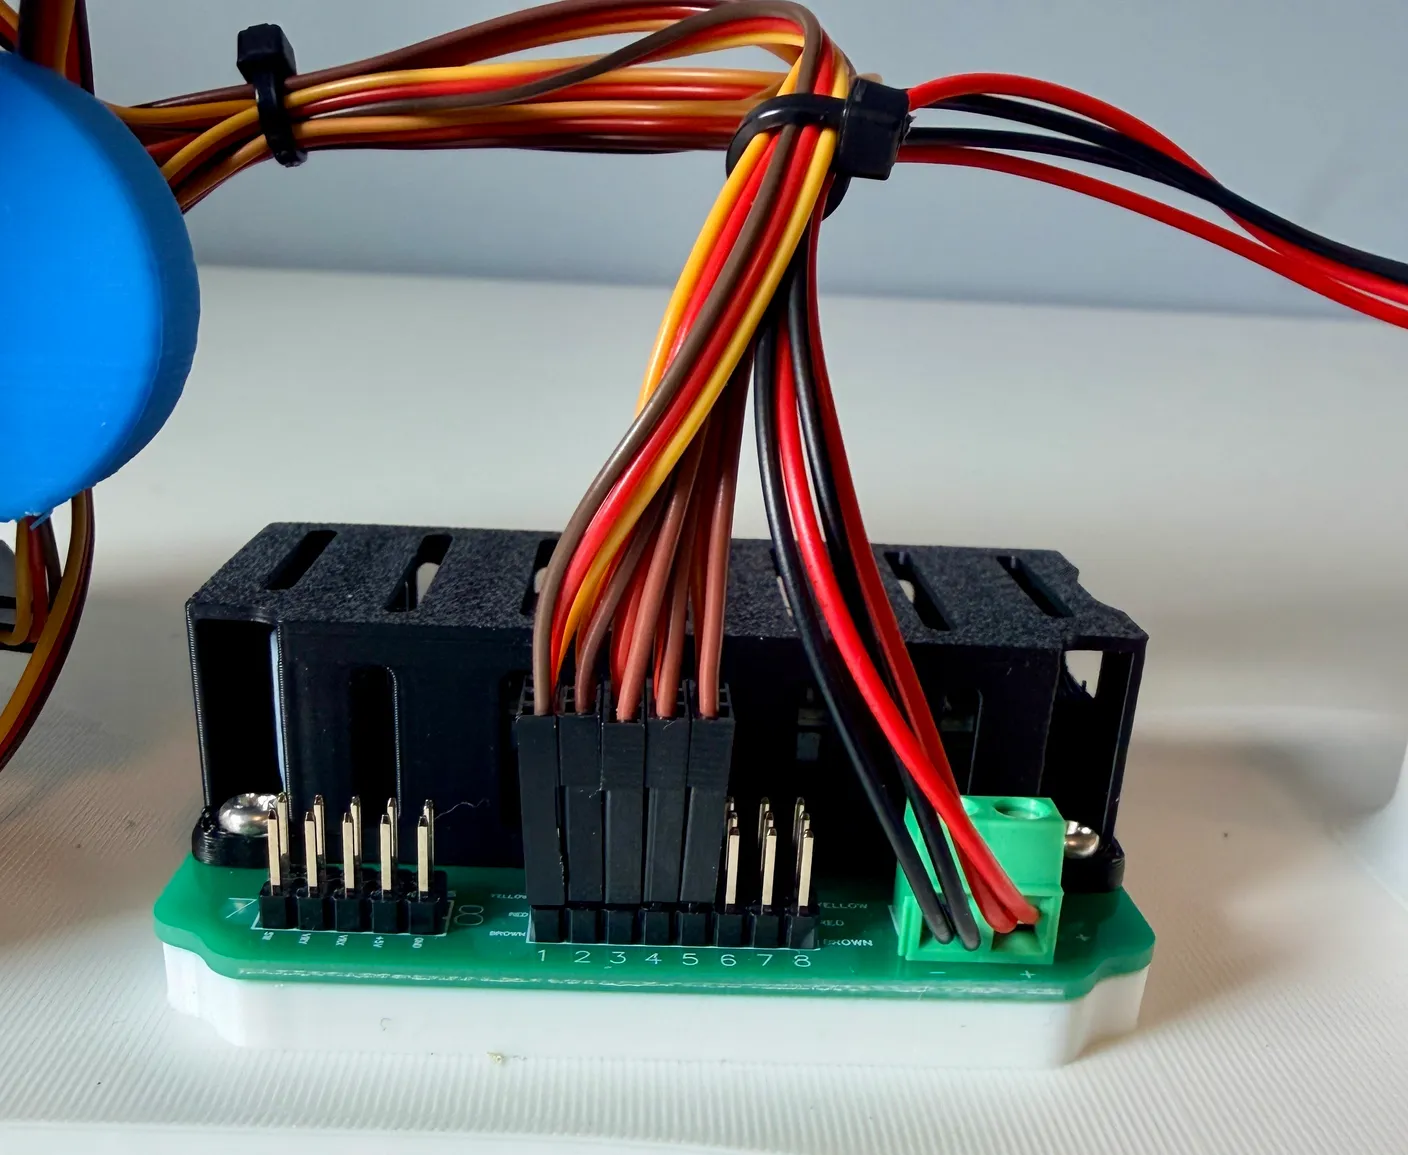
Now look at the circuit board. You can use a zip tie to bundle the servo wires and 9-volt battery connectors, as shown. This one can be tighter, since it’s out of the robot’s way.
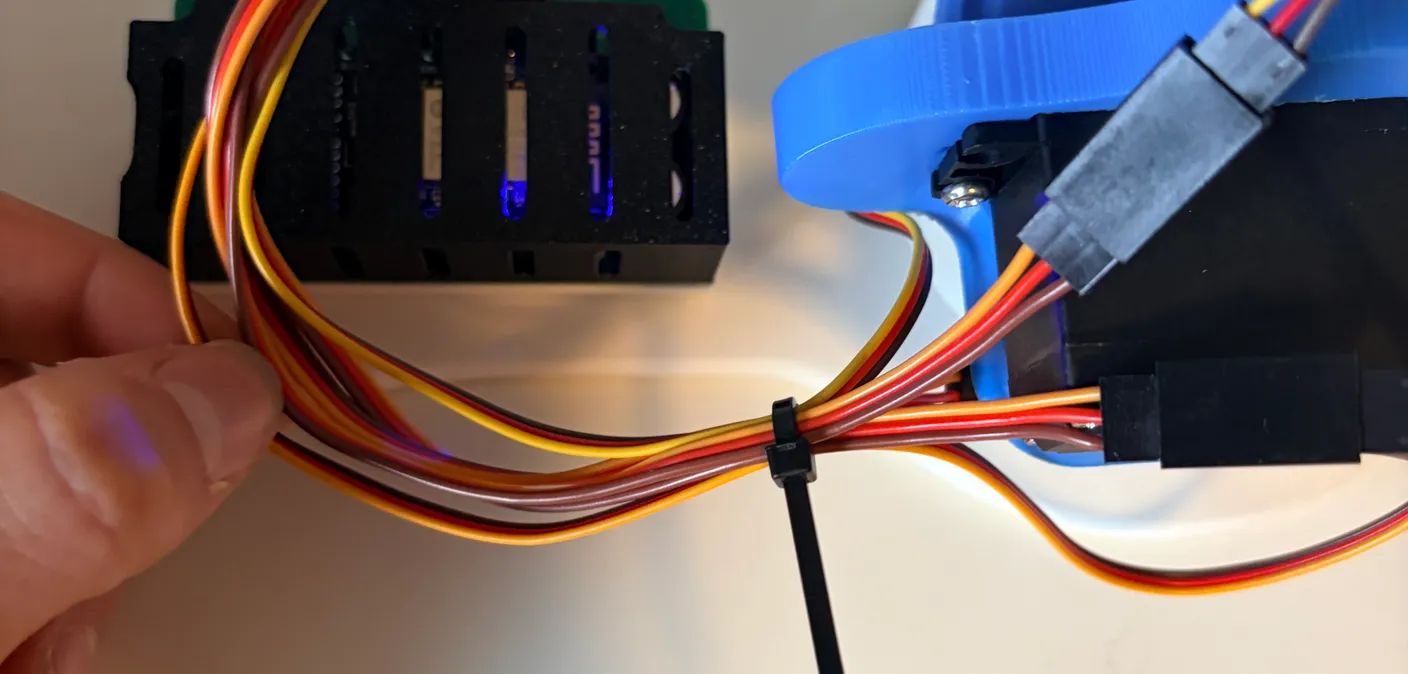
Finally, look at the robot from this angle. Follow the wires up from the circuit board and gather them together up near the big servo, then add a very loose zip tie there, as shown above. Once you’re happy with the placement, carefully snip the ends — being careful not to nick or cut any wires. There’s one extra zip tie included in case you misplace one.
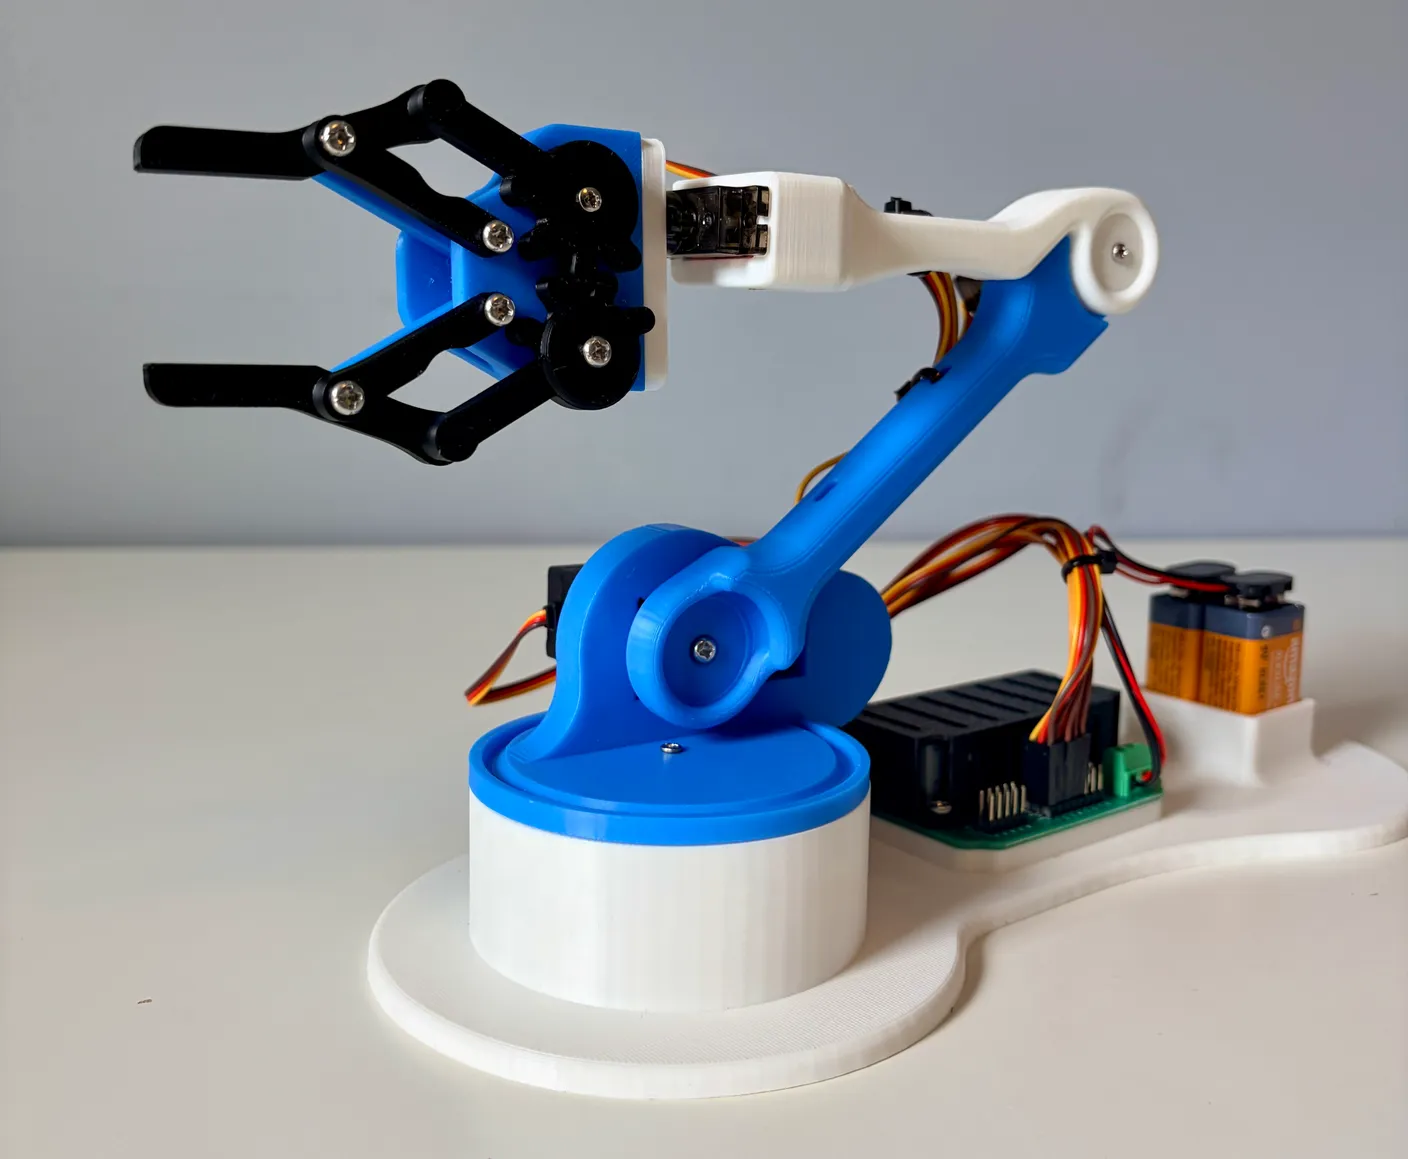
Congratulations! You’ve finished building your robot arm! It looks much nicer with the wires all neat, doesn’t it? Now all that’s left is the fun part — controlling it. Continue to the Operation Tips section for some very important notes and tips on how to control it.
Operation Tips
Re-aligning Your Robot / Looks Like It “Died”?
Don’t worry if it looks like your robot “died” — an arm going limp is totally normal (and the most common problem), and it just means a screw is too loose. Even if a screw started out tight, it’s normal for it to loosen over time from repeated motion, bumping the table, and so on.
To fix it, press the Re-Align button on the control panel (at the top of the page, next to the tutorial button). This moves all the motors to their centered position, shown below. If a motor doesn’t reach the center, move it there by hand and then re-tighten whichever screw is loose. The most common one is the blue “shoulder” joint, since it supports the most weight. Once your robot looks exactly like the image below (which is its true centered position), then screw the screws in TIGHT! A loose screw will cause the joint to fall off again, causing the same problem. Once all the screws are tight, press the button to confirm and watch it move back to its idle position.
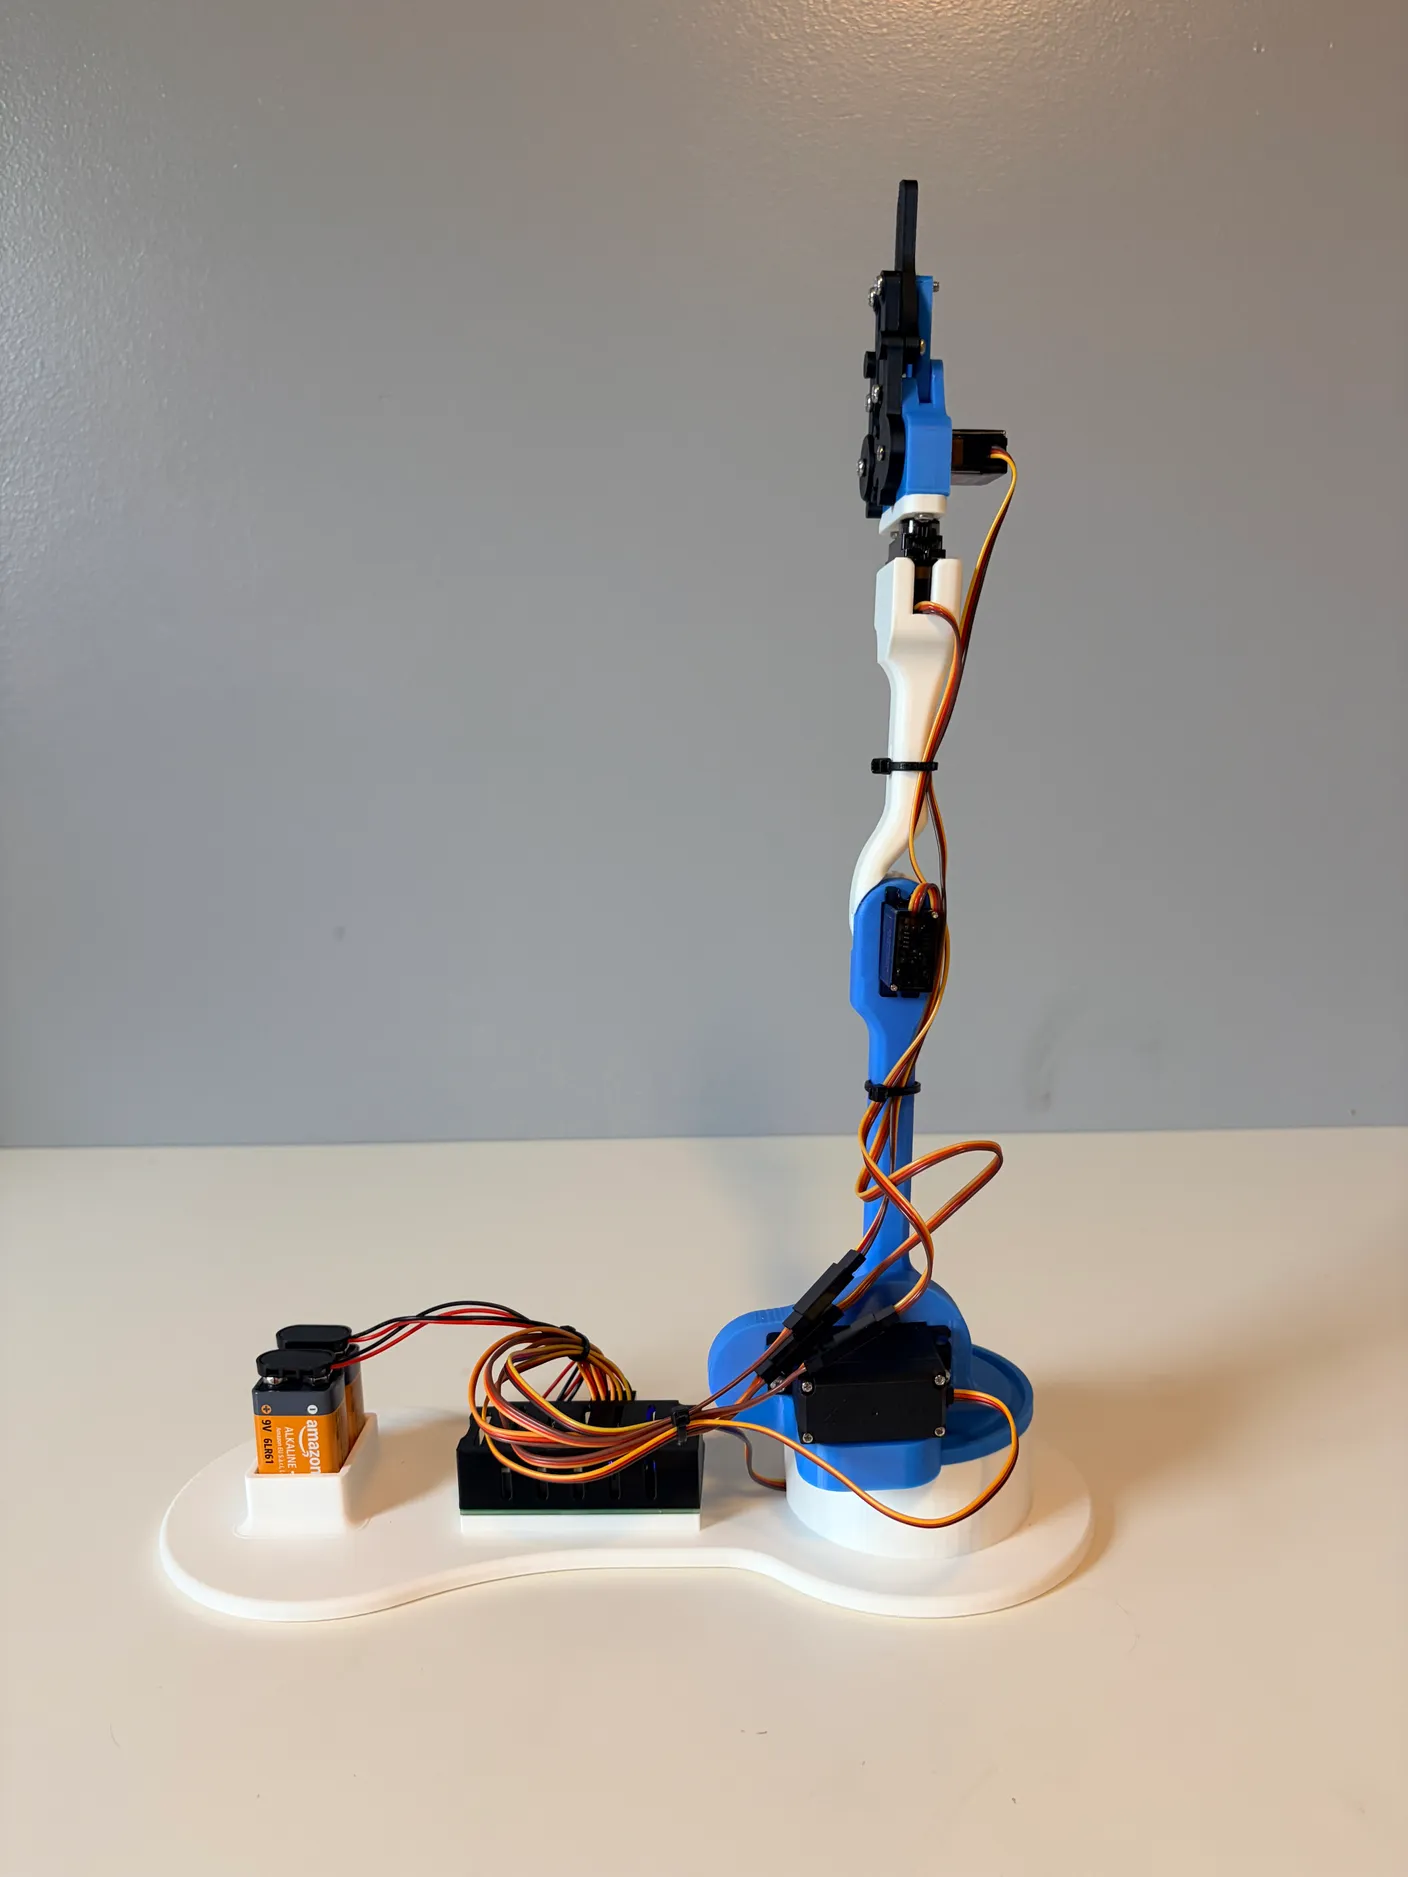
Idle Position
The idle position button sets your robot to a resting position that doesn’t use any power or put load on the motors. It’s best practice to leave your robot in this state when you’re not using it, and to always put it in the idle position before turning it off. When you power the robot on, if it isn’t already in the idle position, it will move there to get ready to operate. Switching between pages also returns it to the idle position, again to prepare it for the actions you give it.
Shakiness & Jitter
If your robot starts shaking or vibrating, don’t worry — it’s not possessed. This is common, and it’s simply because these are small servos, not industrial robotic motors. This kit was designed to get you into robotics, not to be a precision industrial arm. If it starts shaking out of control, just stop it gently with your hand. If it becomes a regular occurrence, it could be a sign the batteries are dying.
Batteries
Make sure to always unplug when not in use, to preserve battery life and prevent unnecessary wear. You can tell the batteries are running low from a few key signs: the robot starts acting erratically or jittering (beyond the ordinary jitters and shakes it normally produces), or it no longer has enough power to lift its arm (usually the “Elbow” joint is the first to not be able to lift all the way up with dying batteries). If the batteries are dead, we recommend replacing them with the same Amazon Basics 9-volt batteries that came with the kit.
Using the Gripper
Feel free to use the gripper to pick up small, lightweight items. It isn’t designed to lift large or heavy loads, though — trying to pick up something too heavy can loosen the screws, put extra load on the servos, and wear them down faster.
Extra Servo
You’ll notice the kit came with an extra servo. It’s provided as a backup in case any servo arrives dead or a servo breaks during use. If that happens, just take out the broken servo and replace it with the spare. And if you’d rather not keep it as a spare, use it to start building your own projects!
There are also 2 extra 6mm screws and an extra zip tie included. If you notice these left over, don’t worry — you didn’t forget a step! And if you lose or can’t find one of the small servo screws, you can use the one that comes with the extra servo.
How to Connect
If you’re having trouble connecting to the robot, there are a few easy fixes. First, make sure BOTH batteries are plugged in and the blue light on the circuit board is on. Next, in your Wi-Fi settings, turn your Wi-Fi off and back on to refresh the list. If you still don’t see the robot, be patient — sometimes it takes a moment to boot up and be recognized.
The first few times you connect, a pop-up (called a captive portal, for our more technical readers) will take you straight to the control panel. Sometimes this doesn’t happen automatically. If it doesn’t, open Safari (or your browser of choice; we recommend Safari for these projects because it connects quickly and easily) and type in exactly: 192.168.4.1. In simple terms, that number — called an IP address — is where your robot arm’s control panel lives. This site will only appear if you’re connected to the RobotArm network. Also, only one device can be connected at a time.
Controlling Your Robot
The controls are meant to be easy and intuitive, but if you ever get a bit confused, tap the Tutorial button at the top of the page for more information. In short, the Control page lets you move each motor and save positions for the robot to return to, and the Sequence page lets you program your robot to perform repeatable tasks. Every time you save something, it’s saved to the circuit board — so your saved positions and sequences last even after a power cycle.
Troubleshooting & Damaged Parts
Our number one goal is for you to finish with a fully working robot. If any parts arrived broken, if you can’t figure out a step, or if you’re stuck on any other problem, feel free to message us on Etsy — we’ll help get it resolved as soon as possible.
Once your robot is finished and working, though, we’re no longer able to provide support, including telling you how to modify or fix it after it’s been used. We love that you’re curious and learning on your own, but we can’t help with damage or troubleshooting caused by modifications made after the base kit is complete.
Please use the Etsy chat courteously (only if you absolutely need it!) — thank you!
Troubleshooting
Running into an issue? We’ve put together a troubleshooting guide covering connection problems, wiring and screw mistakes, loose joints, power issues, and more.
View the troubleshooting guideBonus Content
The official tutorial is officially over… so why are you still here? It’s because you’re one of the curious ones. You didn’t just want to build the robot—you want to understand how it works. And honestly, that curiosity is one of the most important skills in engineering and robotics.
Below is the exact code that comes pre-programmed onto your kit’s board. If you’re a beginner and want to learn more about coding and engineering, one great way to do that is to copy this code and paste it into an AI, then have it explain what each part does. It might feel like cheating at first, but in reality, this is how many real programmers learn and improve.
So go ahead—dig in, explore the code, and see what makes your robot come to life!
/* Robot Arm Controller — ESP8266
*
* What this code does:
* - Controls 5 servo motors (base, shoulder, elbow, wrist, gripper)
* - Moves them smoothly instead of snapping to position
* - Lets you control it from a web browser (no internet needed)
* - Remembers where the arm was before you powered it off
* - Has a build mode for assembling the robot, and a normal mode for using it
* - Holds a helper servo at 0 on D8 during build mode only; once the build is
* confirmed finished, D8/D4/D3 are shut off for good since nothing uses them
*
* Servo pins: D1, D2, D5, D6, D7
* Build-mode-only pin: D8 (holds a servo at 0 until build is confirmed done)
* Unused, shut off after build: D4, D3
*
*/
#include <ESP8266WiFi.h>
#include <ESP8266WebServer.h>
#include <DNSServer.h>
#include <Servo.h>
#include <LittleFS.h>
// ====================== SETTINGS ======================
const char* AP_SSID = "RobotArm";
const char* AP_PASS = "";
const int SERVO_MIN_US = 544;
const int SERVO_MAX_US = 2400;
const int TICK_MS = 10; // Update position every 10ms (100 times per second)
const float ARRIVE_EPS = 0.5; // Close enough to target
const int IDLE_SETTLE_MS = 400; // Wait before powering off
const int SHOULDER = 1;
const int SHOULDER_OFF_MS = 500; // Wait before shoulder power-off
const int HOME_WAKE_MS = 400; // Wake up each motor this far apart
const unsigned long STATE_SAVE_MS = 30000; // Save position to storage every 30 seconds
const float FINISH_DPS = 20.0; // Slowest speed allowed (prevents stalling)
const int MAX_POSES = 30;
const int MAX_SEQS = 20;
const char* BUILT_FLAG = "/built.flag"; // Marks that robot is fully built
const int BUILD_PIN = D8; // Holds a servo at 0 during build mode only
const int UNUSED_PIN_A = D4; // Not used by anything; shut off once build is done
const int UNUSED_PIN_B = D3; // Not used by anything; shut off once build is done
// Rest position - arm folds down and powers off
const int idleA[5] = { 90, 30, 180, 0, 150 };
// Order to fold down: base, wrist, gripper, elbow, shoulder
const uint8_t idleOrder[5] = { 0, 3, 4, 2, 1 };
// Order to move to a saved position: elbow, shoulder, base, wrist, gripper
const uint8_t gotoOrder[5] = { 2, 1, 0, 3, 4 };
// Settings for each servo: pin, min angle, max angle, center, smooth speed, top speed (deg/sec)
struct ServoCfg {
uint8_t pin;
int minA;
int maxA;
int centerA;
float smooth;
int maxDps;
const char* name;
};
ServoCfg cfg[5] = {
{ D1, 0, 180, 90, 0.08, 330, "Base" },
{ D2, 40, 180, 90, 0.05, 50, "Shoulder" },
{ D5, 30, 180, 30, 0.06, 335, "Elbow" },
{ D6, 0, 180, 90, 0.12, 325, "Wrist" },
{ D7, 120, 180, 180, 0.12, 400, "Gripper" },
};
// ==============================================================
const byte DNS_PORT = 53;
IPAddress apIP(192, 168, 4, 1);
DNSServer dnsServer;
ESP8266WebServer server(80);
Servo servos[5];
Servo buildServo; // Lives on BUILD_PIN, only used during build mode
// Motion tracking
float curA[5]; // Current smooth position
int pos[5]; // Last whole-degree position
int lastWritten[5]; // Last angle sent to servo
int active = -1; // Which joint is moving (-1 = none)
int goalA = 0; // Target for the active joint
// Queue for multi-joint moves
uint8_t qServo[5];
int qAngle[5];
bool qFree[5]; // true = can ignore angle limits (only for idle)
int qLen = 0;
bool idlePending = false;
bool centerPending = false;
unsigned long idleOffAt = 0; // Time to power off all motors
unsigned long shoulderOffAt = 0; // Time to power off shoulder only
unsigned long lastTick = 0;
bool stateDirty = false;
unsigned long lastStateSave = 0;
bool commissioned = false; // Robot is fully built
// ---------------------------------------------------------------- Storage
void loadCommissioned() {
commissioned = LittleFS.exists(BUILT_FLAG);
}
void setCommissioned() {
File f = LittleFS.open(BUILT_FLAG, "w");
if (f) { f.print("1"); f.close(); }
commissioned = true;
}
// Build mode only: hold the helper servo on BUILD_PIN at position 0
void holdBuildServo() {
buildServo.attach(BUILD_PIN, SERVO_MIN_US, SERVO_MAX_US);
buildServo.write(0);
}
// Build is confirmed finished: these pins are never used again, so drive them off for good
void shutOffBuildPins() {
if (buildServo.attached()) buildServo.detach();
pinMode(BUILD_PIN, OUTPUT); digitalWrite(BUILD_PIN, LOW);
pinMode(UNUSED_PIN_A, OUTPUT); digitalWrite(UNUSED_PIN_A, LOW);
pinMode(UNUSED_PIN_B, OUTPUT); digitalWrite(UNUSED_PIN_B, LOW);
}
// Save current arm position to storage
void saveState() {
File f = LittleFS.open("/state.txt", "w");
if (!f) return;
for (int i = 0; i < 5; i++) { f.print(pos[i]); f.print("\n"); }
f.close();
stateDirty = false;
lastStateSave = millis();
}
void saveStateIfDue() {
if (stateDirty && millis() - lastStateSave >= STATE_SAVE_MS) saveState();
}
// Load last known arm position from storage
void loadState() {
for (int i = 0; i < 5; i++) {
pos[i] = curA[i] = lastWritten[i] = idleA[i];
}
File f = LittleFS.open("/state.txt", "r");
if (!f) return;
for (int i = 0; i < 5 && f.available(); i++) {
String l = f.readStringUntil('\n'); l.trim();
if (!l.length()) continue;
int v = l.toInt();
if (v >= 0 && v <= 180) pos[i] = curA[i] = lastWritten[i] = v;
}
f.close();
}
// ---------------------------------------------------------------- Motion
// Attach a servo and hold it at its current angle
void attachAt(int i) {
if (servos[i].attached()) return;
servos[i].attach(cfg[i].pin, SERVO_MIN_US, SERVO_MAX_US);
lastWritten[i] = (int)(curA[i] + 0.5f);
servos[i].write(lastWritten[i]);
}
// Start moving one joint to a target angle
void startMove(int i, int angle, bool ignoreLimits = false) {
angle = ignoreLimits ? constrain(angle, 0, 180)
: constrain(angle, cfg[i].minA, cfg[i].maxA);
attachAt(i);
active = i;
goalA = angle;
idleOffAt = 0;
shoulderOffAt = 0;
}
// Add a joint to the queue
void enqueue(int s, int a, bool f) {
if (qLen >= 5) return;
qServo[qLen] = s; qAngle[qLen] = a; qFree[qLen] = f; qLen++;
}
// Start the next queued joint, or power off if queue is empty
void startNextQueued() {
if (qLen == 0) {
if (idlePending) {
idleOffAt = millis() + IDLE_SETTLE_MS;
idlePending = false;
} else if (centerPending) {
shoulderOffAt = millis() + SHOULDER_OFF_MS;
centerPending = false;
}
return;
}
int s = qServo[0], a = qAngle[0]; bool f = qFree[0];
for (int k = 1; k < qLen; k++) {
qServo[k-1] = qServo[k]; qAngle[k-1] = qAngle[k]; qFree[k-1] = qFree[k];
}
qLen--;
startMove(s, a, f);
}
bool robotBusy() {
return active >= 0 || qLen > 0;
}
// Main motion engine - runs 100 times per second
// Smoothly eases the active joint toward its target angle
void motionTick() {
if (active < 0) return;
// How far to the target?
float dist = (float)goalA - curA[active];
float mag = fabs(dist) * cfg[active].smooth;
float maxStep = cfg[active].maxDps * (TICK_MS / 1000.0f);
float minStep = FINISH_DPS * (TICK_MS / 1000.0f);
// Clamp the step size
if (minStep > maxStep) minStep = maxStep;
if (mag > maxStep) mag = maxStep;
if (mag < minStep) mag = minStep;
if (mag > fabs(dist)) mag = fabs(dist);
// Move toward target
curA[active] += (dist >= 0) ? mag : -mag;
// Check if we're close enough
bool done = fabs((float)goalA - curA[active]) < ARRIVE_EPS;
if (done) curA[active] = goalA;
// Only update servo if angle actually changed (keeps servo still = less jitter)
int a = (int)(curA[active] + 0.5f);
if (a != lastWritten[active]) {
servos[active].write(a);
lastWritten[active] = a;
}
pos[active] = a;
// If done, move to next joint in queue
if (done) {
active = -1;
stateDirty = true;
startNextQueued();
}
}
// Run motion until all queued moves finish (used at startup only)
void runMotionToCompletion() {
while (robotBusy()) {
if (millis() - lastTick >= TICK_MS) {
lastTick = millis();
motionTick();
}
yield();
}
}
// Wake up each servo one at a time, holding its current position
void wakeAllStaggered(const char* label, const int* targets) {
for (int k = 0; k < 5; k++) {
int i = idleOrder[k];
Serial.printf(" %-8s remembered %3d -> %s %3d\n", cfg[i].name, pos[i], label, targets[i]);
attachAt(i);
delay(HOME_WAKE_MS);
}
}
// Startup: go to idle and power off (normal commissioned mode)
void homeToIdle() {
Serial.println("Going to idle pose...");
wakeAllStaggered("idle", idleA);
for (int k = 0; k < 5; k++) { int i = idleOrder[k]; enqueue(i, idleA[i], true); }
startNextQueued();
runMotionToCompletion();
delay(IDLE_SETTLE_MS);
for (int i = 0; i < 5; i++) servos[i].detach();
saveState();
Serial.println("Idle. Motors off.");
}
// Startup: go to center and hold (build mode - motors stay on)
void homeToCenterHold() {
Serial.println("Build mode: going to center, motors STAY ON...");
int centers[5];
for (int i = 0; i < 5; i++) centers[i] = cfg[i].centerA;
wakeAllStaggered("center", centers);
for (int k = 0; k < 5; k++) { int i = gotoOrder[k]; enqueue(i, cfg[i].centerA, false); }
startNextQueued();
runMotionToCompletion();
// Intentionally leave motors ON
saveState();
Serial.println("At center. Motors locked.");
}
// Clean up text for saving
String sanitizeName(String n) {
n.replace(";", ""); n.replace("\t", "");
n.replace("\n", ""); n.replace("\r", ""); n.trim();
if (n.length() > 24) n = n.substring(0, 24);
return n;
}
// ---------------------------------------------------------------- Web UI
const char PAGE[] PROGMEM = R"rawhtml(
<!DOCTYPE html>
<html>
<head>
<meta charset="utf-8">
<meta name="viewport" content="width=device-width, initial-scale=1, maximum-scale=1">
<title>Greene Robotics — Arm</title>
<style>
:root { --bg:#eef3f9; --card:#ffffff; --blue:#1a6ee0; --blue2:#0d4fb0;
--text:#16273c; --dim:#68798e; --track:#d5e2f2; }
* { box-sizing:border-box; margin:0; padding:0; -webkit-tap-highlight-color:transparent; }
body { background:var(--bg); color:var(--text); font-family:system-ui,Segoe UI,Roboto,sans-serif;
min-height:100vh; padding:20px; }
.wrap { max-width:480px; margin:0 auto; }
header { display:flex; align-items:center; justify-content:space-between;
flex-wrap:wrap; gap:10px; margin-bottom:16px; }
.logo { font-weight:800; font-size:18px; letter-spacing:-.01em; }
.logo b { color:var(--blue); }
.hactions { display:flex; gap:8px; }
.tutbtn { padding:8px 13px; border-radius:999px; border:1.5px solid var(--track); background:#fff;
color:var(--blue); font-weight:700; font-size:13px; cursor:pointer; white-space:nowrap; }
.tutbtn:active { background:#eaf1ff; }
.card { background:var(--card); border-radius:12px; padding:14px 16px 18px; margin-bottom:12px;
box-shadow:0 1px 4px rgba(22,39,60,.08); transition:opacity .2s; }
.card.locked { opacity:.45; }
.row { display:flex; justify-content:space-between; align-items:baseline; margin-bottom:10px; }
.name { font-size:.95rem; font-weight:600; }
.val { font-size:.9rem; color:var(--blue); font-weight:700; font-variant-numeric:tabular-nums; }
.pins { color:var(--dim); font-size:.7rem; margin-left:8px; font-weight:400; }
input[type=range] { width:100%; height:40px; appearance:none; -webkit-appearance:none; background:transparent; }
input[type=range]::-webkit-slider-runnable-track { height:8px; border-radius:4px; background:var(--track); }
input[type=range]::-webkit-slider-thumb { -webkit-appearance:none; width:32px; height:32px; margin-top:-12px;
border-radius:6px; background:var(--blue); border:3px solid #fff;
box-shadow:0 1px 4px rgba(22,39,60,.35); }
input[type=range]:disabled::-webkit-slider-thumb { background:#a8b9cd; }
input[type=range]::-moz-range-track { height:8px; border-radius:4px; background:var(--track); }
input[type=range]::-moz-range-thumb { width:28px; height:28px; border-radius:6px;
background:var(--blue); border:3px solid #fff; box-shadow:0 1px 4px rgba(22,39,60,.35); }
.btnrow { display:flex; gap:10px; margin-bottom:16px; }
.btn { flex:1; background:var(--blue); color:#fff; border:0; border-radius:10px;
padding:13px; font-size:.95rem; font-weight:700; letter-spacing:.5px;
cursor:pointer; }
.btn.idle { background:var(--card); color:var(--blue); border:2px solid var(--blue); }
.btn.ghost { background:var(--card); color:var(--blue); border:1.5px solid var(--track); }
.btn:disabled { background:#c9d6e6; color:#8296ac; border:0; cursor:default; }
nav { display:flex; gap:8px; margin-bottom:12px; }
.tab { flex:1; padding:11px 6px; border-radius:10px; border:1px solid var(--track);
background:var(--card); color:var(--dim); font-size:12px; font-weight:700;
letter-spacing:.05em; text-transform:uppercase; cursor:pointer; transition:.2s; }
.tab.on { background:var(--blue); color:#fff; border-color:var(--blue); }
.cap { text-align:center; font-size:13px; line-height:1.45; color:var(--dim);
margin:0 10px 16px; animation:fade .25s; }
.page { display:none; } .page.on { display:block; animation:fade .25s; }
@keyframes fade { from { opacity:0; transform:translateY(6px); } to { opacity:1; } }
h3 { font-size:11px; letter-spacing:.16em; text-transform:uppercase; color:var(--dim); margin-bottom:12px; }
.addbtns { display:flex; flex-wrap:wrap; gap:8px; }
.addbtns button { flex:1 1 30%; padding:12px 6px; border-radius:10px; border:1.5px solid var(--track);
background:#fff; color:var(--blue); font-weight:700; font-size:13px; cursor:pointer; }
.addbtns button:active { background:#eaf1ff; }
.steps { display:flex; flex-direction:column; gap:10px; }
.empty { color:var(--dim); font-size:13px; text-align:center; padding:10px 0; }
.step { border:1px solid var(--track); border-radius:12px; padding:12px 14px; background:#fbfcff; transition:.15s; }
.step.play { border-color:var(--blue); background:#eaf1ff; box-shadow:0 0 0 2px rgba(26,110,224,.15); }
.shead { display:flex; align-items:center; justify-content:space-between; }
.sname { font-weight:700; font-size:14px; }
.sname b { color:var(--blue); font-variant-numeric:tabular-nums; }
.sctl { display:flex; gap:6px; }
.sbtn { width:30px; height:30px; border-radius:8px; border:1px solid var(--track); background:#fff;
color:var(--dim); font-size:13px; line-height:1; cursor:pointer; padding:0; }
.sbtn:active { background:#eaf1ff; }
.sbtn.rm { color:#e5484d; }
.srow { margin-top:10px; }
.slbl { font-size:12px; color:var(--dim); margin-bottom:2px; }
.numin { width:100%; padding:10px; border-radius:10px; border:1.5px solid var(--track);
font-size:15px; color:var(--text); outline:none; }
.numin:focus { border-color:var(--blue); }
.loop { display:flex; align-items:center; gap:10px; font-size:14px; margin:0 2px 12px; cursor:pointer; }
.loop input { width:20px; height:20px; accent-color:var(--blue); }
.chips { display:flex; flex-wrap:wrap; gap:10px; }
.chip { display:flex; align-items:center; gap:14px; padding:13px 15px; border-radius:12px;
border:1px solid var(--track); background:#fff; font-size:15px; cursor:pointer; }
.chip:active { background:#eaf1ff; }
.chip b { font-weight:600; }
.chip .x { color:var(--dim); font-weight:700; cursor:pointer; padding:4px 8px;
margin:-4px -6px -4px 0; font-size:16px; border-radius:8px; }
.chip .x:active { color:#e5484d; }
.ovl { position:fixed; inset:0; display:none; align-items:center; justify-content:center;
background:rgba(20,32,54,.45); z-index:9; padding:24px; }
.ovl.on { display:flex; }
.box { width:100%; max-width:340px; background:#fff; border-radius:16px; padding:22px;
box-shadow:0 20px 50px rgba(20,40,80,.3); }
.box h3 { margin-bottom:12px; }
.box input { width:100%; padding:12px; border-radius:10px; border:1.5px solid var(--track);
font-size:15px; color:var(--text); outline:none; margin-bottom:14px; }
.box input:focus { border-color:var(--blue); }
.btns { display:flex; gap:8px; }
.btns button { flex:1; padding:12px; border-radius:10px; border:1.5px solid var(--track);
background:#fff; color:var(--dim); font-weight:700; cursor:pointer; }
.btns .ok { border-color:var(--blue); color:#fff; background:var(--blue); }
.btns .danger { border-color:#e5484d; color:#fff; background:#e5484d; }
.cmsg { color:var(--dim); font-size:14px; margin-bottom:16px; line-height:1.4; }
.btn.wide { width:100%; margin-bottom:0; }
#tutorial { position:fixed; inset:0; z-index:20; background:var(--bg); overflow-y:auto; display:none; }
#tutorial.on { display:block; }
.twrap { max-width:430px; margin:0 auto; padding:26px 22px 40px; }
.twrap h2 { text-align:center; font-size:22px; font-weight:800; margin-bottom:6px; }
.tsub { text-align:center; font-size:13px; color:var(--dim); line-height:1.45; margin-bottom:18px; }
.tsec { background:var(--card); border-radius:16px; margin-bottom:10px;
box-shadow:0 1px 4px rgba(22,39,60,.08); overflow:hidden; }
.tsec summary { list-style:none; cursor:pointer; display:flex; align-items:center;
justify-content:space-between; gap:12px; padding:16px 18px;
color:var(--blue); font-size:12px; font-weight:700;
letter-spacing:.14em; text-transform:uppercase; }
.tsec summary::-webkit-details-marker { display:none; }
.tsec summary:active { background:#f4f8ff; }
.tsec summary::after { content:"+"; font-size:20px; line-height:1; font-weight:600;
color:var(--dim); }
.tsec[open] summary::after { content:"\2212"; }
.tsec .tbody { padding:0 18px 18px; animation:fade .2s; }
.tsec dl { display:grid; grid-template-columns:auto 1fr; gap:8px 12px; font-size:14px; line-height:1.45; }
.tsec dt { font-weight:700; }
.tsec dd { color:var(--dim); }
.tsec ol { margin:0 0 0 18px; font-size:14px; line-height:1.5; color:var(--dim); }
.tsec ol li { margin-bottom:8px; }
.tsec ol li b { color:var(--text); }
.tnote { font-size:14px; line-height:1.5; color:var(--dim); margin-bottom:12px; }
</style>
</head>
<body>
<div class="wrap">
<header>
<div class="logo">Robot Arm <b>Control Panel</b></div>
<div class="hactions">
<button class="tutbtn" id="alignBtn">Re-align</button>
<button class="tutbtn" id="tutBtn">Tutorial</button>
</div>
</header>
<nav>
<button class="tab on" id="tCtl">Control</button>
<button class="tab" id="tSeq">Sequence</button>
</nav>
<div class="cap" id="cap">Drive each joint by hand, then save and recall any position.</div>
<section class="page on" id="pgCtl">
<div class="btnrow">
<button class="btn" id="centerBtn">CENTER ROBOT</button>
<button class="btn idle" id="idleBtn">IDLE</button>
</div>
<div id="sliders"></div>
<button class="btn wide" id="savePosBtn" style="margin-bottom:12px">Save Position</button>
<div class="card"><h3>Saved Positions</h3><div class="chips" id="poseList"></div></div>
</section>
<section class="page" id="pgSeq">
<div class="card"><h3>Add Step</h3>
<div class="addbtns">
<button data-add="0">+ Base</button>
<button data-add="1">+ Shoulder</button>
<button data-add="2">+ Elbow</button>
<button data-add="3">+ Wrist</button>
<button data-add="4">+ Gripper</button>
<button data-add="center">+ Center</button>
<button data-add="idle">+ Idle</button>
<button data-add="delay">+ Delay</button>
</div>
</div>
<div class="card"><h3>Steps</h3><div id="steps" class="steps"></div></div>
<label class="loop"><input type="checkbox" id="loopChk"> Loop the sequence</label>
<div class="btnrow">
<button class="btn" id="playBtn">Play</button>
<button class="btn ghost" id="stopBtn">Stop</button>
</div>
<div class="btnrow">
<button class="btn ghost" id="clearBtn">Clear All</button>
<button class="btn ghost" id="saveSeqBtn">Save Sequence</button>
</div>
<div class="card"><h3>Saved Sequences</h3><div class="chips" id="seqList"></div></div>
</section>
</div>
<!-- First time build confirmation -->
<div id="buildovl" class="ovl"><div class="box">
<div id="buildAsk">
<h3>Have you finished building your robot?</h3>
<p class="cmsg">While you're still assembling the kit, the arm stands at its center pose with every motor locked so nothing moves as you work.</p>
<div class="btns">
<button id="buildNo">Nope, still working</button>
<button class="ok" id="buildYes">Yep, it's done!</button>
</div>
</div>
<div id="buildInfo" style="display:none">
<h3>Keep building</h3>
<p class="cmsg">No problem — finish assembling your robot, then come back here and confirm. The arm will keep holding its center pose with every motor locked while you work.</p>
<button class="btn wide" id="buildBack">Ok, Got it!</button>
</div>
</div></div>
<!-- Re-align confirmation -->
<div id="alignovl" class="ovl"><div class="box">
<h3>Aligning to center</h3>
<p class="cmsg">Every motor is driving to its center pose and locking there. Gently correct the joints by hand if they got loose, and screw it back in to its default center position. If it is in its center position, click the button below — then it will return to idle.</p>
<button class="btn wide" id="alignDone">Yep — it's in its center position</button>
</div></div>
<!-- Save sequence dialog -->
<div id="sovl" class="ovl"><div class="box"><h3>Name this sequence</h3>
<input id="sName" maxlength="24" placeholder="e.g. Pick and Place">
<div class="btns"><button id="sCancel">Cancel</button><button class="ok" id="sOk">Save</button></div></div></div>
<!-- Delete sequence confirmation -->
<div id="scfm" class="ovl"><div class="box"><h3>Delete sequence?</h3><p class="cmsg" id="scfmMsg"></p>
<div class="btns"><button id="scfmNo">Cancel</button><button class="danger" id="scfmYes">Delete</button></div></div></div>
<!-- Save position dialog -->
<div id="povl" class="ovl"><div class="box"><h3>Name this position</h3>
<input id="pName" maxlength="24" placeholder="e.g. Pick Up">
<div class="btns"><button id="pCancel">Cancel</button><button class="ok" id="pOk">Save</button></div></div></div>
<!-- Delete position confirmation -->
<div id="pcfm" class="ovl"><div class="box"><h3>Delete position?</h3><p class="cmsg" id="pcfmMsg"></p>
<div class="btns"><button id="pcfmNo">Cancel</button><button class="danger" id="pcfmYes">Delete</button></div></div></div>
<!-- Tutorial -->
<div id="tutorial"><div class="twrap">
<h2>How it works</h2>
<p class="tsub">Tap a section to open it.</p>
<details class="tsec" open>
<summary>The Basics</summary>
<div class="tbody">
<dl>
<dt>One at a time</dt><dd>Only one motor ever moves at once. While a joint is moving the other sliders grey out and lock, then unlock the moment it arrives.</dd>
<dt>Smooth motion</dt><dd>Every move eases up to speed and settles gently at the end, instead of snapping. Each joint has its own speed — the shoulder is slowest because it carries the whole arm.</dd>
<dt>At power-on</dt><dd>The robot remembers where it was left, wakes each motor in turn, then eases back to the idle pose — before the Wi‑Fi even comes up. Then all motors switch off.</dd>
<dt>Switching pages</dt><dd>Moving between Control and Sequence sends the arm to idle first, so each page always starts from the same known pose.</dd>
<dt>Motors off</dt><dd>A joint powers down whenever nothing needs it to hold — after Idle, and the shoulder after Center. A powered servo constantly corrects itself, which is what causes humming and shaking.</dd>
</dl>
</div>
</details>
<details class="tsec">
<summary>Re-aligning Your Robot</summary>
<div class="tbody">
<p class="tnote">If a joint starts pointing the wrong way, a screw attaching the motor to the physical robot has come loose. This is completely normal and easy to fix — nothing is broken.</p>
<ol>
<li>Tap <b>Re-align</b> at the top of the screen. Every motor drives to its center pose and locks there, holding firm.</li>
<li>Gently correct the joints by hand if they got loose, and screw it back in to its default center position — every joint pointing straight up toward the sky, with the gripper closed.</li>
<li>If it is in its center position, press <b>Yep — it's in its center position</b> — then it will return to idle.</li>
</ol>
</div>
</details>
<details class="tsec">
<summary>Control Page</summary>
<div class="tbody">
<dl>
<dt>Sliders</dt><dd>Each slider drives one joint and the arm follows your finger as you drag. Their travel is limited to the angles that are safe for that joint.</dd>
<dt>Center Robot</dt><dd>Sends every joint to its home pose, one motor at a time. The shoulder then switches off — standing straight up it's balanced enough to stay put on its own, and leaving it powered just makes it shake.</dd>
<dt>Idle</dt><dd>Folds the arm down into its resting pose and switches every motor off. Move any slider to wake it up.</dd>
<dt>Save Position</dt><dd>Names and stores wherever the arm is right now, on the robot itself.</dd>
<dt>Saved positions</dt><dd>Tap one to send the arm there. Joints move in a safe order — elbow, then shoulder, then base, wrist and gripper. Tap the × to delete one.</dd>
</dl>
</div>
</details>
<details class="tsec">
<summary>Sequence Page</summary>
<div class="tbody">
<dl>
<dt>Add step</dt><dd>Build a routine from single joint moves, Center, Idle, and Delay steps. New joint steps start at that joint's current angle.</dd>
<dt>Steps</dt><dd>Each joint step has its own slider for its target angle, and each Delay step has a box for its length in milliseconds.</dd>
<dt>Reorder</dt><dd>Use ▲▼ to move a step up or down, and × to remove it.</dd>
<dt>Play / Stop</dt><dd>Runs the steps top to bottom on the robot, highlighting the one in progress. Every step waits for the arm to actually finish before the next begins. Tick Loop to keep repeating.</dd>
<dt>Save Sequence</dt><dd>Names and stores a routine on the robot. Tap a saved one to load it into the builder; × deletes it.</dd>
<dt>Clear All</dt><dd>Empties the builder above. It never touches your saved sequences.</dd>
</dl>
</div>
</details>
<details class="tsec">
<summary>Good to Know</summary>
<div class="tbody">
<dl>
<dt>First time</dt><dd>Until you confirm the build is finished, the arm powers up standing at center with every motor locked, so you can assemble it safely. Press “Yep, it's done!” when finished and from then on it starts up in the folded idle pose instead.</dd>
<dt>Before unplugging</dt><dd>Press Idle first. The arm settles onto itself and powers down, so gravity has nothing to pull on and it starts up exactly where it left off.</dd>
<dt>Where things live</dt><dd>Saved positions and saved sequences are both stored on the robot, so they're there from any phone or browser, and they survive being switched off.</dd>
<dt>Another browser</dt><dd>Reopen the controls in any browser at <b>192.168.4.1</b>, as long as that device is joined to the <b>RobotArm</b> network.</dd>
<dt>Internet</dt><dd>Disconnect from the RobotArm network to get your normal internet access back.</dd>
</dl>
</div>
</details>
<button class="btn wide" id="tutClose" style="margin-top:4px">Got it</button>
</div></div>
<script>
const SERVOS = [
{n:0, name:"Base", pin:"D1"},
{n:1, name:"Shoulder", pin:"D2"},
{n:2, name:"Elbow", pin:"D5"},
{n:3, name:"Wrist", pin:"D6"},
{n:4, name:"Gripper", pin:"D7"}
];
const CAPTIONS = {
ctl: "Drive each joint by hand, then save and recall any position.",
seq: "Automate your robot to repeat a task on its own."
};
let limits = [];
let dragging = -1;
let active = -1;
let commissioned = true;
const box = document.getElementById('sliders');
SERVOS.forEach(s => {
const card = document.createElement('div');
card.className = 'card'; card.id = 'card'+s.n;
card.innerHTML =
'<div class="row"><span class="name">'+s.name+
'<span class="pins">S'+(s.n+1)+' · '+s.pin+'</span></span>'+
'<span class="val" id="val'+s.n+'">--°</span></div>'+
'<input type="range" id="sl'+s.n+'" min="0" max="180" value="90" step="1">';
box.appendChild(card);
const sl = card.querySelector('input');
let lastSend = 0, sendTimer = null;
sl.addEventListener('input', () => {
dragging = s.n;
setVal(s.n, sl.value);
const now = Date.now();
if (now - lastSend >= 100) {
lastSend = now;
send(s.n, sl.value);
} else {
clearTimeout(sendTimer);
sendTimer = setTimeout(() => { lastSend = Date.now(); send(s.n, sl.value); }, 110);
}
});
sl.addEventListener('change', () => {
dragging = -1;
clearTimeout(sendTimer);
send(s.n, sl.value);
});
});
function setVal(n, v){ document.getElementById('val'+n).innerHTML = v + '°'; }
function send(n, angle){
fetch('/set?servo='+n+'&angle='+angle)
.then(r => r.text())
.then(t => { if (t === 'BUSY') poll(); })
.catch(()=>{});
}
document.getElementById('centerBtn').addEventListener('click', () => {
fetch('/center').then(poll).catch(()=>{});
});
document.getElementById('idleBtn').addEventListener('click', () => {
fetch('/idle').then(poll).catch(()=>{});
});
const $ = id => document.getElementById(id);
$('tutBtn').onclick = () => $('tutorial').classList.add('on');
$('tutClose').onclick = () => $('tutorial').classList.remove('on');
function checkSetup(){
fetch('/setup').then(r => r.json()).then(j => {
commissioned = !!j.done;
if (!commissioned) $('buildovl').classList.add('on');
}).catch(()=>{});
}
function commission(){
fetch('/commission').catch(()=>{}).finally(()=>{
commissioned = true;
$('buildovl').classList.remove('on');
$('buildAsk').style.display = 'block';
$('buildInfo').style.display = 'none';
poll();
});
}
$('buildNo').onclick = () => { $('buildAsk').style.display='none'; $('buildInfo').style.display='block'; };
$('buildBack').onclick = () => { $('buildInfo').style.display='none'; $('buildAsk').style.display='block'; };
$('buildYes').onclick = commission;
$('alignBtn').onclick = () => {
stopPlay();
fetch('/align').then(r => r.text()).then(t => {
if (t === 'ok') { $('alignovl').classList.add('on'); poll(); }
}).catch(()=>{});
};
$('alignDone').onclick = () => {
fetch('/idle').catch(()=>{}).finally(() => {
$('alignovl').classList.remove('on');
poll();
});
};
function show(t){
$('pgCtl').className = 'page' + (t==='ctl' ? ' on' : '');
$('pgSeq').className = 'page' + (t==='seq' ? ' on' : '');
$('tCtl').className = 'tab' + (t==='ctl' ? ' on' : '');
$('tSeq').className = 'tab' + (t==='seq' ? ' on' : '');
const cap = $('cap');
cap.textContent = CAPTIONS[t];
cap.style.animation = 'none'; void cap.offsetWidth;
cap.style.animation = '';
stopPlay();
if (commissioned) fetch('/idle').then(poll).catch(()=>{});
else poll();
}
$('tCtl').onclick = () => show('ctl');
$('tSeq').onclick = () => show('seq');
let seq = [], playing = false, playTimer = null, loop = false;
try { seq = JSON.parse(localStorage.getItem('armSeq')||'[]')||[]; } catch(e){ seq = []; }
function saveDraft(){ try{ localStorage.setItem('armSeq', JSON.stringify(seq)); }catch(e){} }
function stepTitle(s){
if (s.type === 'servo') return 'Move ' + SERVOS[s.n].name;
if (s.type === 'center') return 'Center Robot';
if (s.type === 'idle') return 'Idle Pose';
return 'Delay';
}
function addStep(t){
if (t === 'center') seq.push({type:'center'});
else if (t === 'idle') seq.push({type:'idle'});
else if (t === 'delay') seq.push({type:'delay', ms:1000});
else {
const n = +t;
seq.push({type:'servo', n:n, val: +$('sl'+n).value});
}
saveDraft(); renderSeq();
}
function moveStep(i,dir){
const j = i + dir;
if (j < 0 || j >= seq.length) return;
const t = seq[i]; seq[i] = seq[j]; seq[j] = t;
saveDraft(); renderSeq();
}
function mkBtn(txt, cls, fn){
const b = document.createElement('button');
b.type = 'button'; b.className = cls; b.textContent = txt;
b.addEventListener('click', fn); return b;
}
function renderSeq(){
const box = $('steps'); box.innerHTML = '';
if (!seq.length){
const e = document.createElement('div'); e.className = 'empty';
e.textContent = 'No steps yet — add some above.'; box.appendChild(e); return;
}
seq.forEach((s, i) => {
const d = document.createElement('div'); d.className = 'step'; d.id = 'step'+i;
const head = document.createElement('div'); head.className = 'shead';
const nm = document.createElement('div'); nm.className = 'sname';
nm.innerHTML = (i+1) + '. ' + stepTitle(s) +
(s.type === 'servo' ? ' <b id="sv'+i+'">' + s.val + '°</b>' : '');
const ctl = document.createElement('div'); ctl.className = 'sctl';
ctl.appendChild(mkBtn('▲','sbtn',()=>moveStep(i,-1)));
ctl.appendChild(mkBtn('▼','sbtn',()=>moveStep(i,1)));
ctl.appendChild(mkBtn('✕','sbtn rm',()=>{ seq.splice(i,1); saveDraft(); renderSeq(); }));
head.appendChild(nm); head.appendChild(ctl); d.appendChild(head);
if (s.type === 'servo'){
const w = document.createElement('div'); w.className = 'srow';
const r = document.createElement('input'); r.type = 'range';
const lim = limits[s.n] || [0,180];
r.min = lim[0]; r.max = lim[1]; r.value = s.val;
r.addEventListener('input', e => {
s.val = +e.target.value; saveDraft();
$('sv'+i).innerHTML = s.val + '°';
});
w.appendChild(r); d.appendChild(w);
} else if (s.type === 'delay'){
const w = document.createElement('div'); w.className = 'srow';
const l = document.createElement('div'); l.className = 'slbl'; l.textContent = 'Milliseconds';
const inp = document.createElement('input');
inp.type = 'number'; inp.min = '0'; inp.step = '100'; inp.value = s.ms; inp.className = 'numin';
inp.addEventListener('input', e => { s.ms = Math.max(0, +e.target.value || 0); saveDraft(); });
w.appendChild(l); w.appendChild(inp); d.appendChild(w);
}
box.appendChild(d);
});
}
function markPlaying(i){
const p = document.querySelector('.step.play'); if (p) p.classList.remove('play');
const s = $('step'+i); if (s) s.classList.add('play');
}
function stopPlay(){
playing = false;
if (playTimer){ clearTimeout(playTimer); playTimer = null; }
const p = document.querySelector('.step.play'); if (p) p.classList.remove('play');
$('playBtn').textContent = 'Play';
}
function waitIdle(cb){
if (!playing) return;
fetch('/status').then(r=>r.json()).then(st => {
if (st.active < 0 && st.seq === 0) cb();
else playTimer = setTimeout(()=>waitIdle(cb), 250);
}).catch(()=>{ playTimer = setTimeout(()=>waitIdle(cb), 400); });
}
function runStep(i){
if (!playing) return;
if (i >= seq.length){
if (loop && seq.length){ runStep(0); return; }
stopPlay(); return;
}
markPlaying(i);
const s = seq[i];
if (s.type === 'delay'){ playTimer = setTimeout(()=>runStep(i+1), s.ms); return; }
const url = s.type === 'servo' ? '/set?servo='+s.n+'&angle='+s.val : '/'+s.type;
fetch(url).catch(()=>{})
.finally(()=>{ playTimer = setTimeout(()=>waitIdle(()=>runStep(i+1)), 200); });
}
document.querySelectorAll('[data-add]').forEach(b => {
b.addEventListener('click', ()=>addStep(b.getAttribute('data-add')));
});
$('playBtn').onclick = () => {
if (playing || !seq.length) return;
playing = true; $('playBtn').textContent = 'Playing…'; runStep(0);
};
$('stopBtn').onclick = stopPlay;
$('clearBtn').onclick = () => { if (!seq.length) return; stopPlay(); seq = []; saveDraft(); renderSeq(); };
$('loopChk').addEventListener('change', e => { loop = e.target.checked; });
let savedSeqs = [];
function loadSeqs(){
fetch('/seqs').then(r => r.text()).then(t => {
savedSeqs = [];
t.split('\n').forEach(l => {
const i = l.indexOf('\t'); if (i < 0) return;
try {
const steps = JSON.parse(l.slice(i+1));
if (Array.isArray(steps)) savedSeqs.push({name:l.slice(0,i), steps:steps});
} catch(e){}
});
renderSavedSeqs();
}).catch(()=>{ renderSavedSeqs(); });
}
function renderSavedSeqs(){
const box = $('seqList'); box.innerHTML = '';
if (!savedSeqs.length){
const e = document.createElement('div'); e.className = 'empty';
e.textContent = 'No saved sequences yet.'; box.appendChild(e); return;
}
savedSeqs.forEach(sq => {
const c = document.createElement('div'); c.className = 'chip';
const n = document.createElement('b'); n.textContent = sq.name + ' (' + sq.steps.length + ')';
const x = document.createElement('span'); x.className = 'x'; x.textContent = '✕';
c.appendChild(n); c.appendChild(x);
c.onclick = () => { stopPlay(); seq = JSON.parse(JSON.stringify(sq.steps)); saveDraft(); renderSeq(); };
x.onclick = e => { e.stopPropagation(); askDeleteSeq(sq.name); };
box.appendChild(c);
});
}
$('saveSeqBtn').onclick = () => {
if (!seq.length) return;
$('sName').value = ''; $('sovl').classList.add('on'); $('sName').focus();
};
$('sCancel').onclick = () => $('sovl').classList.remove('on');
$('sName').addEventListener('keydown', e => { if (e.key === 'Enter') $('sOk').click(); });
$('sOk').onclick = () => {
const n = $('sName').value.trim(); if (!n) return;
fetch('/seq/save?name=' + encodeURIComponent(n), {method:'POST', body: JSON.stringify(seq)})
.catch(()=>{})
.finally(()=>{ $('sovl').classList.remove('on'); loadSeqs(); });
};
let delSeqName = null;
function askDeleteSeq(name){
delSeqName = name;
$('scfmMsg').textContent = 'Delete "' + name + '"? This can\'t be undone.';
$('scfm').classList.add('on');
}
$('scfmNo').onclick = () => { $('scfm').classList.remove('on'); delSeqName = null; };
$('scfmYes').onclick = () => {
if (delSeqName != null){
fetch('/seq/del?name=' + encodeURIComponent(delSeqName)).catch(()=>{})
.finally(loadSeqs);
}
$('scfm').classList.remove('on'); delSeqName = null;
};
function loadPoses(){
fetch('/poses').then(r => r.text()).then(t => {
const box = $('poseList'); box.innerHTML = '';
t = t.trim();
if (!t){
const e = document.createElement('div'); e.className = 'empty';
e.textContent = 'No saved positions yet.'; box.appendChild(e); return;
}
t.split('\n').forEach(l => {
const p = l.split(';'); if (p.length < 6) return;
const c = document.createElement('div'); c.className = 'chip';
const n = document.createElement('b'); n.textContent = p[0];
const x = document.createElement('span'); x.className = 'x'; x.textContent = '✕';
c.appendChild(n); c.appendChild(x);
c.onclick = () => {
fetch('/goto?a0='+p[1]+'&a1='+p[2]+'&a2='+p[3]+'&a3='+p[4]+'&a4='+p[5])
.then(poll).catch(()=>{});
};
x.onclick = e => { e.stopPropagation(); askDeletePose(p[0]); };
box.appendChild(c);
});
}).catch(()=>{});
}
$('savePosBtn').onclick = () => { $('pName').value = ''; $('povl').classList.add('on'); $('pName').focus(); };
$('pCancel').onclick = () => $('povl').classList.remove('on');
$('pName').addEventListener('keydown', e => { if (e.key === 'Enter') $('pOk').click(); });
$('pOk').onclick = () => {
const n = $('pName').value.trim(); if (!n) return;
let u = '/pose/save?name=' + encodeURIComponent(n);
for (let i = 0; i < 5; i++) u += '&a' + i + '=' + $('sl'+i).value;
fetch(u).catch(()=>{}).finally(()=>{ $('povl').classList.remove('on'); loadPoses(); });
};
let delPoseName = null;
function askDeletePose(name){
delPoseName = name;
$('pcfmMsg').textContent = 'Delete "' + name + '"? This can\'t be undone.';
$('pcfm').classList.add('on');
}
$('pcfmNo').onclick = () => { $('pcfm').classList.remove('on'); delPoseName = null; };
$('pcfmYes').onclick = () => {
if (delPoseName != null){
fetch('/pose/del?name=' + encodeURIComponent(delPoseName)).catch(()=>{})
.finally(loadPoses);
}
$('pcfm').classList.remove('on'); delPoseName = null;
};
function poll(){
fetch('/status').then(r => r.json()).then(st => {
active = st.active;
limits = st.limits;
if (!poll.limsReady && limits.length){ poll.limsReady = true; renderSeq(); }
const busy = active >= 0 || st.seq > 0;
document.getElementById('centerBtn').disabled = busy;
document.getElementById('idleBtn').disabled = busy;
SERVOS.forEach(s => {
const sl = document.getElementById('sl'+s.n);
const card = document.getElementById('card'+s.n);
if (limits[s.n]) { sl.min = limits[s.n][0]; sl.max = limits[s.n][1]; }
const locked = st.seq > 0 || (busy && s.n !== active);
sl.disabled = locked;
card.className = 'card' + (locked ? ' locked' : '');
if (dragging !== s.n && s.n !== active) {
sl.value = st.pos[s.n];
setVal(s.n, st.pos[s.n]);
} else if (s.n === active && dragging !== s.n) {
setVal(s.n, st.pos[s.n]);
}
});
}).catch(()=>{});
}
poll();
setInterval(poll, 400);
renderSeq();
loadPoses();
loadSeqs();
checkSetup();
</script>
</body>
</html>
)rawhtml";
// ---------------------------------------------------------------- Web routes
// Each function below answers one URL that the control page calls.
// Sends the control page itself
void handleRoot() {
server.send_P(200, "text/html", PAGE);
}
// Moves one joint to an angle (called continuously while a slider is dragged)
void handleSet() {
if (!server.hasArg("servo") || !server.hasArg("angle")) {
server.send(400, "text/plain", "ERR");
return;
}
int n = server.arg("servo").toInt();
if (n < 0 || n > 4) { server.send(400, "text/plain", "ERR"); return; }
int a = server.arg("angle").toInt();
if (qLen > 0 || (active >= 0 && active != n)) {
server.send(200, "text/plain", "BUSY");
return;
}
if (active == n) {
goalA = constrain(a, cfg[n].minA, cfg[n].maxA);
idleOffAt = 0;
shoulderOffAt = 0;
} else {
startMove(n, a);
}
server.send(200, "text/plain", "OK");
}
// Tells the page whether the robot has been marked as fully built yet
void handleSetup() {
server.send(200, "application/json", commissioned ? "{\"done\":1}" : "{\"done\":0}");
}
// Marks the build as finished, switches off the build-only pins, and folds the arm to idle
void handleCommission() {
setCommissioned();
shutOffBuildPins();
if (!robotBusy()) {
for (int k = 0; k < 5; k++) { int i = idleOrder[k]; enqueue(i, idleA[i], true); }
idlePending = true;
centerPending = false;
startNextQueued();
}
server.send(200, "text/plain", "ok");
}
// Sends every joint to its center pose and holds there, for realigning the physical arm
void handleAlign() {
if (robotBusy()) { server.send(200, "text/plain", "BUSY"); return; }
for (int k = 0; k < 5; k++) { int i = gotoOrder[k]; enqueue(i, cfg[i].centerA, false); }
idlePending = false;
centerPending = false;
startNextQueued();
server.send(200, "text/plain", "ok");
}
// Sends every joint to its center (home) pose, then powers off the shoulder after a pause
void handleCenter() {
if (robotBusy()) { server.send(200, "text/plain", "BUSY"); return; }
for (int i = 0; i < 5; i++) enqueue(i, cfg[i].centerA, false);
centerPending = true;
startNextQueued();
server.send(200, "text/plain", "OK");
}
// Folds the arm down into its resting pose and powers off every motor
void handleIdle() {
if (robotBusy()) { server.send(200, "text/plain", "BUSY"); return; }
for (int k = 0; k < 5; k++) {
int i = idleOrder[k];
enqueue(i, idleA[i], true);
}
idlePending = true;
centerPending = false;
startNextQueued();
server.send(200, "text/plain", "OK");
}
// Moves the arm to a specific set of angles (used to recall a saved position)
void handleGoto() {
if (robotBusy()) { server.send(200, "text/plain", "BUSY"); return; }
for (int k = 0; k < 5; k++) {
int i = gotoOrder[k];
String key = "a" + String(i);
if (server.hasArg(key)) enqueue(i, server.arg(key).toInt(), false);
}
startNextQueued();
server.send(200, "text/plain", "OK");
}
// Sends the list of saved positions, stored on the robot itself, to the page
void handlePoses() {
File f = LittleFS.open("/poses.txt", "r");
if (!f) { server.send(200, "text/plain", ""); return; }
server.streamFile(f, "text/plain");
f.close();
}
// Saves the arm's current angles under a name
void handlePoseSave() {
String name = sanitizeName(server.arg("name"));
if (!name.length()) { server.send(400, "text/plain", "bad name"); return; }
String line = name;
for (int i = 0; i < 5; i++) {
int a = constrain(server.arg("a" + String(i)).toInt(), cfg[i].minA, cfg[i].maxA);
line += ";" + String(a);
}
String out = ""; int count = 0;
File f = LittleFS.open("/poses.txt", "r");
if (f) {
while (f.available()) {
String l = f.readStringUntil('\n'); l.trim();
if (!l.length()) continue;
if (l.substring(0, l.indexOf(';')) != name) { out += l + "\n"; count++; }
}
f.close();
}
if (count >= MAX_POSES) { server.send(400, "text/plain", "pose limit reached"); return; }
out += line + "\n";
File w = LittleFS.open("/poses.txt", "w");
if (!w) { server.send(500, "text/plain", "fs error"); return; }
w.print(out); w.close();
server.send(200, "text/plain", "ok");
}
// Deletes a saved position by name
void handlePoseDel() {
String name = sanitizeName(server.arg("name"));
String out = "";
File f = LittleFS.open("/poses.txt", "r");
if (f) {
while (f.available()) {
String l = f.readStringUntil('\n'); l.trim();
if (!l.length()) continue;
if (l.substring(0, l.indexOf(';')) != name) out += l + "\n";
}
f.close();
}
File w = LittleFS.open("/poses.txt", "w");
if (w) { w.print(out); w.close(); }
server.send(200, "text/plain", "ok");
}
// Sends the list of saved sequences, stored on the robot itself, to the page
void handleSeqs() {
File f = LittleFS.open("/seqs.txt", "r");
if (!f) { server.send(200, "text/plain", ""); return; }
server.streamFile(f, "text/plain");
f.close();
}
// Saves a sequence of steps under a name
void handleSeqSave() {
String name = sanitizeName(server.arg("name"));
if (!name.length()) { server.send(400, "text/plain", "bad name"); return; }
String body = server.arg("plain");
body.replace("\n", ""); body.replace("\r", ""); body.replace("\t", "");
body.trim();
if (!body.length()) { server.send(400, "text/plain", "empty"); return; }
String out = ""; int count = 0;
File f = LittleFS.open("/seqs.txt", "r");
if (f) {
while (f.available()) {
String l = f.readStringUntil('\n');
l.replace("\r", "");
if (!l.length()) continue;
if (l.substring(0, l.indexOf('\t')) != name) { out += l + "\n"; count++; }
}
f.close();
}
if (count >= MAX_SEQS) { server.send(400, "text/plain", "sequence limit reached"); return; }
out += name + "\t" + body + "\n";
File w = LittleFS.open("/seqs.txt", "w");
if (!w) { server.send(500, "text/plain", "fs error"); return; }
w.print(out); w.close();
server.send(200, "text/plain", "ok");
}
// Deletes a saved sequence by name
void handleSeqDel() {
String name = sanitizeName(server.arg("name"));
String out = "";
File f = LittleFS.open("/seqs.txt", "r");
if (f) {
while (f.available()) {
String l = f.readStringUntil('\n');
l.replace("\r", "");
if (!l.length()) continue;
if (l.substring(0, l.indexOf('\t')) != name) out += l + "\n";
}
f.close();
}
File w = LittleFS.open("/seqs.txt", "w");
if (w) { w.print(out); w.close(); }
server.send(200, "text/plain", "ok");
}
// Reports what the robot is doing right now, so the page can keep its sliders in sync
void handleStatus() {
String json = "{\"active\":" + String(active) +
",\"seq\":" + String(qLen) + ",\"pos\":[";
for (int i = 0; i < 5; i++) {
json += String(pos[i]);
if (i < 4) json += ",";
}
json += "],\"limits\":[";
for (int i = 0; i < 5; i++) {
json += "[" + String(cfg[i].minA) + "," + String(cfg[i].maxA) + "]";
if (i < 4) json += ",";
}
json += "]}";
server.send(200, "application/json", json);
}
// Sends any request for an unknown page back to the control page.
// Phones and computers probe for these pages when joining a Wi-Fi network with
// no internet; answering them makes the control page pop up automatically.
void handleCaptive() {
server.sendHeader("Location", String("http://") + apIP.toString() + "/", true);
server.send(302, "text/plain", "");
}
// Runs once when the board powers on: loads saved data, moves the arm to its
// starting pose, then starts the Wi-Fi hotspot and web server
void setup() {
Serial.begin(115200);
Serial.println("\nRobot Arm starting...");
LittleFS.begin();
loadState();
loadCommissioned();
if (commissioned) shutOffBuildPins();
else holdBuildServo();
if (commissioned) homeToIdle();
else homeToCenterHold();
WiFi.mode(WIFI_AP);
WiFi.setSleepMode(WIFI_NONE_SLEEP);
WiFi.softAPConfig(apIP, apIP, IPAddress(255, 255, 255, 0));
if (strlen(AP_PASS) >= 8) WiFi.softAP(AP_SSID, AP_PASS);
else WiFi.softAP(AP_SSID);
dnsServer.start(DNS_PORT, "*", apIP);
// Connect each URL the control page uses to the function that handles it
server.on("/", handleRoot);
server.on("/set", handleSet);
server.on("/setup", handleSetup);
server.on("/commission", handleCommission);
server.on("/align", handleAlign);
server.on("/center", handleCenter);
server.on("/idle", handleIdle);
server.on("/goto", handleGoto);
server.on("/poses", handlePoses);
server.on("/pose/save", handlePoseSave);
server.on("/pose/del", handlePoseDel);
server.on("/seqs", handleSeqs);
server.on("/seq/save", HTTP_POST, handleSeqSave);
server.on("/seq/del", handleSeqDel);
server.on("/status", handleStatus);
server.on("/generate_204", handleCaptive);
server.on("/hotspot-detect.html", handleCaptive);
server.on("/connecttest.txt", handleCaptive);
server.on("/ncsi.txt", handleCaptive);
server.on("/fwlink", handleCaptive);
server.onNotFound(handleCaptive);
server.begin();
Serial.print("AP: ");
Serial.println(AP_SSID);
Serial.print("Mode: ");
Serial.println(commissioned ? "Normal (idle on boot)" : "Build (center on boot, locked)");
Serial.print("URL: http://");
Serial.println(apIP);
}
// Runs forever after setup(): handles web requests and advances the arm's motion
void loop() {
dnsServer.processNextRequest();
server.handleClient();
// Advance the currently moving joint a little closer to its target
if (millis() - lastTick >= TICK_MS) {
lastTick = millis();
motionTick();
}
// Power off all motors once idle motion has fully settled
if (idleOffAt && millis() >= idleOffAt) {
for (int i = 0; i < 5; i++) servos[i].detach();
idleOffAt = 0;
saveState();
}
// Power off just the shoulder once it's settled at center
if (shoulderOffAt && millis() >= shoulderOffAt) {
servos[SHOULDER].detach();
shoulderOffAt = 0;
saveState();
}
saveStateIfDue();
}